Get ahead
VMware offers training and certification to turbo-charge your progress.
Learn moreBy Jason Weathersby and Josh Long
Developers use BIRT to build and deploy reports in a Java/Java EE environment. In BIRT 3.7, a new POJO-based runtime environment is available that makes deployment of the BIRT engine much simpler. This article discusses several BIRT integration scenarios that use components from the Spring Framework.
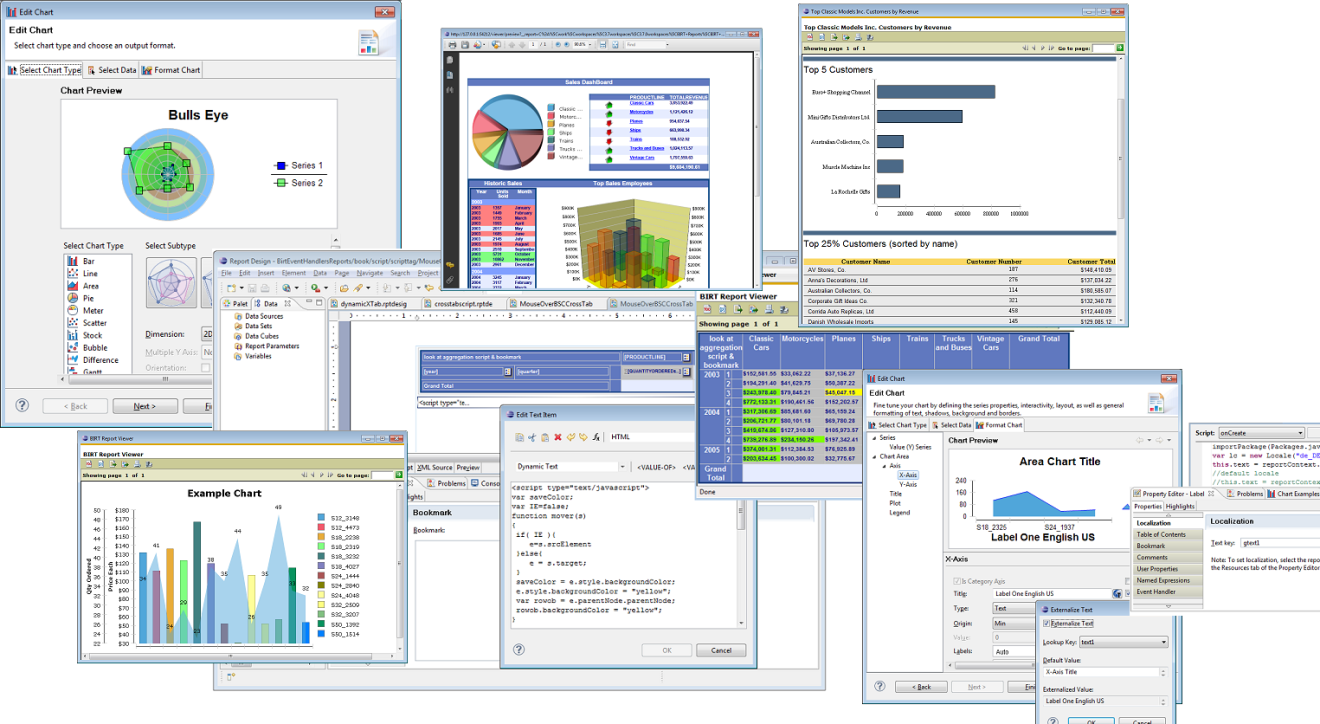 Figure 1 BIRT Collage
The BIRT project includes the following key components:
The Spring framework is a popular collection of architectural and implementation approaches that makes enterprise Java development easier. Core parts of this framework are Dependency Injection and Aspect Oriented Programming. These are exploited in order to reduce coupling between the infrastructure-specific parts of an application and the business functionality that is its prime goal. The Spring framework is developed in an open source way by the SpringSource business unit within VMware (the original SpingSource company was acquired by VMware in 2009). It is in very wide use in the Java developer community and executes on all platforms, including VMwares supported flavor of Tomcat, called tcServer.
While the Spring Framework offers many useful features, most questions regarding integration with BIRT revolve around Spring MVC and Spring bean access within a report. This article covers three scenarios:
This article assumes the reader has programming knowledge of both BIRT and the Spring Framework. To learn more about the Spring framework, check out the Green Beans blog series.
Each scenario has an associated example attached to this article that was built and tested using the following components:
These examples are meant to be illustrative and contain very little error checking.
Throughout this article, the different integration scenarios refer to a generic Spring bean that supplies data to a BIRT report. The Spring Framework contains many sophisticated data access components, but this simple example is a useful learning tool for more complicated scenarios. Within the example code, there are two packages: org.eclipse.birt.spring.example and org.eclipse.birt.spring.core. The example package contains simple code that can be replaced with your own data access objects. The core package contains a Spring View for running and rendering BIRT reports, A parameter converter class that converts report parameters entered in the URL to the appropriate BIRT report parameter type, and a BIRT engine Factory which supplies the Report Engine to other beans. The example classes are shown below and are used throughout this article. The core classes are described in the next section.
We start with a simple POJO that will be used within our BIRT reports. It is named Car and contains simple properties for describing a car.
package org.eclipse.birt.spring.example;

public class Car{
	private String make;
	private String model;
	private String year;
	public String getMake() {
		return make;
	}
	public void setMake(String make) {
		this.make = make;
	}
	public String getModel() {
		return model;
	}
	public void setModel(String model) {
		this.model = model;
	}
	public String getYear() {
		return year;
	}
	public void setYear(String year) {
		this.year = year;
	}
	public Car() {

	}
	public String toString(){
		return "Make:--"+this.make+" Model:--"+this.model+" Year:--"+this.year;
	}
	public String getCarString(){
		return( this.toString() );
	}
}
The example provides a service class to load up several Car POJOs to use for reporting purposes.
package org.eclipse.birt.spring.example;
import java.util.*;

public class CarServiceImpl implements CarService {

	public List getAllCars (){
		Car car1 = new Car();
		car1.setYear("2000");
		car1.setMake("Chevrolet");
		car1.setModel("Corvette");
		Car car2 = new Car();
		car2.setYear("2005");
		car2.setMake("Dodge");
		car2.setModel("Viper");
		Car car3 = new Car();
		car3.setYear("2002");
		car3.setMake("Ford");
		car3.setModel("Mustang GT");
		List cars = Arrays.asList(  car1, car2, car3 ) ;
		return cars ;


	}
}
To make this service available within the Spring Context we use a simple class, configured with Spring Annotations.
package org.eclipse.birt.spring.example;

import org.springframework.context.annotation.Bean;
import org.springframework.context.annotation.Configuration;


@Configuration
public class BirtDataServiceConfiguration {

	@Bean
	public CarService carService(){
		return new CarServiceImpl();

	}
}
There are many ways to integrate the BIRT engines into Spring, and Spring MVC in particular. For this example we have implemented a Spring View that uses parameters to determine the report and output format that a user desires. The BIRT report engine is injected into the View to do the actual running and rendering of the report.
The BIRT engine can be used by multiple threads, but it is generally expensive to startup. Ideally, we only want to start the BIRT engine once for the life of the application. We also want to shutdown the engine properly when the application shuts down. With this in mind, we first create a BirtEngineFactory class that acts as a factory bean which can be used by other beans to return an instance of the BIRT report engine. In Spring the FactoryBean interface is a smart constructor for complex objects. It has one important contract: to return a ready-to-use object from its getObject method.
package org.eclipse.birt.spring.core;
import java.io.File;
import java.io.IOException;
import org.eclipse.birt.core.exception.BirtException;
import org.eclipse.birt.core.framework.Platform;
import org.eclipse.birt.report.engine.api.EngineConfig;
import org.eclipse.birt.report.engine.api.IReportEngine;
import org.eclipse.birt.report.engine.api.IReportEngineFactory;
import org.springframework.beans.factory.DisposableBean;
import org.springframework.beans.factory.FactoryBean;
import org.springframework.context.ApplicationContext;
import org.springframework.context.ApplicationContextAware;
import org.springframework.core.io.Resource;
import org.springframework.util.Assert;
/**
Factory bean for the instance of the {@link IReportEngine report engine}.
*/
public class BirtEngineFactory implements FactoryBean, ApplicationContextAware, DisposableBean {
public boolean isSingleton(){ return true ; }
private ApplicationContext context ;
private IReportEngine birtEngine ;
private Resource logDirectory ;
private File _resolvedDirectory ;
private java.util.logging.Level logLevel ;
public void setApplicationContext(ApplicationContext ctx){
this.context = ctx;
}
public void destroy() throws Exception {
birtEngine.destroy();
Platform.shutdown() ;
}
public void setLogLevel( java.util.logging.Level ll){
this.logLevel = ll ;
}
public void setLogDirectory( org.springframework.core.io.Resource resource ){
File f=null;
try {
f = resource.getFile();
validateLogDirectory(f);
this._resolvedDirectory = f ;
} catch (IOException e) {
throw new RuntimeException( couldnt set the log directory);
}
}
private void validateLogDirectory (File f) {
Assert.notNull ( f , " the directory must not be null");
Assert.isTrue(f.isDirectory() , " the path given must be a directory");
Assert.isTrue(f.exists() , "the path specified must exist!");
}
public void setLogDirectory ( java.io.File f ){
validateLogDirectory(f) ;
this._resolvedDirectory = f;
}
public IReportEngine getObject(){
		EngineConfig config = new EngineConfig();

		//This line injects the Spring Context into the BIRT Context
		config.getAppContext().put("spring", this.context );
config.setLogConfig( null != this._resolvedDirectory ? this._resolvedDirectory.getAbsolutePath() : null , this.logLevel);
try {
Platform.startup( config );
}
catch ( BirtException e ) {
throw new RuntimeException ( "Could not start the Birt engine!", e) ;
}
IReportEngineFactory factory = (IReportEngineFactory) Platform.createFactoryObject( IReportEngineFactory.EXTENSION_REPORT_ENGINE_FACTORY );
IReportEngine be = factory.createReportEngine( config );
this.birtEngine = be ;
return be ;
}
@Override
public Class getObjectType() {
return IReportEngine.class;
}
}
This class also implements the DisposableBean interface so that the engine can be shutdown properly when the application closes. As the Spring ApplicationContext is shutdown, Spring will call the DisposableBean#destroy method on all beans that implement DisposableBean. Our implementation calls the destroy method. Finally, this class implements the ApplicationContextAware interface to receive an instance of the Spring ApplicationContext. We store the ApplicationContext and then pass it to the BIRT Report Engine using the following code:
EngineConfig config = new EngineConfig();
//This line injects the Spring Context into the BIRT Context
config.getAppContext().put("spring", this.context );
This code will allow the Spring Context objects to be accessed from within BIRT Scripting and Expressions.
Next we create a Spring View that runs and renders the report. This View expects the BIRT report engine to be injected. The View searches the request for ReportName and ReportFormat parameters to decide which report to run and what format is required. The request is also searched for report parameter names. If found these report parameters are set to the appropriate values. A portion of this View is presented below. See the example code for more information.
/**
* BirtView is used to run and render BIRT reports.
* This class expects the request to contain a ReportName and ReportFormat
* parameter. In addition Report parameters are automatically searched for in the
* the request object.
*/
public class BirtView extends AbstractView {
public static final String PARAM_ISNULL = "__isnull";
public static final String UTF_8_ENCODE = "UTF-8";
private IReportEngine birtEngine;
private String reportNameRequestParameter = ReportName ;
private String reportFormatRequestParameter = ReportFormat ;
private IRenderOption renderOptions ;
public void setRenderOptions(IRenderOption ro) {
this.renderOptions = ro;
}
public void setReportFormatRequestParameter( String rf ){
Assert.hasText( rf , the report format parameter must not be null) ;
this.reportFormatRequestParameter = rf ;
}
public void setReportNameRequestParameter ( String rn ) {
Assert.hasText( rn , the reportNameRequestParameter must not be null) ;
this.reportNameRequestParameter = rn ;
}
protected void renderMergedOutputModel(
Map map, HttpServletRequest request,
HttpServletResponse response) throws Exception {
String reportName = request.getParameter( this.reportNameRequestParameter );
String format = request.getParameter( this.reportFormatRequestParameter );
ServletContext sc = request.getSession().getServletContext();
if( format == null ){
format="html";
}
IReportRunnable runnable = null;
runnable = birtEngine.openReportDesign( sc.getRealPath("/Reports")+"/"+reportName );
IRunAndRenderTask runAndRenderTask = birtEngine.createRunAndRenderTask(runnable);
runAndRenderTask.setParameterValues(discoverAndSetParameters( runnable, request ));
response.setContentType( birtEngine.getMIMEType( format ));
IRenderOption options = null == this.renderOptions ? new RenderOption() : this.renderOptions;
if( format.equalsIgnoreCase("html")){
HTMLRenderOption htmlOptions = new HTMLRenderOption( options);
htmlOptions.setOutputFormat("html");
htmlOptions.setOutputStream(response.getOutputStream());
htmlOptions.setImageHandler(new HTMLServerImageHandler());
htmlOptions.setBaseImageURL(request.getContextPath()+"/images");
htmlOptions.setImageDirectory(sc.getRealPath("/images"));
runAndRenderTask.setRenderOption(htmlOptions);
}else if( format.equalsIgnoreCase("pdf") ){
PDFRenderOption pdfOptions = new PDFRenderOption( options );
pdfOptions.setOutputFormat("pdf");
pdfOptions.setOption(IPDFRenderOption.PAGE_OVERFLOW, IPDFRenderOption.FIT_TO_PAGE_SIZE);
pdfOptions.setOutputStream(response.getOutputStream());
runAndRenderTask.setRenderOption(pdfOptions);
}else{
String att ="download."+format;
String uReportName = reportName.toUpperCase();
if( uReportName.endsWith(".RPTDESIGN") ){
att = uReportName.replace(".RPTDESIGN", "."+format);
}
response.setHeader( "Content-Disposition", "attachment; filename=\"" + att + "\"" );
options.setOutputStream(response.getOutputStream());
options.setOutputFormat(format);
runAndRenderTask.setRenderOption(options);
}
runAndRenderTask.getAppContext().put( EngineConstants.APPCONTEXT_BIRT_VIEWER_HTTPSERVET_REQUEST, request );
runAndRenderTask.run();
runAndRenderTask.close();
}
public void setBirtEngine(IReportEngine birtEngine) {
this.birtEngine = birtEngine;
}
.
.
To setup Spring MVC (and use this new View within our application) we need to create a Spring @Configuration class with the @EnableWebMVC annotation. To override parts of the Spring MVC machinery, we can simply extend a base class -WebMvcConfigurerAdapter - and hook into the appropriate callback method. This class is a regular Spring @Configuration class, as we saw before when configuring the services. We use the @ComponentScan annotation to tell Spring to register the annotated beans from our two packages to the Spring context. Next we override the addViewControllers method to tell Spring that URLs ending in /reports should be delegated to the new Birt Spring MVC View. The birtView and BIRT engine are created as beans and the birtEngine property of the BirtView bean is set.
package org.eclipse.birt.spring.example;

import org.eclipse.birt.spring.core.BirtEngineFactory;
import org.eclipse.birt.spring.core.BirtView;
import org.springframework.context.annotation.Bean;
import org.springframework.context.annotation.ComponentScan;
import org.springframework.context.annotation.Configuration;
import org.springframework.context.annotation.Import;
import org.springframework.web.servlet.config.annotation.EnableWebMvc;
import org.springframework.web.servlet.config.annotation.ViewControllerRegistry;
import org.springframework.web.servlet.config.annotation.WebMvcConfigurerAdapter;
import org.springframework.web.servlet.view.BeanNameViewResolver;

@EnableWebMvc
@ComponentScan( {"org.eclipse.birt.spring.core", "org.eclipse.birt.spring.example"})
@Configuration
public class BirtWebConfiguration  extends WebMvcConfigurerAdapter  {

	@Override
	public void addViewControllers(ViewControllerRegistry registry) {
		registry.addViewController("/reports").setViewName("birtView");

	}

	@Bean
	public BirtView birtView(){
		BirtView bv = new BirtView();
		bv.setBirtEngine( this.engine().getObject() );
		return bv;
	}


	@Bean public BeanNameViewResolver beanNameResolver(){
		BeanNameViewResolver br = new BeanNameViewResolver() ;
		return br;
	}

	@Bean
	protected BirtEngineFactory engine(){
		BirtEngineFactory factory = new BirtEngineFactory() ;
		//Enable BIRT Engine Logging
		//factory.setLogLevel( Level.FINEST);
		//factory.setLogDirectory( new FileSystemResource("c:/temp"));

		return factory ;
	}


}
As stated earlier when describing the BIRT engine factory class we provide a reference to the Spring ApplicationContext from the BIRT context. The BIRT context object is nothing more than a Map of Objects that the BIRT engine makes available to downstream processes, such as BIRT expressions, BIRT event handlers, etc. BIRT uses the Rhino JavaScript engine to process BIRT expressions and to evaluate JavaScript event handlers. The BIRT context is preloaded into the script environment with the Rhino engine objects. This object allows a report developer to retrieve a Spring bean and use it in an expression or event script using the following syntax:
var mypojo = spring.getBean("carService");
mypojo.getAllCars() ().get(0);
If you do not want to inject the Spring context into the BIRT application context, you can always use JavaScript similar to the following code to access Spring beans in BIRT expressions and JavaScript event handlers:
importPackage(Packages.org.springframework.context);
importPackage(Packages.org.springframework.web.context.support );
//ServletContext
var sc = reportContext.getHttpServletRequest().getSession().getServletContext();
//ApplicationContext
var spring = WebApplicationContextUtils.getWebApplicationContext(sc);
var mypojo = spring.getBean("carService");
this.text = mypojo.getAllCars().get(0).getMake();
To run this web application, add the JAR files from the downloaded BIRT 3.7.1 runtime, birt-runtime-3_7_1\ReportEngine\lib directory, to the WEB-INF/lib of the webapp. You will also need the following JAR files from Spring Framework download in WEB-INF/lib:
The example that accompanies this article has the following web.xml:
<?xml version="1.0" encoding="utf-8"?>
<!DOCTYPE web-app PUBLIC "-//Sun Microsystems, Inc.//DTD Web Application 2.2//EN"
    "http://java.sun.com/j2ee/dtds/web-app_2_2.dtd">
<web-app>

 <servlet>
   <servlet-name>springandbirt</servlet-name>
   <servlet-class>
     org.springframework.web.servlet.DispatcherServlet
   </servlet-class>
   <init-param>
     <param-name>contextClass</param-name>
     <param-value>org.springframework.web.context.support.AnnotationConfigWebApplicationContext</param-value>
   </init-param>
   <init-param>
     <param-name>contextConfigLocation</param-name>
     <param-value>org.eclipse.birt.spring.example.BirtWebConfiguration</param-value>
   </init-param>
   <load-on-startup>1</load-on-startup>
 </servlet>

 <servlet-mapping>
   <servlet-name>springandbirt</servlet-name>
   <url-pattern>/reports</url-pattern>
 </servlet-mapping>

  <welcome-file-list>
    <welcome-file>
      index.jsp
    </welcome-file>
  </welcome-file-list>
</web-app>
All /reports URLs are routed to the Spring DispatcherServlet. The index.jsp has two links to run two report examples. One report uses the BIRT Sample Derby database and the other accesses the Car Service bean, as shown in the following code:
<html>
<head>
</head>
<body>
<h1>BIRT Report</h1>
<p>
<a href="http://localhost:8080/springandbirt/reports?ReportName=TopNPercent.rptdesign">click here to run BIRT Report</a><br>
<a href="http://localhost:8080/springandbirt/reports?ReportName=SampleSpring.rptdesign">click here to run BIRT Report that calls a Spring Bean</a>
</p>
<%= new java.util.Date() %>
</body>
</html>
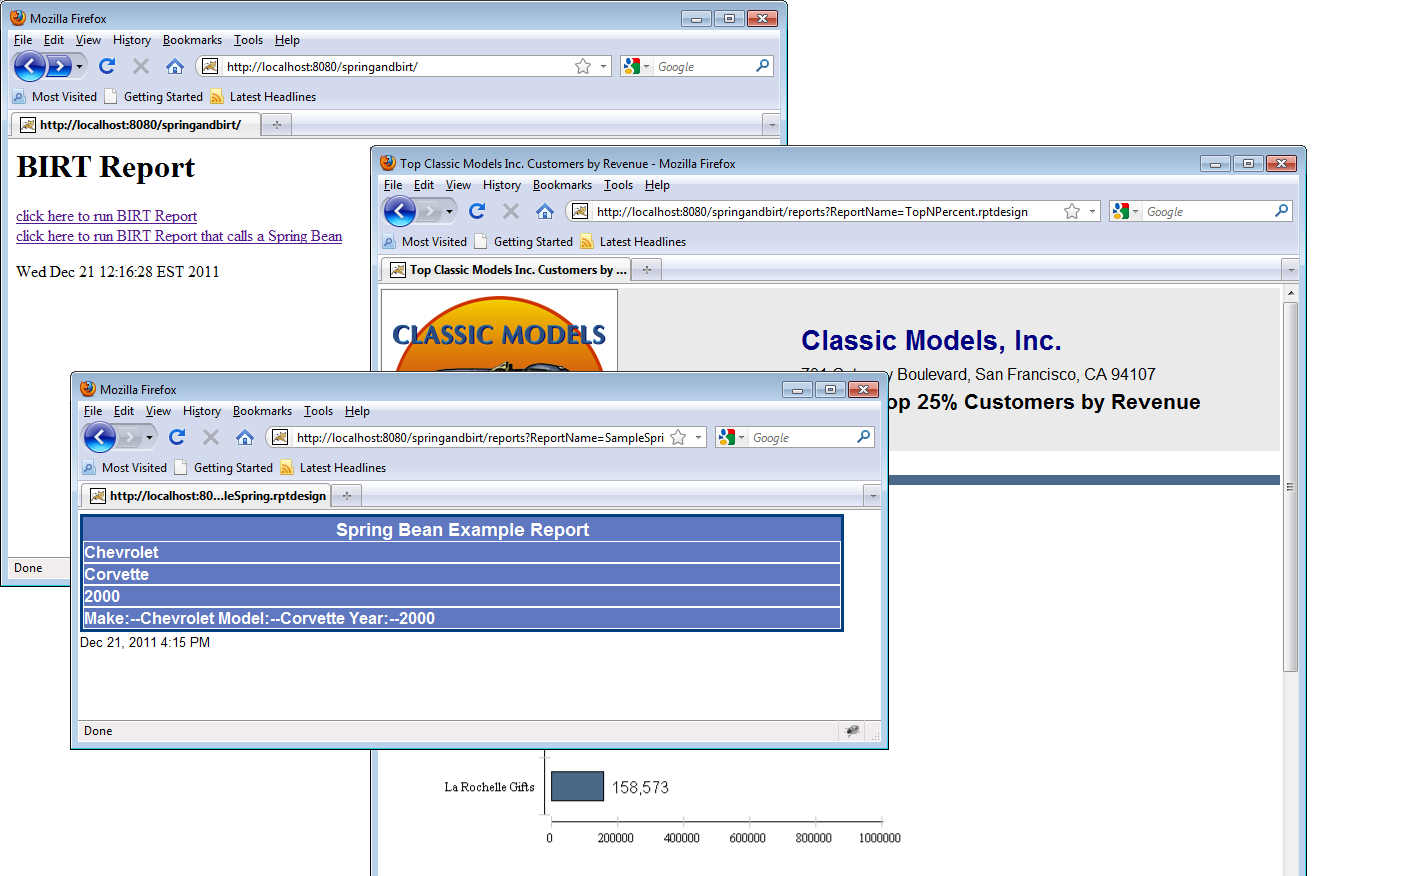 Figure 1 Viewing BIRT Spring MVC example output
In many cases, BIRT users wish to add the Spring IOC Container to the BIRT Viewer. The Viewer is an AJAX-based Java web application and is used to run and render reports. The Viewer supports pagination, table of contents, and exporting to other formats like PDF. When deployed in this fashion, developers need access to the beans located in the Spring container for reporting purposes. This scenario is very simple to implement.
Download and extract the BIRT Runtime from the BIRT website. The BIRT Viewer is located in the WebViewerExample directory of the runtime download. To deploy the Viewer to Tomcat, a user can just copy the WebViewerExample directory to the tomcatinstall/webapps directory. Most users rename this folder to something more pertinent like BirtViewer. The BIRT website supplies more details on deploying the viewer to other application servers. Once the viewer is installed, a Spring ContextLoaderListener can be added to the web.xml of the Viewer. To do this, add the following listener entry below the context parameters to the web.xml:
<listener>
	<listener-class>org.springframework.web.context.ContextLoaderListener</listener-class>
</listener>
You can also specify a context parameter to point to the Spring Context class, as shown in the following code:
   <context-param>
     <param-name>contextClass</param-name>
     <param-value>org.springframework.web.context.support.AnnotationConfigWebApplicationContext</param-value>
   </context-param>
   <context-param>
     <param-name>contextConfigLocation</param-name>
     <param-value>org.eclipse.birt.spring.webviewer.example.BirtDataServiceConfiguration</param-value>
   </context-param>
In this scenario we do not need the BirtWebConfiguration class so we are pointing the contextConfigLocation to point to the BirtDataServiceConfiguration class instead.
The same POJO classes described in the first section of this article are used here (just a different package name) and need to be in the WEB-INF/classes directory or the package needs to be in a JAR file and placed in the WEB-INF/lib directory of the Viewer. Finally, add the following JAR files from the Spring Framework download to the WebViewers WEB-INF/lib directory:
To access the carService bean within a BIRT expression or from a BIRT JavaScript event handler, use the following syntax:
//BIRT label report item onCreate Script
importPackage(Packages.org.springframework.context);
importPackage(Packages.org.springframework.web.context.support );
var sc = reportContext.getHttpServletRequest().getSession().getServletContext();
//ApplicationContext
spring = WebApplicationContextUtils.getWebApplicationContext(sc);
var mypojo = spring.getBean("carService");
this.Text = mypojo.getAllCars().get(0).getMake();
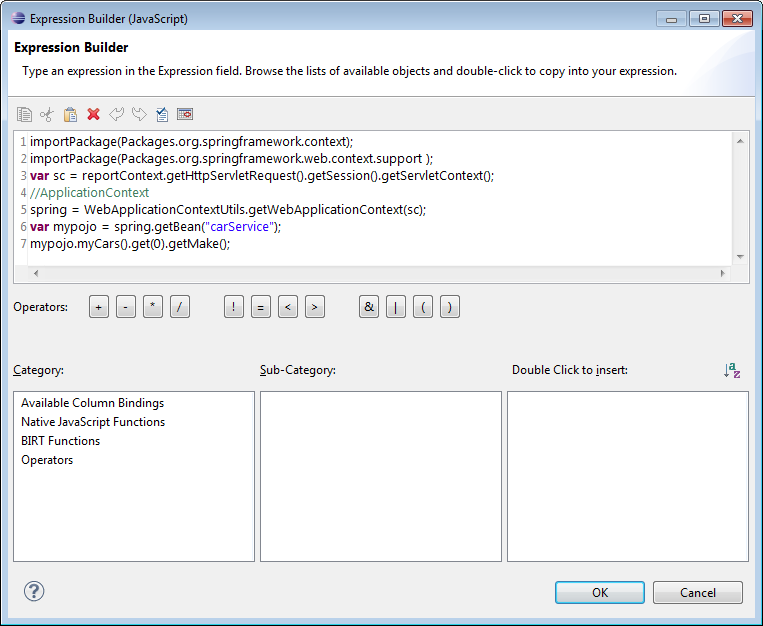 Figure 2- Building a BIRT Expression
The BIRT expression or script fails when previewing the report in the designer. To prevent the failure, wrap the expression or script in an if statement, as shown in the following code:
if( !reportContext.getHttpServletRequest().getAttribute("attributeBean").isDesigner()){
//Access Bean
}
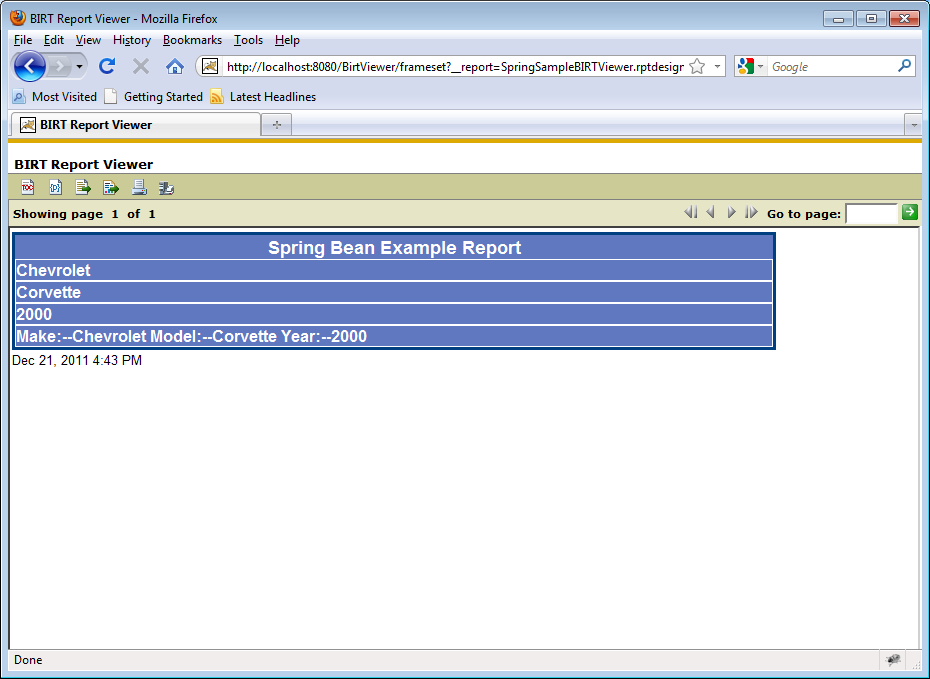 Figure 3 Displaying Spring bean output in BIRT Viewer
The previous two sections of this article focused on integrating the BIRT engine and Viewer with the Spring framework. While these approaches work well, suppose you need to access a Spring bean that is located in a separate context or on another machine. Spring Remoting can be used to implement this functionality.
While any of the Spring Remoting technologies or other mechanisms like SOAP or REST would work, this section describes using Springs HTTP Invoker-based service exporter. To implement this example, we first build an example web application containing a Car Service bean that supplies Car POJOs to a remoting client.
For remoting, we first define the Car POJO, as shown in the following code:
package org.eclipse.birt.spring.remoting.example;

public class Car implements ICar{

	private static final long serialVersionUID = 1L;
	private String make;
	private String model;
	private String year;
	public String getMake() {
		return make;
	}
	public void setMake(String make) {
		this.make = make;
	}
	public String getModel() {
		return model;
	}
	public void setModel(String model) {
		this.model = model;
	}
	public String getYear() {
		return year;
	}
	public void setYear(String year) {
		this.year = year;
	}
	public Car() {
		this.year = "2000";
		this.make = "Chevrolet";
		this.model = "Corvette";
	}
	public String toString(){
		return "Make:--"+this.make+" Model:--"+this.model+" Year:--"+this.year;
	}
}
Next we implement the Car Service.
package org.eclipse.birt.spring.remoting.example;
import java.util.Arrays;
import java.util.List;

import org.eclipse.birt.spring.remoting.example.Car;
import org.eclipse.birt.spring.remoting.example.CarService;
public class CarServiceImpl implements CarService{

public List getAllCars(){
	Car car1 = new Car();
	car1.setYear("2000");
	car1.setMake("Chevrolet");
	car1.setModel("Corvette");
	Car car2 = new Car();
	car2.setYear("2005");
	car2.setMake("Dodge");
	car2.setModel("Viper");
	Car car3 = new Car();
	car3.setYear("2002");
	car3.setMake("Ford");
	car3.setModel("Mustang GT");
	List cars = Arrays.asList(  car1, car2, car3 ) ;
	return cars ;


}
}
Finally we implement the BirtDataServiceConfiguration file to handle Java configuration of the Spring context.
package org.eclipse.birt.spring.remoting.example;

import java.util.HashMap;
import java.util.Map;

import org.springframework.context.annotation.Bean;
import org.springframework.context.annotation.Configuration;
import org.springframework.remoting.httpinvoker.HttpInvokerServiceExporter;
import org.springframework.web.servlet.handler.SimpleUrlHandlerMapping;


@Configuration
public class BirtDataServiceConfiguration {

	@Bean
	public CarService carService(){

		return  new CarServiceImpl();
	}

	@Bean
	public HttpInvokerServiceExporter myServiceExporter(){
		HttpInvokerServiceExporter hse = new HttpInvokerServiceExporter();
		hse.setService( this.carService()) ;
		hse.setServiceInterface( CarService.class);
		return hse;
	}

	@Bean
	public SimpleUrlHandlerMapping myUrlMapping(){

		SimpleUrlHandlerMapping mapping = new SimpleUrlHandlerMapping();
		Map urlMap = new HashMap();
		urlMap.put("/carService", myServiceExporter());
		mapping.setUrlMap(urlMap);
		mapping.setAlwaysUseFullPath(true);
		return mapping;
	}


}
This class just maps /carService URLs to an HttpInvokerServiceExporter object that exposes the carService bean to remoting clients.
Next, we can create a web.xml for this application that uses the Spring DispatcherServlet, as shown in the following code:
<?xml version="1.0" encoding="utf-8"?>
<!DOCTYPE web-app PUBLIC "-//Sun Microsystems, Inc.//DTD Web Application 2.2//EN"
    "http://java.sun.com/j2ee/dtds/web-app_2_2.dtd">
<web-app>

 <servletgt;
   <servlet-name>springandbirt</servlet-name>
   <servlet-class>
     org.springframework.web.servlet.DispatcherServlet
   </servlet-class>
   <init-param>
     <param-namegt;contextClass</param-name>
     <param-valuegt;org.springframework.web.context.support.AnnotationConfigWebApplicationContextlt;/param-value>
   </init-param>
   <init-param>
     <param-name>contextConfigLocation</param-name>
     <param-value>org.eclipse.birt.spring.remoting.example.BirtDataServiceConfiguration</param-value>
   </init-param>
   <load-on-startup>1</load-on-startup>
 </servlet>

 <servlet-mapping>
   <servlet-name>springandbirt</servlet-name>
   <url-pattern>/carService</url-pattern>
 </servlet-mapping>

  <welcome-file-list>
    <welcome-file>
      index.jsp
    </welcome-file>
  </welcome-file-list>

</web-app>
The web application needs the following JAR files from the Spring Framework in the WEB-INF/lib directory:
The application can now be built and deployed.
Next, we need to build a remoting client to access the previously built application. In this example, it is simply a JAR file that we can include with the BIRT Viewer for a separate context access to the carService.
The client jar should contain the CarService Interface and the CarPojo/ICarPojo Class/Interface. In addition to these three Classes we need a configuration class to handle Java configuration of the Spring Context
This class uses an AnnotationConfigApplicationContext class to specify a Java class to handle configuration of the Spring Context. The class ContextConfig is presented below and uses an HttpInvokerProxyFactoryBean to connect to the server and retrieve the car service bean.
package org.eclipse.birt.spring.remoting.client.example;

import org.eclipse.birt.spring.remoting.example.CarService;
import org.springframework.context.annotation.Bean;
import org.springframework.context.annotation.Configuration;
import org.springframework.remoting.httpinvoker.HttpInvokerProxyFactoryBean;

@Configuration
public class ContextConfig {

	@Bean
	public HttpInvokerProxyFactoryBean client() {
		HttpInvokerProxyFactoryBean proxy = new HttpInvokerProxyFactoryBean();
		proxy.setServiceInterface(CarService.class);
		proxy.setServiceUrl("http://localhost:8080/springandbirtremote/carService");
		return proxy;
	}

}
This configuration file defines one bean that acts as the HTTP invoker proxy. The service URL defines the location of the remoting server that we defined earlier and the service interface defines the object returned. To build the client JAR file, add the same JAR files that were added for the server to the classpath.
To call the car service from the BIRT viewer, use the following JavaScript snippet in the BIRT Expression Builder or from a JavaScript event handler, as shown in the following code:
importPackage(Packages.org.springframework.context);
importPackage(Packages.org.springframework.web.context.support );
var sc = reportContext.getHttpServletRequest().getSession().getServletContext();
//ApplicationContext
var spring = WebApplicationContextUtils.getWebApplicationContext(sc);
var mypojo = spring.getBean("client");
mypojo.getAllCars().get(0).getMake();
Add all the jars described in the section on building the remoting server to the WEB-INF/lib of the BIRT Viewer. In addition, add the remoting client jar to the WEB-INF/lib of the BIRT Viewer. Finally add the following to the web.xml of the deployed viewer. These settings were discussed in the Accessing Spring Beans from the BIRT Viewer section of this article. Note that the contextConfigLocation is changed to the ContextConfig class.
<listener>
	<listener-class>org.springframework.web.context.ContextLoaderListener</listener-class>
</listener>

   <context-param>
     <param-name>contextClass</param-name>
     <param-value>org.springframework.web.context.support.AnnotationConfigWebApplicationContext</param-value>
   </context-param>
   <context-param>
     <param-name>contextConfigLocation</param-name>
     <param-value>org.eclipse.birt.spring.webviewer.example.ContextConfig</param-value>
   </context-param>
This approach allows an existing deployed BIRT Viewer to access a separate machine/context to access remote beans. As a final note, if you are using an intermediate Java class to access the remote Bean use the following code.
.
.
private final CarService carPojoService;

	public CarPojoClient(){
		final ApplicationContext context = new AnnotationConfigApplicationContext( ContextConfig.class);
		this.carPojoService = (CarService) context.getBean("client");
.
.
The Spring and BIRT frameworks are very popular in the Java community. Many users of the BIRT technology are also using Spring functionality as part of their enterprise application code to handle such functions as sourcing data, report presentation and access control. These are just some of the benefits of using the Spring Framework in conjunction with BIRT. This article provides an introduction to integrating BIRT and Spring. While other scenarios do exist, this article can serve as a learning tool to get you started using the two technologies concurrently.
Developers that wish to take advantage of the integration classes described in this article can use the SpringandBirtCoreJar.zip download below. For the examples, see the SpringBirtArticleSamples.zip download.

VMware offers training and certification to turbo-charge your progress.
Learn moreTanzu Spring Runtime offers support and binaries for OpenJDK™, Spring, and Apache Tomcat® in one simple subscription.
Learn moreCheck out all the upcoming events in the Spring community.
View all