<?xml version="1.0" encoding="UTF-8"?>
<project xmlns="http://maven.apache.org/POM/4.0.0" xmlns:xsi="http://www.w3.org/2001/XMLSchema-instance"
	xsi:schemaLocation="http://maven.apache.org/POM/4.0.0 https://maven.apache.org/xsd/maven-4.0.0.xsd">
	<modelVersion>4.0.0</modelVersion>
	<parent>
		<groupId>org.springframework.boot</groupId>
		<artifactId>spring-boot-starter-parent</artifactId>
		<version>3.3.0</version>
		<relativePath/> <!-- lookup parent from repository -->
	</parent>
	<groupId>com.example</groupId>
	<artifactId>integration-complete</artifactId>
	<version>0.0.1-SNAPSHOT</version>
	<name>integration-complete</name>
	<description>Demo project for Spring Boot</description>

	<properties>
		<java.version>17</java.version>
	</properties>

	<dependencies>
		<dependency>
			<groupId>org.springframework.boot</groupId>
			<artifactId>spring-boot-starter-integration</artifactId>
		</dependency>
		<dependency>
			<groupId>org.springframework.integration</groupId>
			<artifactId>spring-integration-feed</artifactId>
		</dependency>
		<dependency>
			<groupId>org.springframework.integration</groupId>
			<artifactId>spring-integration-file</artifactId>
		</dependency>

		<dependency>
			<groupId>org.springframework.boot</groupId>
			<artifactId>spring-boot-starter-test</artifactId>
			<scope>test</scope>
		</dependency>
		<dependency>
			<groupId>org.springframework.integration</groupId>
			<artifactId>spring-integration-test</artifactId>
			<scope>test</scope>
		</dependency>
	</dependencies>

	<build>
		<plugins>
			<plugin>
				<groupId>org.springframework.boot</groupId>
				<artifactId>spring-boot-maven-plugin</artifactId>
			</plugin>
		</plugins>
	</build>

</project>
Integrating Data
This guide walks you through the process of using Spring Integration to create a simple application that retrieves data from an RSS Feed (Spring Blog), manipulates the data, and then writes it to a file. This guide uses traditional Spring Integration XML configuration. Other guides show how to use Java Configuration and DSL with and without Lambda expressions.
What You Will Build
You will create a flow with Spring Integration by using traditional XML configuration.
What You Need
-
About 15 minutes
-
A favorite text editor or IDE
-
Java 17 or later
-
You can also import the code straight into your IDE:
How to complete this guide
Like most Spring Getting Started guides, you can start from scratch and complete each step or you can bypass basic setup steps that are already familiar to you. Either way, you end up with working code.
To start from scratch, move on to Starting with Spring Initializr.
To skip the basics, do the following:
-
Download and unzip the source repository for this guide, or clone it using Git:
git clone https://github.com/spring-guides/gs-integration.git -
cd into
gs-integration/initial -
Jump ahead to Define an Integration Flow.
When you finish, you can check your results against the code in gs-integration/complete.
Starting with Spring Initializr
You can use this pre-initialized project and click Generate to download a ZIP file. This project is configured to fit the examples in this tutorial.
To manually initialize the project:
-
Navigate to https://start.spring.io. This service pulls in all the dependencies you need for an application and does most of the setup for you.
-
Choose either Gradle or Maven and the language you want to use. This guide assumes that you chose Java.
-
Click Dependencies and select Spring Integration.
-
Click Generate.
-
Download the resulting ZIP file, which is an archive of a web application that is configured with your choices.
| If your IDE has the Spring Initializr integration, you can complete this process from your IDE. |
| You can also fork the project from Github and open it in your IDE or other editor. |
Add to the Build Files
For this example, you need to add two dependencies:
-
spring-integration-feed -
spring-integration-file
The following listing shows the final pom.xml file:
The following listing shows the final build.gradle file:
plugins {
	id 'org.springframework.boot' version '3.3.0'
	id 'java'
}

apply plugin: 'io.spring.dependency-management'

group = 'com.example'
version = '0.0.1-SNAPSHOT'
sourceCompatibility = '17'

repositories {
	mavenCentral()
}

dependencies {
	implementation 'org.springframework.boot:spring-boot-starter-integration'
	implementation 'org.springframework.integration:spring-integration-feed'
	implementation 'org.springframework.integration:spring-integration-file'
	testImplementation('org.springframework.boot:spring-boot-starter-test')
	testImplementation 'org.springframework.integration:spring-integration-test'
}

test {
	useJUnitPlatform()
}
Define an Integration Flow
For this guide’s sample application, you will define a Spring Integration flow that:
-
Reads blog posts from the RSS feed at spring.io.
-
Transforms them into an easily readable
Stringconsisting of the post title and the URL for the post. -
Appends that
Stringto the end of a file (/tmp/si/SpringBlog).
To define an integration flow, you can create a Spring XML configuration with a handful of elements from Spring Integration’s XML namespaces. Specifically, for the desired integration flow, you work with elements from these Spring Integration namespaces: core, feed, and file. (Getting the last two is why we had to modify the build files provided by the Spring Initializr.)
The following XML configuration file (from src/main/resources/integration/integration.xml) defines the integration flow:
<?xml version="1.0" encoding="UTF-8"?>
<beans xmlns="http://www.springframework.org/schema/beans"
	xmlns:xsi="http://www.w3.org/2001/XMLSchema-instance"
	xmlns:int="http://www.springframework.org/schema/integration"
	xmlns:file="http://www.springframework.org/schema/integration/file"
	xmlns:feed="http://www.springframework.org/schema/integration/feed"
	xsi:schemaLocation="http://www.springframework.org/schema/integration/feed https://www.springframework.org/schema/integration/feed/spring-integration-feed.xsd
		http://www.springframework.org/schema/beans https://www.springframework.org/schema/beans/spring-beans.xsd
		http://www.springframework.org/schema/integration/file https://www.springframework.org/schema/integration/file/spring-integration-file.xsd
		http://www.springframework.org/schema/integration https://www.springframework.org/schema/integration/spring-integration.xsd">

    <feed:inbound-channel-adapter id="news" url="https://spring.io/blog.atom" auto-startup="${auto.startup:true}">
        <int:poller fixed-rate="5000"/>
    </feed:inbound-channel-adapter>

    <int:transformer
            input-channel="news"
            expression="payload.title + ' @ ' + payload.link + '#{systemProperties['line.separator']}'"
            output-channel="file"/>

    <file:outbound-channel-adapter id="file"
            mode="APPEND"
            charset="UTF-8"
            directory="/tmp/si"
            filename-generator-expression="'${feed.file.name:SpringBlog}'"/>

</beans>
Three integration elements are in play here:
-
<feed:inbound-channel-adapter>: An inbound adapter that retrieves the posts, one per poll. As configured here, it polls every five seconds. The posts are placed into a channel namednews(corresponding to the adapter’s ID). -
<int:transformer>: Transforms entries (com.rometools.rome.feed.synd.SyndEntry) in thenewschannel, extracting the entry’s title (payload.title) and link (payload.link) and concatenating them into a readableString(and adding a newline). TheStringis then sent to the output channel namedfile. -
<file:outbound-channel-adapter>: An outbound channel adapter that writes content from its channel (namedfile) to a file. Specifically, as configured here, it appends anything in thefilechannel to a file at/tmp/si/SpringBlog.
The following image shows this simple flow:
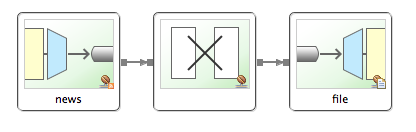
Ignore the auto-startup attribute for now. We revisit that later when we discuss testing. For now, notice that it is, by default, true, which means the posts are fetched when the application starts. Also note the property placeholder in the filename-generator-expression. It means that the default is SpringBlog but can be overridden with a property.
Make the Application Executable
Although it is common to configure a Spring Integration flow within a larger application (perhaps even a web application), there is no reason that it cannot be defined in a simpler standalone application. That is what you will do next: Create a main class that kicks off the integration flow and that declares a handful of beans to support the integration flow. You will also build the application into a standalone executable JAR file. We use Spring Boot’s @SpringBootApplication annotation to create the application context. Since this guide uses the XML namespace for the integration flow, you must use the @ImportResource annotation to load it into the application context. The following listing (from src/main/java/com/example/integration/IntegrationApplication.java) shows the application file:
package com.example.integration;

import org.springframework.boot.SpringApplication;
import org.springframework.boot.autoconfigure.SpringBootApplication;
import org.springframework.context.ConfigurableApplicationContext;
import org.springframework.context.annotation.ImportResource;

@SpringBootApplication
@ImportResource("/integration/integration.xml")
public class IntegrationApplication {
  public static void main(String[] args) throws Exception {
    ConfigurableApplicationContext ctx = new SpringApplication(IntegrationApplication.class).run(args);
    System.out.println("Hit Enter to terminate");
    System.in.read();
    ctx.close();
  }

}
Build an executable JAR
You can run the application from the command line with Gradle or Maven. You can also build a single executable JAR file that contains all the necessary dependencies, classes, and resources and run that. Building an executable jar makes it easy to ship, version, and deploy the service as an application throughout the development lifecycle, across different environments, and so forth.
If you use Gradle, you can run the application by using ./gradlew bootRun. Alternatively, you can build the JAR file by using ./gradlew build and then run the JAR file, as follows:
If you use Maven, you can run the application by using ./mvnw spring-boot:run. Alternatively, you can build the JAR file with ./mvnw clean package and then run the JAR file, as follows:
| The steps described here create a runnable JAR. You can also build a classic WAR file. |
Run the application
Now you can run the application from the jar by running the following command:
java -jar build/libs/{project_id}-0.1.0.jar

... app starts up ...
Once the application starts, it connects to the RSS feed and starts fetching blog posts. The application processes those posts through the integration flow you defined, ultimately appending the post information to a file at /tmp/si/SpringBlog.
After the application has been running for awhile, you should be able to view the file at /tmp/si/SpringBlog to see the data from a handful of posts. On a UNIX-based operating system, you can also tail the file to see the results, as they are written, by running the following command:
tail -f /tmp/si/SpringBlogYou should see something like the following sample output (though the actual news will differ):
Spring Integration Java DSL 1.0 GA Released @ https://spring.io/blog/2014/11/24/spring-integration-java-dsl-1-0-ga-released
This Week in Spring - November 25th, 2014 @ https://spring.io/blog/2014/11/25/this-week-in-spring-november-25th-2014
Spring Integration Java DSL: Line by line tutorial @ https://spring.io/blog/2014/11/25/spring-integration-java-dsl-line-by-line-tutorial
Spring for Apache Hadoop 2.1.0.M2 Released @ https://spring.io/blog/2014/11/14/spring-for-apache-hadoop-2-1-0-m2-released
Testing
Examine the complete project and you will see a test case, in src/test/java/com/example/integration/FlowTests.java:
package com.example.integration;

import static org.assertj.core.api.Assertions.assertThat;

import java.io.BufferedReader;
import java.io.File;
import java.io.FileReader;

import org.junit.jupiter.api.Test;

import org.springframework.beans.factory.annotation.Autowired;
import org.springframework.boot.test.context.SpringBootTest;
import org.springframework.integration.endpoint.SourcePollingChannelAdapter;
import org.springframework.integration.support.MessageBuilder;
import org.springframework.messaging.MessageChannel;

import com.rometools.rome.feed.synd.SyndEntryImpl;

@SpringBootTest({ "auto.startup=false",   // we don't want to start the real feed
          "feed.file.name=Test" })   // use a different file
public class FlowTests {

  @Autowired
  private SourcePollingChannelAdapter newsAdapter;

  @Autowired
  private MessageChannel news;

  @Test
  public void test() throws Exception {
    assertThat(this.newsAdapter.isRunning()).isFalse();
    SyndEntryImpl syndEntry = new SyndEntryImpl();
    syndEntry.setTitle("Test Title");
    syndEntry.setLink("http://characters/frodo");
    File out = new File("/tmp/si/Test");
    out.delete();
    assertThat(out.exists()).isFalse();
    this.news.send(MessageBuilder.withPayload(syndEntry).build());
    assertThat(out.exists()).isTrue();
    BufferedReader br = new BufferedReader(new FileReader(out));
    String line = br.readLine();
    assertThat(line).isEqualTo("Test Title @ http://characters/frodo");
    br.close();
    out.delete();
  }

}
This test uses Spring Boot’s test support to set a property named auto.startup to false. It is generally not a good idea to rely on a network connection for tests, especially in a CI environment. Instead, we prevent the feed adapter from starting and inject a SyndEntry into the news channel for processing by the rest of the flow. The test also sets the feed.file.name so that the test writes to a different file. Then it:
-
Verifies that the adapter is stopped.
-
Creates a test
SyndEntry. -
Deletes the test output file (if it is present).
-
Sends the message.
-
Verifies that the file exists.
-
Reads the file and verifies that the data is as expected.
Summary
Congratulations! You have developed a simple application that uses Spring Integration to fetch blog posts from spring.io, process them, and write them to a file.
See Also
The following guide may also be helpful:
Want to write a new guide or contribute to an existing one? Check out our contribution guidelines.
| All guides are released with an ASLv2 license for the code, and an Attribution, NoDerivatives creative commons license for the writing. |