http://gs-sts-cloud-foundry-deployment-myname.cfapps.io/greeting
Deploying to Cloud Foundry from STS
This guide walks you through the process of deploying a "hello world" Spring application to Cloud Foundry from Spring Tool Suite (STS).
What You’ll Deploy to Cloud Foundry
You’ll deploy a Spring Boot application to Cloud Foundry that will accept HTTP GET requests at:
The application URL will vary depending on the host portion that you have to change later on in this guide.
The application will then respond with a web page displaying a greeting:
"Hello, World!"
You can customize the greeting with an optional name parameter in the query string:
http://gs-sts-cloud-foundry-deployment-myname.cfapps.io/greeting?name=User
The name parameter value overrides the default value of "World" and is reflected in the response:
"Hello, User!"
The myname portion of the URL is what you will change when you deploy your application to Cloud Foundry through STS, to avoid host-taken errors during deployment. |
This application is based on a Spring service that serves web content. Further information on how to create the service from scratch can be found at Serving Web Content with Spring MVC, or it can be imported into STS through the Import Spring Getting Started Content wizard.
What You’ll Need
About 15 minutes
JDK 8 or later
{pws}[Pivotal Web Services (PWS) account]
Installing STS
If you don’t have STS installed yet, visit the link up above. From there, you can download a copy for your platform. To install it simply unpack the downloaded archive.
When you’re done, go ahead and launch STS.
Spring Boot Dashboard
The Spring Boot Dashboard is what you will use to deploy your application to Cloud Foundry, and is included in STS version 3.7.1 or higher. It is required for this guide.
Creating a Cloud Foundry Target
You first need to create a target to a Cloud Foundry organization and space where you would like to deploy your application.
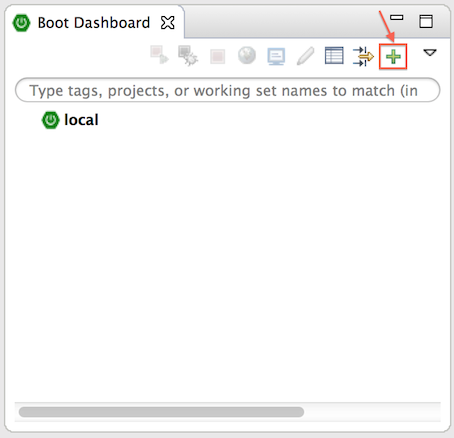
To create a Cloud Foundry target, first open the Boot Dashboard view.
You can click on the Boot Dashboard button in the main STS toolbar:

Or you can open it through the Eclipse Show View menu:
Window → Show View → Other → Spring → Boot Dashboard
Once visible, click on the '+' button on the top right of the Boot Dashboard toolbar to open the Cloud Foundry Target wizard.
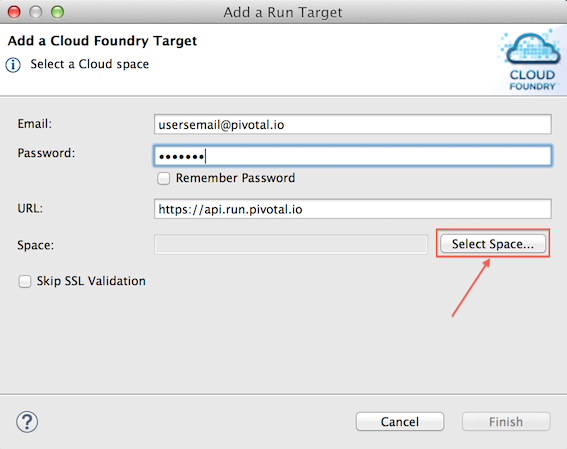
In the wizard, enter your PWS credentials, and click "Select Space" to select a Cloud Foundry organization and space to connect to. Once a space is selected, click "Finish" to create the target.
The target will now appear in the Boot Dashboard.
Import the Sample Spring Application
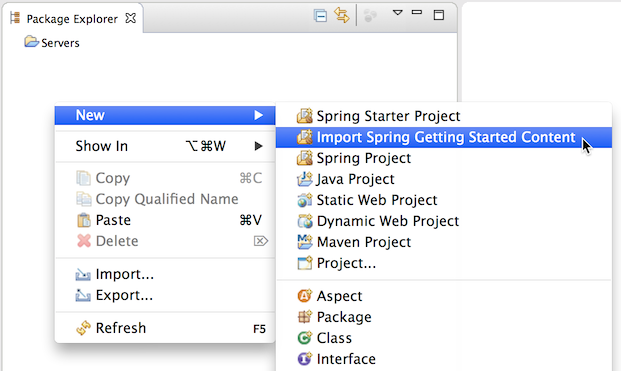
Now you can import a Spring Boot application that serves web content. You will be deploying this to Cloud Foundry.
In STS, open the "Import Spring Getting Started Content" wizard:
In the search field, enter "sts cloud foundry" and the sts-cloud-foundry-deployment guide should appear.

Select the build type.
Select the "default" code set.
Click "Finish".
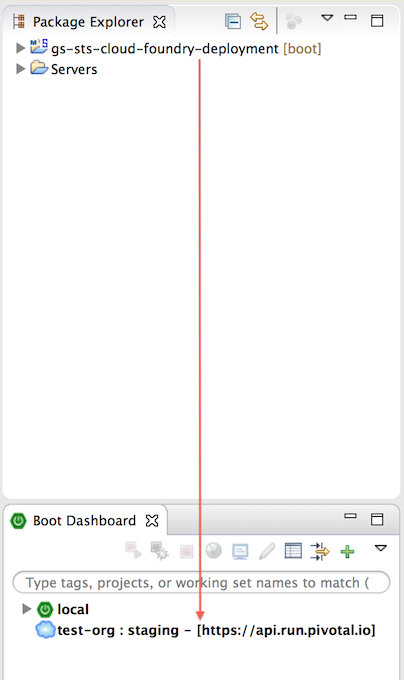
The import wizard will create a new project in your workspace called "gs-sts-cloud-foundry-deployment".
Deploying to Cloud Foundry
Now simply drag and drop the project to your Cloud Foundry target in the Boot Dashboard.
This will open the deployment manifest dialogue. Boot Dashboard uses Cloud Foundry manifest.yml to specify deployment details for your application, including the application name, host, memory, and services to bind.
You can either use an existing manifest.yml file that you have added to your Spring Boot project, or you can select "manual" to use default values generated by the dialogue.
In manual mode, no manifest.yml file is created in your project.
| To ensure that the URL for the application has not yet been taken by another application, and avoid host-taken errors during deployment, specify a different host in the manifest.yml editor inside the dialogue. |
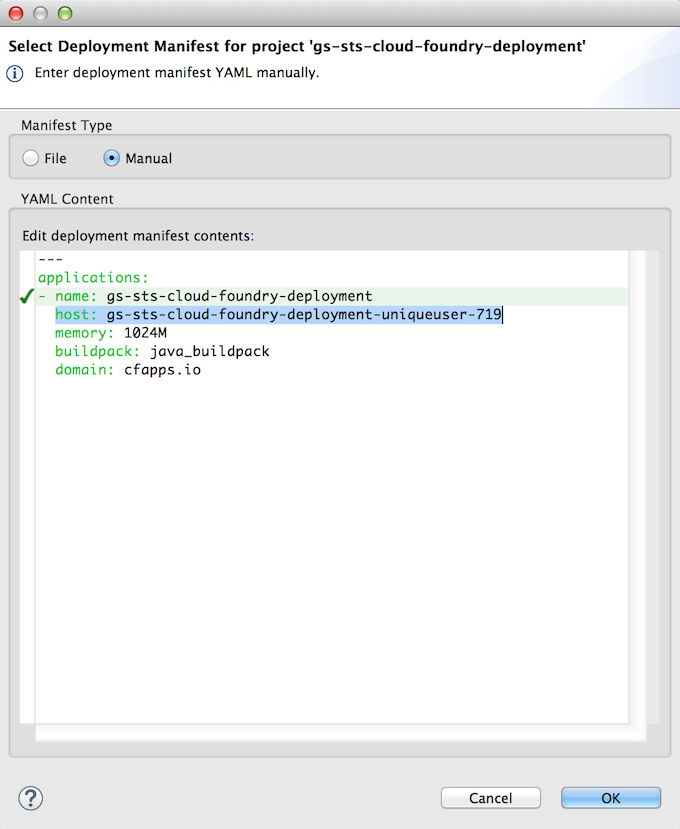
Once you have finished configuring your application, click "OK" to complete the deployment.
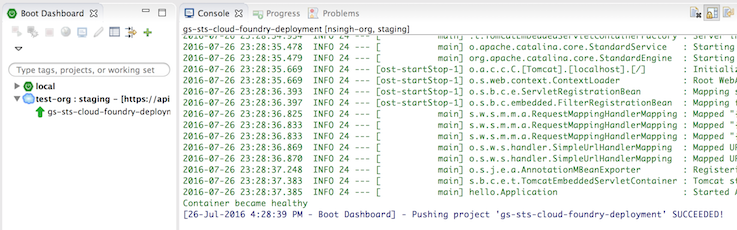
The deployment may take some time, but as the application is being deployed and started, the application’s console will automatically open and indicate progress. Both the console and the Boot Dashboard view will show when the application has successfully started and is running. The Boot Dashboard icon for the application will turn into a green "up" arrow.
Test the Application
Now that your application is running on Cloud Foundry, you can open the application’s web site within STS by double-clicking on the application in the Boot Dashboard. This will open a default web browser.
In the browser, append:
/greeting
to the application URL, and you will see the application page show:
"Hello, World!"
Provide a name query string parameter and append it to the URL in the browser:
/greeting?name=User.
Notice how the message changes from "Hello, World!" to "Hello, User!":
"Hello, User!"
Summary
Congratulations! You have just deployed your Spring Boot application to Cloud Foundry.