$ mkdir ui && cd ui
$ curl https://start.spring.io/starter.tgz -d dependencies=web,security -d name=ui | tar -xzvf -Spring Security and Angular
A Secure Single Page Application
In this tutorial we show some nice features of Spring Security, Spring Boot and Angular working together to provide a pleasant and secure user experience. It should be accessible to beginners with Spring and Angular, but there also is plenty of detail that will be of use to experts in either. This is actually the first in a series of sections on Spring Security and Angular, with new features exposed in each one successively. We’ll improve on the application in the second and subsequent installments, but the main changes after this are architectural rather than functional.
Spring and the Single Page Application
HTML5, rich browser-based features, and the "single page application" are extremely valuable tools for modern developers, but any meaningful interactions will involve a backend server, so as well as static content (HTML, CSS and JavaScript) we are going to need a backend server. The backend server can play any or all of a number of roles: serving static content, sometimes (but not so often these days) rendering dynamic HTML, authenticating users, securing access to protected resources, and (last but not least) interacting with JavaScript in the browser through HTTP and JSON (sometimes referred to as a REST API).
Spring has always been a popular technology for building the backend features (especially in the enterprise), and with the advent of Spring Boot things have never been easier. Let’s have a look at how to build a new single page application from nothing using Spring Boot, Angular and Twitter Bootstrap. There’s no particular reason to choose that specific stack, but it is quite popular, especially with the core Spring constituency in enterprise Java shops, so it’s a worthwhile starting point.
Create a New Project
We are going to step through creating this application in some detail, so that anyone who isn’t completely au fait with Spring and Angular can follow what is happening. If you prefer to cut to the chase, you can skip to the end where the application is working, and see how it all fits together. There are various options for creating a new project:
The source code for the complete project we are going to build is in Github here, so you can just clone the project and work directly from there if you want. Then jump to the next section.
Using Curl
The easiest way to create a new project to get started is via the Spring Boot Initializr. E.g. using curl on a UN*X like system:
You can then import that project (it’s a normal Maven Java project by default) into your favourite IDE, or just work with the files and "mvn" on the command line. Then jump to the next section.
Using Spring Boot CLI
You can create the same project using the Spring Boot CLI, like this:
$ spring init --dependencies web,security ui/ && cd uiThen jump to the next section.
Using the Initializr Website
If you prefer you can also get the same code directly as a .zip file from the Spring Boot Initializr. Just open it up in your browser and select dependencies "Web" and "Security", then click on "Generate Project". The .zip file contains a standard Maven or Gradle project in the root directory, so you might want to create an empty directory before you unpack it. Then jump to the next section.
Using Spring Tool Suite
In Spring Tool Suite (a set of Eclipse plugins) you can also create and import a project using a wizard at File->New->Spring Starter Project. Then jump to the next section. IntelliJ IDEA and NetBeans have similar features.
Add an Angular App
The core of a single page application in Angular (or any modern front-end framework) these days is going to be a Node.js build. Angular has some tools for setting this up quickly, so lets use those, and also keep the option of building with Maven, like any other Spring Boot application. The details of how to set up the Angular app are covered elsewhere, or you can just checkout the code for this tutorial from github.
Running the Application
Once the Angular app is primed, your application will be loadable in a browser (even though it doesn’t do much yet). On the command line you can do this
$ mvn spring-boot:runand go to a browser at http://localhost:8080. When you load the home page you should get a browser dialog asking for username and password (the username is "user" and the password is printed in the console logs on startup). There’s actually no content yet (or maybe the default "hero" tutorial content from the ng CLI), so you should get essentially a blank page.
If you don’t like scraping the console log for the password just add this to the "application.properties" (in "src/main/resources"): spring.security.user.password=password (and choose your own password). We did this in the sample code using "application.yml". |
In an IDE, just run the main() method in the application class (there is only one class, and it is called UiApplication if you used the "curl" command above).
To package and run as a standalone JAR, you can do this:
$ mvn package
$ java -jar target/*.jar
Customize the Angular Application
Let’s customize the "app-root" component (in "src/app/app.component.ts").
A minimal Angular application looks like this:
app.component.ts
import { Component } from '@angular/core';

@Component({
  selector: 'app-root',
  standalone: true,
  templateUrl: './app.component.html',
  styleUrls: ['./app.component.css']
})
export class AppComponent {
  title = 'Demo';
  greeting = {'id': 'XXX', 'content': 'Hello World'};
}
Most of the code in this TypeScript is boiler plate. The interesting stuff is all going to be in the AppComponent where we define the "selector" (the name of the HTML element) and a snippet of HTML to render via the @Component annotation. We also need to edit the HTML template ("app.component.html"):
app.component.html
<div style="text-align:center"class="container">
  <h1>
    Welcome {{title}}!
  </h1>
  <div class="container">
    <p>Id: <span>{{greeting.id}}</span></p>
    <p>Message: <span>{{greeting.content}}</span></p>
  </div>
</div>
If you added those files under "src/app" and rebuilt your app it should now be secure and functional, and it will say "Hello World!". The greeting is rendered by Angular in the HTML using the handlebar placeholders, {{greeting.id}} and {{greeting.content}}.
Adding Dynamic Content
So far we have an application with a greeting that is hard coded. That’s useful for learning how things fit together, but really we expect content to come from a backend server, so let’s create an HTTP endpoint that we can use to grab a greeting. In your application class (in "src/main/java/demo"), add the @RestController annotation and define a new @RequestMapping:
UiApplication.java
@SpringBootApplication
@RestController
public class UiApplication {

	@RequestMapping("/resource")
	public Map<String,Object> home() {
		Map<String,Object> model = new HashMap<String,Object>();
		model.put("id", UUID.randomUUID().toString());
		model.put("content", "Hello World");
		return model;
	}
Depending on the way you created your new project it might not be called UiApplication. |
Run that application and try to curl the "/resource" endpoint and you will find that it is secure by default:
$ curl localhost:8080/resource
{"timestamp":1420442772928,"status":401,"error":"Unauthorized","message":"Full authentication is required to access this resource","path":"/resource"}
Loading a Dynamic Resource from Angular
So let’s grab that message in the browser. Modify the AppComponent to load the protected resource using XHR:
app.component.ts
import { Component, inject } from '@angular/core';
import { HttpClient } from '@angular/common/http';

interface Greeting {
  id?: number;
  content?: string;
}

@Component({
  selector: 'app-root',
  standalone: true,
  templateUrl: './app.component.html',
  styleUrls: ['./app.component.css']
})
export class AppComponent {
  title = 'Demo';
  greeting: Greeting = {};

  private http = inject(HttpClient);

  constructor() {
    this.http.get<Greeting>('resource').subscribe(data => this.greeting = data);
  }
}
We use Angular’s inject() function to get an HttpClient service, and use it to GET our resource. Angular passes us the response and we pull out JSON and assign it to the greeting.
To enable the HttpClient service in our application, we need to provide it in the application bootstrap:
main.ts
import { bootstrapApplication } from '@angular/platform-browser';
import { AppComponent } from './app/app.component';
import { provideHttpClient } from '@angular/common/http';

bootstrapApplication(AppComponent, {
  providers: [
    provideHttpClient()
  ]
}).catch(err => console.error(err));
Run the application again (or just reload the home page in the browser), and you will see the dynamic message with its unique ID. So, even though the resource is protected and you can’t curl it directly, the browser was able to access the content. We have a secure single page application in less than a hundred lines of code!
| You might need to force your browser to reload the static resources after you change them. In Chrome (and Firefox with a plugin) you can use "developer tools" (F12), and that might be enough. Or you might have to use CTRL+F5. |
How Does it Work?
The interactions between the browser and the backend can be seen in your browser if you use some developer tools (usually F12 opens this up, works in Chrome by default, may require a plugin in Firefox). Here’s a summary:
| Verb | Path | Status | Response |
|---|---|---|---|
|
GET |
/ |
401 |
Browser prompts for authentication |
|
GET |
/ |
200 |
index.html |
|
GET |
/*.js |
200 |
Loads of third assets from angular |
|
GET |
/main.bundle.js |
200 |
Application logic |
|
GET |
/resource |
200 |
JSON greeting |
You might not see the 401 because the browser treats the home page load as a single interaction, and you might see 2 requests for "/resource" because there is a CORS negotiation.
Look more closely at the requests and you will see that all of them have an "Authorization" header, something like this:
Authorization: Basic dXNlcjpwYXNzd29yZA==The browser is sending the username and password with every request (so remember to use HTTPS exclusively in production). There’s nothing "Angular" about that, so it works with your JavaScript framework or non-framework of choice.
What’s Wrong with That?
On the face of it, it seems like we did a pretty good job, it’s concise, easy to implement, all our data are secured by a secret password, and it would still work if we changed the front end or backend technologies. But there are some issues.
-
Basic authentication is restricted to username and password authentication.
-
The authentication UI is ubiquitous but ugly (browser dialog).
-
There is no protection from Cross Site Request Forgery (CSRF).
CSRF isn’t really an issue with our application as it stands since it only needs to GET the backend resources (i.e. no state is changed in the server). As soon as you have a POST, PUT or DELETE in your application it simply isn’t secure any more by any reasonable modern measure.
In the next section in this series we will extend the application to use form-based authentication, which is a lot more flexible than HTTP Basic. Once we have a form we will need CSRF protection, and both Spring Security and Angular have some nice out-of-the box features to help with this. Spoiler: we are going to need to use the HttpSession.
The Login Page
In this section we continue our discussion of how to use Spring Security with Angular in a "single page application". Here we show how to use Angular to authenticate a user via a form and fetch a secure resource to render in the UI. This is the second in a series of sections, and you can catch up on the basic building blocks of the application or build it from scratch by reading the first section, or you can just go straight to the source code in Github. In the first section we built a simple application that used HTTP Basic authentication to protect the backend resources. In this one we add a login form, give the user some control over whether to authenticate or not, and fix the issues with the first iteration (principally lack of CSRF protection).
Reminder: if you are working through this section with the sample application, be sure to clear your browser cache of cookies and HTTP Basic credentials. In Chrome the best way to do that for a single server is to open a new incognito window.
Add Navigation to the Home Page
The core of an Angular application is an HTML template for the basic page layout. We already had a really basic one, but for this application we need to offer some navigation features (login, logout, home), so let’s modify it (in src/app):
app.component.html
<div class="container">
  <ul class="nav nav-pills">
    <li class="nav-item"><a class="nav-link" routerLinkActive="active" routerLink="/home">Home</a></li>
    <li class="nav-item"><a class="nav-link" routerLinkActive="active" routerLink="/login">Login</a></li>
    <li class="nav-item"><a class="nav-link" (click)="logout()">Logout</a></li>
  </ul>
</div>
<div class="container">
  <router-outlet></router-outlet>
</div>
The main content is a <router-outlet/> and there is a navigation bar with login and logout links.
The <router-outlet/> selector is provided by Angular, and it needs to be wired up to a component in the application bootstrap. There is going to be one component per route (per menu link), and a helper service to glue them together, and share some state (AppService). Here’s the implementation that pulls all the pieces together using Angular’s standalone component architecture:
main.ts
import { bootstrapApplication } from '@angular/platform-browser';
import { provideRouter, Routes } from '@angular/router';
import { provideHttpClient, withInterceptors } from '@angular/common/http';
import { AppComponent } from './app/app.component';
import { HomeComponent } from './app/home.component';
import { LoginComponent } from './app/login.component';
import { xhrInterceptor } from './app/xhr.interceptor';

const routes: Routes = [
  { path: '', pathMatch: 'full', redirectTo: 'home' },
  { path: 'home', component: HomeComponent },
  { path: 'login', component: LoginComponent }
];

bootstrapApplication(AppComponent, {
  providers: [
    provideRouter(routes),
    provideHttpClient(withInterceptors([xhrInterceptor]))
  ]
}).catch(err => console.error(err));
We use provideRouter() with a routes array to set up links to "/" (redirects to "home"), "/home" (the HomeComponent), and "/login" (the LoginComponent).
We also configure provideHttpClient() with an interceptor, which will be needed later for adding default headers to HTTP requests.
The AppComponent actually doesn’t do very much. The TypeScript component that goes with the app root is here:
app.component.ts
import { Component, inject } from '@angular/core';
import { Router, RouterLink, RouterLinkActive, RouterOutlet } from '@angular/router';
import { HttpClient } from '@angular/common/http';
import { AppService } from './app.service';
import { finalize } from 'rxjs/operators';

@Component({
  selector: 'app-root',
  standalone: true,
  imports: [RouterOutlet, RouterLink, RouterLinkActive],
  templateUrl: './app.component.html',
  styleUrls: ['./app.component.css']
})
export class AppComponent {
  private app = inject(AppService);
  private http = inject(HttpClient);
  private router = inject(Router);

  constructor() {
    this.app.authenticate(undefined, undefined);
  }

  logout(): void {
    this.http.post('logout', {}).pipe(
      finalize(() => {
        this.app.authenticated = false;
        this.router.navigateByUrl('/login');
      })
    ).subscribe();
  }
}
Salient features:
-
There is dependency injection using Angular’s
inject()function, including theAppService -
There is a logout function exposed as a method of the component, which we can use later to send a logout request to the backend. It sets a flag in the
appservice, and sends the user back to the login screen (and it does this unconditionally via afinalize()callback). -
We are using
templateUrlto externalize the template HTML into a separate file. -
The
authenticate()function is called when the controller is loaded to see if the user is actually already authenticated (e.g. if they had refreshed the browser in the middle of a session). We need theauthenticate()function to make a remote call because the actual authentication is done by the server, and we don’t want to trust the browser to keep track of it.
The app service that we injected above needs a boolean flag so we can tell if the user is currently authenticated, and a function authenticate() that can be used to authenticate with the back end server, or just to query it for the user details:
app.service.ts
import { Injectable, inject } from '@angular/core';
import { HttpClient, HttpHeaders } from '@angular/common/http';

@Injectable({ providedIn: 'root' })
export class AppService {
  authenticated = false;
  private http = inject(HttpClient);

  authenticate(credentials: { username: string; password: string } | undefined, callback?: () => void): void {
    const headers = new HttpHeaders(credentials ? {
      authorization: 'Basic ' + btoa(credentials.username + ':' + credentials.password)
    } : {});

    this.http.get<{ name?: string }>('user', { headers }).subscribe({
      next: (response) => {
        this.authenticated = !!response?.name;
        if (callback) {
          callback();
        }
      },
      error: () => {
        this.authenticated = false;
      }
    });
  }
}
The authenticated flag is simple. The authenticate() function sends HTTP Basic authentication credentials if they are provided, and otherwise not. It also has an optional callback argument that we can use to execute some code if the authentication is successful.
The Greeting
The greeting content from the old home page can go right next to the "app.component.html" in "src/app":
home.component.html
<h1>Greeting</h1>
<div [hidden]="!authenticated()">
	<p>The ID is {{greeting.id}}</p>
	<p>The content is {{greeting.content}}</p>
</div>
<div [hidden]="authenticated()">
	<p>Login to see your greeting</p>
</div>
Since the user now has the choice whether to login or not (before it was all controlled by the browser), we need to distinguish in the UI between content that is secure and that which is not. We have anticipated this by adding references to an (as yet non-existent) authenticated() function.
The HomeComponent has to fetch the greeting, and also provide the authenticated() utility function that pulls the flag out of the AppService:
home.component.ts
import { Component, inject } from '@angular/core';
import { HttpClient } from '@angular/common/http';
import { AppService } from './app.service';

interface Greeting {
  id?: number;
  content?: string;
}

@Component({
  selector: 'app-home',
  standalone: true,
  templateUrl: './home.component.html'
})
export class HomeComponent {
  title = 'Demo';
  greeting: Greeting = {};

  private app = inject(AppService);
  private http = inject(HttpClient);

  constructor() {
    this.http.get<Greeting>('resource').subscribe(data => this.greeting = data);
  }

  authenticated(): boolean {
    return this.app.authenticated;
  }
}
The Login Form
The login form also gets its own component:
login.component.html
<div class="alert alert-danger" [hidden]="!error">
	There was a problem logging in. Please try again.
</div>
<form role="form" (submit)="login()">
	<div class="form-group">
		<label for="username">Username:</label> <input type="text"
			class="form-control" id="username" name="username" [(ngModel)]="credentials.username"/>
	</div>
	<div class="form-group">
		<label for="password">Password:</label> <input type="password"
			class="form-control" id="password" name="password" [(ngModel)]="credentials.password"/>
	</div>
	<button type="submit" class="btn btn-primary">Submit</button>
</form>
This is a very standard login form, with 2 inputs for username and password and a button for submitting the form via an Angular event handler (submit). You don’t need an action on the form tag, so it’s probably better not to put one in at all. There is also an error message, shown only if the angular model contains an error. The form controls use ngModel from Angular Forms to pass data between the HTML and the Angular controller, and in this case we are using a credentials object to hold the username and password.
The Authentication Process
To support the login form we just added we need to add some more features. On the client side these will be implemented in the LoginComponent, and on the server it will be Spring Security configuration.
Submitting the Login Form
To submit the form we need to define the login() function that we referenced already in the form via (submit), and the credentials object that we referenced via ngModel. Let’s flesh out the "login" component:
login.component.ts
import { Component, inject } from '@angular/core';
import { Router } from '@angular/router';
import { FormsModule } from '@angular/forms';
import { AppService } from './app.service';

@Component({
  selector: 'app-login',
  standalone: true,
  imports: [FormsModule],
  templateUrl: './login.component.html'
})
export class LoginComponent {
  credentials = { username: '', password: '' };
  error = false;

  private app = inject(AppService);
  private router = inject(Router);

  login(): boolean {
    this.app.authenticate(this.credentials, () => {
      this.router.navigateByUrl('/');
    });
    return false;
  }
}
In addition to initializing the credentials object, it defines the login() that we need in the form.
The authenticate() makes a GET to a relative resource (relative to the deployment root of your application) "/user". When called from the login() function it adds the Base64-encoded credentials in the headers so on the server it does an authentication and accepts a cookie in return. The login() function also sets a local error flag accordingly when we get the result of the authentication, which is used to control the display of the error message above the login form.
The Currently Authenticated User
To service the authenticate() function we need to add a new endpoint to the backend:
UiApplication.java
@GetMapping("/user")
@ResponseBody
public Principal user(Principal user) {
    return user;
}
This is a useful trick in a Spring Security application. If the "/user" resource is reachable then it will return the currently authenticated user (an Authentication), and otherwise Spring Security will intercept the request and send a 401 response through an AuthenticationEntryPoint.
Handling the Login Request on the Server
Spring Security makes it easy to handle the login request. We just need to add some configuration to our main application class (e.g. as an inner class):
UiApplication.java
@Configuration
protected static class SecurityConfiguration {
    @Bean
    public SecurityFilterChain filterChain(HttpSecurity http) throws Exception {
        http
            .httpBasic(basic -> basic
                .securityContextRepository(new HttpSessionSecurityContextRepository())
            )
            .authorizeHttpRequests(authorize -> authorize
                .requestMatchers("/index.html", "/", "/home", "/login", "/*.js", "/*.css", "/*.ico").permitAll()
                .anyRequest().authenticated()
            )
            .csrf(csrf -> csrf
                .csrfTokenRepository(CookieCsrfTokenRepository.withHttpOnlyFalse()));
        return http.build();
    }
}
This is a standard Spring Boot application with Spring Security customization, just allowing anonymous access to the static (HTML) resources. The HTML resources need to be available to anonymous users, not just ignored by Spring Security, for reasons that will become clear.
Adding Default HTTP Request Headers
If you run the app at this point you will find that the browser pops up a Basic authentication dialogue (for user and password). It does this because it sees a 401 reponse from the XHR requests to /user and /resource with a "WWW-Authenticate" header. The way to suppress this popup is to suppress the header, which is coming from Spring Security. And the way to suppress the reponse header is to send a special, conventional request header "X-Requested-With=XMLHttpRequest". It used to be the default in Angular but they took it out in 1.3.0. So here’s how to set default headers in an Angular XHR request.
Create an HTTP interceptor function that adds the header to every request:
xhr.interceptor.ts
import { HttpInterceptorFn } from '@angular/common/http';

export const xhrInterceptor: HttpInterceptorFn = (req, next) => {
  const xhr = req.clone({
    headers: req.headers.set('X-Requested-With', 'XMLHttpRequest')
  });
  return next(xhr);
};
The syntax here is straightforward. We define a functional interceptor that clones the request with an additional header and passes it along. This interceptor is called by Angular for every HTTP request and can be used to add additional headers.
To install this interceptor we declare it in the provideHttpClient() call in our application bootstrap:
main.ts
bootstrapApplication(AppComponent, {
  providers: [
    provideRouter(routes),
    provideHttpClient(withInterceptors([xhrInterceptor]))
  ]
Logout
The application is almost finished functionally. The last thing we need to do is implement the logout feature that we sketched in the home page. If the user is authenticated then we show a "logout" link and hook it to a logout() function in the AppComponent. Remember, it sends an HTTP POST to "/logout" which we now need to implement on the server. This is straightforward because it is added for us already by Spring Security (i.e. we don’t need to do anything for this simple use case). For more control over the behaviour of logout you could use the HttpSecurity callbacks in your SecurityFilterChain to, for instance execute some business logic after logout.
CSRF Protection
The application is almost ready to use, and in fact if you run it you will find that everything we built so far actually works except the logout link. Try using it and look at the responses in the browser and you will see why:
POST /logout HTTP/1.1
...
Content-Type: application/x-www-form-urlencoded

username=user&password=password

HTTP/1.1 403 Forbidden
Set-Cookie: JSESSIONID=3941352C51ABB941781E1DF312DA474E; Path=/; HttpOnly
Content-Type: application/json;charset=UTF-8
Transfer-Encoding: chunked
...

{"timestamp":1420467113764,"status":403,"error":"Forbidden","message":"Expected CSRF token not found. Has your session expired?","path":"/login"}
That’s good because it means that Spring Security’s built-in CSRF protection has kicked in to prevent us from shooting ourselves in the foot. All it wants is a token sent to it in a header called "X-CSRF". The value of the CSRF token was available server side in the HttpRequest attributes from the initial request that loaded the home page. To get it to the client we could render it using a dynamic HTML page on the server, or expose it via a custom endpoint, or else we could send it as a cookie. The last choice is the best because Angular has built in support for CSRF (which it calls "XSRF") based on cookies.
So on the server we need a custom filter that will send the cookie. Angular wants the cookie name to be "XSRF-TOKEN" and Spring Security provides it as a request attribute by default, so we just need to transfer the value from a request attribute to a cookie. Fortunately, Spring Security provides a special CsrfTokenRepository that does precisely this:
UiApplication.java
.csrf(csrf -> csrf
    .csrfTokenRepository(CookieCsrfTokenRepository.withHttpOnlyFalse()));
With those changes in place we don’t need to do anything on the client side and the login form is now working.
How Does it Work?
The interactions between the browser and the backend can be seen in your browser if you use some developer tools (usually F12 opens this up, works in Chrome by default, may require a plugin in Firefox). Here’s a summary:
| Verb | Path | Status | Response |
|---|---|---|---|
|
GET |
/ |
200 |
index.html |
|
GET |
/*.js |
200 |
Assets from angular |
|
GET |
/user |
401 |
Unauthorized (ignored) |
|
GET |
/home |
200 |
Home page |
|
GET |
/user |
401 |
Unauthorized (ignored) |
|
GET |
/resource |
401 |
Unauthorized (ignored) |
|
GET |
/user |
200 |
Send credentials and get JSON |
|
GET |
/resource |
200 |
JSON greeting |
The responses that are marked "ignored" above are HTML responses received by Angular in an XHR call, and since we aren’t processing that data the HTML is dropped on the floor. We do look for an authenticated user in the case of the "/user" resource, but since it isn’t there in the first call, that response is dropped.
Look more closely at the requests and you will see that they all have cookies. If you start with a clean browser (e.g. incognito in Chrome), the very first request has no cookies going off to the server, but the server sends back "Set-Cookie" for "JSESSIONID" (the regular HttpSession) and "X-XSRF-TOKEN" (the CRSF cookie that we set up above). Subsequent requests all have those cookies, and they are important: the application doesn’t work without them, and they are providing some really basic security features (authentication and CSRF protection). The values of the cookies change when the user authenticates (after the POST) and this is another important security feature (preventing session fixation attacks).
| It is not adequate for CSRF protection to rely on a cookie being sent back to the server because the browser will automatically send it even if you are not in a page loaded from your application (a Cross Site Scripting attack, otherwise known as XSS). The header is not automatically sent, so the origin is under control. You might see that in our application the CSRF token is sent to the client as a cookie, so we will see it being sent back automatically by the browser, but it is the header that provides the protection. |
Help, How is My Application Going to Scale?
"But wait…" you are saying, "isn’t it Really Bad to use session state in a single-page application?" The answer to that question is going to have to be "mostly", because it very definitely is a Good Thing to use the session for authentication and CSRF protection. That state has to be stored somewhere, and if you take it out of the session, you are going to have to put it somewhere else and manage it manually yourself, on both the server and the client. That’s just more code and probably more maintenance, and generally re-inventing a perfectly good wheel.
"But, but…" you are going to respond, "how do I scale my application horizontally now?" This is the "real" question you were asking above, but it tends to get shortened to "session state is bad, I must be stateless". Don’t panic. The main point to take on board here is that security is stateful. You can’t have a secure, stateless application. So where are you going to store the state? That’s all there is to it. Rob Winch gave a very useful and insightful talk at Spring Exchange 2014 explaining the need for state (and the ubiquity of it - TCP and SSL are stateful, so your system is stateful whether you knew it or not), which is probably worth a look if you want to look into this topic in more depth.
The good news is you have a choice. The easiest choice is to store the session data in-memory, and rely on sticky sessions in your load balancer to route requests from the same session back to the same JVM (they all support that somehow). That’s good enough to get you off the ground and will work for a really large number of use cases. The other choice is to share the session data between instances of your application. As long as you are strict and only store the security data, it is small and changes infrequently (only when users log in and out, or their session times out), so there shouldn’t be any major infrastructure problems. It’s also really easy to do with Spring Session. We’ll be using Spring Session in the next section in this series, so there’s no need to go into any detail about how to set it up here, but it is literally a few lines of code and a Redis server, which is super fast.
| Another easy way to set up shared session state is to deploy your application as a WAR file to Cloud Foundry Pivotal Web Services and bind it to a Redis service. |
But, What about My Custom Token Implementation (it’s Stateless, Look)?
If that was your response to the last section, then read it again because maybe you didn’t get it the first time. It’s probably not stateless if you stored the token somewhere, but even if you didn’t (e.g. you use JWT encoded tokens), how are you going to provide CSRF protection? It’s important. Here’s a rule of thumb (attributed to Rob Winch): if your application or API is going to be accessed by a browser, you need CSRF protection. It’s not that you can’t do it without sessions, it’s just that you’d have to write all that code yourself, and what would be the point because it’s already implemented and works perfectly well on top of HttpSession (which in turn is part of the container you are using and baked into specs since the very beginning)? Even if you decide you don’t need CSRF, and have a perfectly "stateless" (non-session based) token implementation, you still had to write extra code in the client to consume and use it, where you could have just delegated to the browser and server’s own built-in features: the browser always sends cookies, and the server always has a session (unless you switch it off). That code is not business logic, and it isn’t making you any money, it’s just an overhead, so even worse, it costs you money.
Conclusion
The application we have now is close to what a user might expect in a "real" application in a live environment, and it probably could be used as a template for building out into a more feature rich application with that architecture (single server with static content and JSON resources). We are using the HttpSession for storing security data, relying on our clients to respect and use the cookies we send them, and we are comfortable with that because it lets us concentrate on our own business domain. In the next section we expand the architecture to a separate authentication and UI server, plus a standalone resource server for the JSON. This is obviously easily generalised to multiple resource servers. We are also going to introduce Spring Session into the stack and show how that can be used to share authentication data.
The Resource Server
In this section we continue our discussion of how to use Spring Security with Angular in a "single page application". Here we start by breaking out the "greeting" resource that we are using as the dynamic content in our application into a separate server, first as an unprotected resource, and then protected by an opaque token. This is the third in a series of sections, and you can catch up on the basic building blocks of the application or build it from scratch by reading the first section, or you can just go straight to the source code in Github, which is in two parts: one where the resource is unprotected, and one where it is protected by a token.
| if you are working through this section with the sample application, be sure to clear your browser cache of cookies and HTTP Basic credentials. In Chrome the best way to do that for a single server is to open a new incognito window. |
A Separate Resource Server
Client Side Changes
On the client side there isn’t very much to do to move the resource to a different backend. Here’s the "home" component in the last section:
home.component.ts
import { Component, inject } from '@angular/core';
import { HttpClient } from '@angular/common/http';
import { AppService } from './app.service';

interface Greeting {
  id?: number;
  content?: string;
}

@Component({
  selector: 'app-home',
  standalone: true,
  templateUrl: './home.component.html'
})
export class HomeComponent {
  title = 'Demo';
  greeting: Greeting = {};

  private app = inject(AppService);
  private http = inject(HttpClient);

  constructor() {
    this.http.get<Greeting>('resource').subscribe(data => this.greeting = data);
  }

  authenticated(): boolean {
    return this.app.authenticated;
  }
}
All we need to do to this is change the URL. For example, if we are going to run the new resource on localhost, it could look like this:
home.component.ts
import { Component, inject } from '@angular/core';
import { HttpClient } from '@angular/common/http';
import { AppService } from './app.service';

interface Greeting {
  id?: number;
  content?: string;
}

@Component({
  selector: 'app-home',
  standalone: true,
  templateUrl: './home.component.html'
})
export class HomeComponent {
  title = 'Demo';
  greeting: Greeting = {};

  private app = inject(AppService);
  private http = inject(HttpClient);

  constructor() {
    this.http.get<Greeting>('http://localhost:9000').subscribe(data => this.greeting = data);
  }

  authenticated(): boolean {
    return this.app.authenticated;
  }
}
Server Side Changes
The UI server is trivial to change: we just need to remove the @RequestMapping for the greeting resource (it was "/resource"). Then we need to create a new resource server, which we can do like we did in the first section using the Spring Boot Initializr. E.g. using curl on a UN*X like system:
$ mkdir resource && cd resource
$ curl https://start.spring.io/starter.tgz -d dependencies=web -d name=resource | tar -xzvf -
You can then import that project (it’s a normal Maven Java project by default) into your favourite IDE, or just work with the files and "mvn" on the command line.
Just add a @RequestMapping to the main application class, copying the implementation from the old UI:
ResourceApplication.java
package demo;

import java.util.UUID;

import org.springframework.boot.SpringApplication;
import org.springframework.boot.autoconfigure.SpringBootApplication;
import org.springframework.web.bind.annotation.CrossOrigin;
import org.springframework.web.bind.annotation.RequestMapping;
import org.springframework.web.bind.annotation.RestController;

@SpringBootApplication
@RestController
public class ResourceApplication {

	@RequestMapping("/")
	@CrossOrigin(origins="*", maxAge=3600)
	public Message home() {
		return new Message("Hello World");
	}

	public static void main(String[] args) {
		SpringApplication.run(ResourceApplication.class, args);
	}

}

class Message {
	private String id = UUID.randomUUID().toString();
	private String content;

	Message() {
	}

	public Message(String content) {
		this.content = content;
	}

	public String getId() {
		return id;
	}

	public String getContent() {
		return content;
	}
}
Once that is done your application will be loadable in a browser. On the command line you can do this
$ mvn spring-boot:run -Dserver.port=9000and go to a browser at http://localhost:9000 and you should see JSON with a greeting. You can bake in the port change in application.properties (in"src/main/resources"):
application.properties
server.port: 9000If you try loading that resource from the UI (on port 8080) in a browser, you will find that it doesn’t work because the browser won’t allow the XHR request.
CORS Negotiation
The browser tries to negotiate with our resource server to find out if it is allowed to access it according to the Cross Origin Resource Sharing protocol. It’s not an Angular responsibility, so just like the cookie contract it will work like this with all JavaScript in the browser. The two servers do not declare that they have a common origin, so the browser declines to send the request and the UI is broken.
To fix that we need to support the CORS protocol which involves a "pre-flight" OPTIONS request and some headers to list the allowed behaviour of the caller. Spring has fine-grained CORS support, so we can just add an annotation to our controller mapping, for example:
ResourceApplication.java
@RequestMapping("/")
@CrossOrigin(origins="*", maxAge=3600)
public Message home() {
	return new Message("Hello World");
}
Blithely using origins=* is quick and dirty, and it works, but it is not not secure and is not in any way recommended. |
Securing the Resource Server
Great! We have a working application with a new architecture. The only problem is that the resource server has no security.
Adding Spring Security
We can also look at how to add security to the resource server as a filter layer, like in the UI server. The first step is really easy: just add Spring Security to the classpath in the Maven POM:
pom.xml
<dependencies>
  <dependency>
    <groupId>org.springframework.boot</groupId>
    <artifactId>spring-boot-starter-security</artifactId>
  </dependency>
  ...
</dependencies>
Re-launch the resource server and, hey presto! It’s secure:
$ curl -v localhost:9000
< HTTP/1.1 302 Found
< Location: http://localhost:9000/login
...
We are getting a redirect to a (whitelabel) login page because curl is not sending the same headers that our Angular client will. Modifying the command to send more similar headers:
$ curl -v -H "Accept: application/json" \
    -H "X-Requested-With: XMLHttpRequest" localhost:9000
< HTTP/1.1 401 Unauthorized
...
So all we need to do is teach the client to send credentials with every request.
Token Authentication
The internet, and people’s Spring backend projects, are littered with custom token-based authentication solutions. Spring Security provides a barebones Filter implementation to get you started on your own (see for example AbstractPreAuthenticatedProcessingFilter and TokenService). There is no canonical implementation in Spring Security though, and one of the reasons why is probably that there’s an easier way.
Remember from Part II of this series that Spring Security uses the HttpSession to store authentication data by default. It doesn’t interact directly with the session though: there’s an abstraction layer (SecurityContextRepository) in between that you can use to change the storage backend. If we can point that repository, in our resource server, to a store with an authentication verified by our UI, then we have a way to share authentication between the two servers. The UI server already has such a store (the HttpSession), so if we can distribute that store and open it up to the resource server, we have most of a solution.
Spring Session
That part of the solution is pretty easy with Spring Session. All we need is a shared data store (Redis and JDBC are supported out of the box), and a few lines of configuration in the servers to set up a Filter.
In the UI application we need to add some dependencies to our POM:
pom.xml
<dependency>
  <groupId>org.springframework.session</groupId>
  <artifactId>spring-session-data-redis</artifactId>
</dependency>
<dependency>
  <groupId>org.springframework.boot</groupId>
  <artifactId>spring-boot-starter-data-redis</artifactId>
</dependency>
Spring Boot and Spring Session work together to connect to Redis and store session data centrally.
With that configuration in place and a Redis server running on localhost you can run the UI application, login with some valid user credentials, and the session data (the authentication) will be stored in redis.
if you don’t have a redis server running locally you can easily spin one up with Docker (on Windows or MacOS this requires a VM). There is a docker-compose.yml file in the source code in Github which you can run really easily on the command line with docker-compose up. If you do this in a VM the Redis server will be running on a different host than localhost, so you either need to tunnel it onto localhost, or configure the app to point at the correct spring.redis.host in your application.properties. |
Sending a Custom Token from the UI
The only missing piece is the transport mechanism for the key to the data in the store. The key is the HttpSession ID, so if we can get hold of that key in the UI client, we can send it as a custom header to the resource server. So the "home" controller would need to change so that it sends the header as part of the HTTP request for the greeting resource. For example:
home.component.ts
import { Component, inject } from '@angular/core';
import { HttpClient, HttpHeaders } from '@angular/common/http';
import { AppService } from './app.service';

interface Greeting {
  id?: number;
  content?: string;
}

interface TokenResponse {
  token?: string;
}

@Component({
  selector: 'app-home',
  standalone: true,
  templateUrl: './home.component.html'
})
export class HomeComponent {
  title = 'Demo';
  greeting: Greeting = {};

  private app = inject(AppService);
  private http = inject(HttpClient);

  constructor() {
    this.http.get<TokenResponse>('token').subscribe({
      next: (data) => {
        const token = data.token;
        if (token) {
          this.http.get<Greeting>('http://localhost:9000', {
            headers: new HttpHeaders().set('X-Auth-Token', token)
          }).subscribe(response => this.greeting = response);
        }
      },
      error: () => {}
    });
  }

  authenticated(): boolean {
    return this.app.authenticated;
  }
}
(A more elegant solution might be to grab the token as needed, and use an HTTP interceptor to add the header to every request to the resource server.)
Instead of going directly to "http://localhost:9000" we have wrapped that call in the success callback of a call to a new custom endpoint on the UI server at "/token". The implementation of that is trivial:
UiApplication.java
@GetMapping("/token")
@ResponseBody
public Map<String, String> token(HttpSession session) {
    return Collections.singletonMap("token", session.getId());
}
So the UI application is ready and will include the session ID in a header called "X-Auth-Token" for all calls to the backend.
Authentication in the Resource Server
There is one tiny change to the resource server for it to be able to accept the custom header. The CORS configuration has to nominate that header as an allowed one from remote clients, e.g.
ResourceApplication.java
@RequestMapping("/")
@CrossOrigin(origins = "*", maxAge = 3600, allowedHeaders = { "x-auth-token", "x-requested-with", "x-xsrf-token" })
public Message home() {
	return new Message("Hello World");
}
The pre-flight check from the browser will now be handled by Spring MVC, but we need to tell Spring Security that it is allowed to let it through:
ResourceApplication.java
@Bean
public SecurityFilterChain filterChain(HttpSecurity http) throws Exception {
	http.cors(Customizer.withDefaults())
		.authorizeHttpRequests(authorize -> authorize.anyRequest().authenticated());
	return http.build();
}
There is no need to permitAll() access to all resources, and there might be a handler that inadvertently sends sensitive data because it is not aware that the request is pre-flight. The cors() configuration utility mitigates this by handling all pre-flight requests in the filter layer. |
All that remains is to pick up the custom token in the resource server and use it to authenticate our user. This turns out to be pretty straightforward because all we need to do is tell Spring Security where the session repository is, and where to look for the token (session ID) in an incoming request. First we need to add the Spring Session and Redis dependencies, and then we can set up the HttpSessionIdResolver:
ResourceApplication.java
@Bean
HttpSessionIdResolver sessionStrategy() {
	return HeaderHttpSessionIdResolver.xAuthToken();
}
This resolver is the mirror image of the one in the UI server, so it establishes Redis as the session store. The only difference is that it uses a custom HttpSessionIdResolver that looks in the header ("X-Auth-Token" by default) instead of the default (cookie named "SESSION"). We also need to prevent the browser from popping up a dialog in an unauthenticated client - the app is secure but sends a 401 with WWW-Authenticate: Basic by default, so the browser responds with a dialog for username and password. There is more than one way to achieve this, but we already made Angular send an "X-Requested-With" header, so Spring Security handles it for us by default.
Re-launch the resource server and open the UI up in a new browser window.
Why Doesn’t it All Work With Cookies?
We had to use a custom header and write code in the client to populate the header, which isn’t terribly complicated, but it seems to contradict the advice in Part II to use cookies and sessions wherever possible. The argument there was that not to do so introduces additional unecessary complexity, and for sure the implementation we have now is the most complex we have seen so far: the technical part of the solution far outweighs the business logic (which is admittedly tiny). This is definitely a fair criticism (and one we plan to address in the next section in this series), but let’s just briefly look at why it’s not as simple as just using cookies and sessions for everything.
At least we are still using the session, which makes sense because Spring Security and the Servlet container know how to do that with no effort on our part. But couldn’t we have continued to use cookies to transport the authentication token? It would have been nice, but there is a reason it wouldn’t work, and that is that the browser wouldn’t let us. You can just go poking around in the browser’s cookie store from a JavaScript client, but there are some restrictions, and for good reason. In particular you don’t have access to the cookies that were sent by the server as "HttpOnly" (which you will see is the case by default for session cookies). You also can’t set cookies in outgoing requests, so we couldn’t set a "SESSION" cookie (which is the Spring Session default cookie name), we had to use a custom "X-Auth-Token" header. Both these restrictions are for your own protection so malicious scripts cannot access your resources without proper authorization.
TL;DR the UI and resource servers do not have a common origin, so they cannot share cookies (even though we can use Spring Session to force them to share sessions).
Conclusion
We have duplicated the features of the application in Part II of this series: a home page with a greeting fetched from a remote backend, with login and logout links in a navigation bar. The difference is that the greeting comes from a resource server that is a standalone, instead of being embedded in the UI server. This added significant complexity to the implementation, but the good news is that we have a mostly configuration-based (and practically 100% declarative) solution. We could even make the solution 100% declarative by extracting all the new code into libraries (Spring configuration and Angular custom directives). We are going to defer that interesting task for after the next couple of installments. In the next section we are going to look at a different really great way to reduce all the complexity in the current implementation: the API Gateway Pattern (the client sends all its requests to one place and authentication is handled there).
| We used Spring Session here to share sessions between 2 servers that are not logically the same application. It’s a neat trick, and it isn’t possible with "regular" JEE distributed sessions. |
The API Gateway
In this section we continue our discussion of how to use Spring Security with Angular in a "single page application". Here we show how to build an API Gateway to control the authentication and access to the backend resources using Spring Cloud. This is the fourth in a series of sections, and you can catch up on the basic building blocks of the application or build it from scratch by reading the first section, or you can just go straight to the source code in Github. In the last section we built a simple distributed application that used Spring Session to authenticate the backend resources. In this one we make the UI server into a reverse proxy to the backend resource server, fixing the issues with the last implementation (technical complexity introduced by custom token authentication), and giving us a lot of new options for controlling access from the browser client.
Reminder: if you are working through this section with the sample application, be sure to clear your browser cache of cookies and HTTP Basic credentials. In Chrome the best way to do that for a single server is to open a new incognito window.
Creating an API Gateway
An API Gateway is a single point of entry (and control) for front end clients, which could be browser based (like the examples in this section) or mobile. The client only has to know the URL of one server, and the backend can be refactored at will with no change, which is a significant advantage. There are other advantages in terms of centralization and control: rate limiting, authentication, auditing and logging. And implementing a simple reverse proxy is really simple with Spring Cloud.
If you were following along in the code, you will know that the application implementation at the end of the last section was a bit complicated, so it’s not a great place to iterate away from. There was, however, a halfway point which we could start from more easily, where the backend resource wasn’t yet secured with Spring Security. The source code for this is a separate project in Github so we are going to start from there. It has a UI server and a resource server and they are talking to each other. The resource server doesn’t have Spring Security yet so we can get the system working first and then add that layer.
Declarative Reverse Proxy in One Line
To turn it into an API Gateway, the UI server needs one small tweak. We need to add Spring Cloud Gateway to the classpath and configure a route. First, we add the dependency to our Maven POM:
pom.xml
<dependencyManagement>
  <dependencies>
    <dependency>
      <groupId>org.springframework.cloud</groupId>
      <artifactId>spring-cloud-dependencies</artifactId>
      <version>2025.0.0</version>
      <type>pom</type>
      <scope>import</scope>
    </dependency>
  </dependencies>
</dependencyManagement>

<dependencies>
  <dependency>
    <groupId>org.springframework.cloud</groupId>
    <artifactId>spring-cloud-starter-gateway-server-webmvc</artifactId>
  </dependency>
  ...
</dependencies>
Note the use of the "spring-cloud-starter-gateway-server-webmvc" - it’s a starter POM just like the Spring Boot ones, but it governs the dependencies we need for the Spring Cloud Gateway MVC proxy. We are also using <dependencyManagement> because we want to be able to depend on all the versions of transitive dependencies being correct.
Then in an external configuration file we need to map a local resource in the UI server to a remote one in the external configuration ("application.yml"):
application.yml
spring:
  security:
    user:
      password: password
  session:
    store-type: redis
  web:
    resources:
      static-locations: classpath:/static/browser/
  cloud:
    gateway:
      mvc:
        routes:
          - id: resource
            uri: http://localhost:9000
            predicates:
              - Path=/resource/**
            filters:
              - StripPrefix=1
This says "map paths with the pattern /resource/** in this server to the same paths in the remote server at localhost:9000". The StripPrefix=1 filter removes the /resource prefix before forwarding the request, so a request to /resource/ becomes a request to / on the backend. Simple and yet effective!
Consuming the Proxy in the Client
With those changes in place our application still works, but we haven’t actually used the new proxy yet until we modify the client. Fortunately that’s trivial. We just need to revert the change we made going from the "single" to the "vanilla" samples in the last section:
home.component.ts
constructor(private app: AppService, private http: HttpClient) {
  http.get('resource').subscribe(data => this.greeting = data);
}
Now when we fire up the servers everything is working and the requests are being proxied through the UI (API Gateway) to the resource server.
Further Simplifications
Even better: we don’t need the CORS filter any more in the resource server. We threw that one together pretty quickly anyway, and it should have been a red light that we had to do anything as technically focused by hand (especially where it concerns security). Fortunately it is now redundant, so we can just throw it away, and go back to sleeping at night!
Securing the Resource Server
You might remember in the intermediate state that we started from there is no security in place for the resource server.
Aside: Lack of software security might not even be a problem if your network architecture mirrors the application architecture (you can just make the resource server physically inaccessible to anyone but the UI server). As a simple demonstration of that we can make the resource server only accessible on localhost. Just add this to
application.propertiesin the resource server:
application.properties
server.address: 127.0.0.1Wow, that was easy! Do that with a network address that’s only visible in your data center and you have a security solution that works for all resource servers and all user desktops.
Suppose that we decide we do need security at the software level (quite likely for a number of reasons). That’s not going to be a problem, because all we need to do is add Spring Security as a dependency (in the resource server POM):
pom.xml
<dependency>
  <groupId>org.springframework.boot</groupId>
  <artifactId>spring-boot-starter-security</artifactId>
</dependency>
That’s enough to get us a secure resource server, but it won’t get us a working application yet, for the same reason that it didn’t in Part III: there is no shared authentication state between the two servers.
Sharing Authentication State
We can use the same mechanism to share authentication (and CSRF) state as we did in the last, i.e. Spring Session. We add the dependency to both servers as before:
pom.xml
<dependency>
  <groupId>org.springframework.session</groupId>
  <artifactId>spring-session-data-redis</artifactId>
</dependency>
<dependency>
  <groupId>org.springframework.boot</groupId>
  <artifactId>spring-boot-starter-data-redis</artifactId>
</dependency>
but this time the configuration is much simpler because Spring Cloud Gateway forwards all headers by default.
Then we can move on to the resource server. There are two small changes to make: one is to explicitly disable HTTP Basic in the resource server (to prevent the browser from popping up authentication dialogs), and the other is to set the session creation policy to NEVER so the resource server won’t create sessions but will use existing ones:
ResourceApplication.java
package demo;

import java.util.UUID;

import org.springframework.boot.SpringApplication;
import org.springframework.boot.autoconfigure.SpringBootApplication;
import org.springframework.context.annotation.Bean;
import org.springframework.security.config.annotation.web.builders.HttpSecurity;
import org.springframework.security.config.http.SessionCreationPolicy;
import org.springframework.security.web.SecurityFilterChain;
import org.springframework.web.bind.annotation.RequestMapping;
import org.springframework.web.bind.annotation.RestController;

@SpringBootApplication
@RestController
public class ResourceApplication {

	@RequestMapping("/")
	public Message home() {
		return new Message("Hello World");
	}

	@Bean
	public SecurityFilterChain filterChain(HttpSecurity http) throws Exception {
		http.httpBasic(httpBasic -> httpBasic.disable());
		http.sessionManagement(session -> session.sessionCreationPolicy(SessionCreationPolicy.NEVER));
		http.authorizeHttpRequests(authorize -> authorize.anyRequest().authenticated());
		return http.build();
	}

	public static void main(String[] args) {
		SpringApplication.run(ResourceApplication.class, args);
	}

}

class Message {
	private String id = UUID.randomUUID().toString();
	private String content;

	Message() {
	}

	public Message(String content) {
		this.content = content;
	}

	public String getId() {
		return id;
	}

	public String getContent() {
		return content;
	}
}
Aside: an alternative, which would also prevent the authentication dialog, would be to keep HTTP Basic but change the 401 challenge to something other than "Basic". You can do that with a one-line implementation of
AuthenticationEntryPointin theHttpSecurityconfiguration callback.
The UI server also needs to be configured to use session-based security context storage with HTTP Basic authentication:
UiApplication.java
package demo;

import java.security.Principal;

import org.springframework.boot.SpringApplication;
import org.springframework.boot.autoconfigure.SpringBootApplication;
import org.springframework.context.annotation.Bean;
import org.springframework.context.annotation.Configuration;
import org.springframework.security.config.Customizer;
import org.springframework.security.config.annotation.web.builders.HttpSecurity;
import org.springframework.security.web.SecurityFilterChain;
import org.springframework.security.web.context.HttpSessionSecurityContextRepository;
import org.springframework.security.web.csrf.CookieCsrfTokenRepository;
import org.springframework.stereotype.Controller;
import org.springframework.web.bind.annotation.GetMapping;
import org.springframework.web.bind.annotation.ResponseBody;

@SpringBootApplication
@Controller
public class UiApplication {

    @GetMapping("/user")
    @ResponseBody
    public Principal user(Principal user) {
        return user;
    }

    @GetMapping(value = "/{path:[^\\.]*}")
    public String redirect() {
        return "forward:/";
    }

    public static void main(String[] args) {
        SpringApplication.run(UiApplication.class, args);
    }

    @Configuration
    protected static class SecurityConfiguration {
        @Bean
        public SecurityFilterChain filterChain(HttpSecurity http) throws Exception {
            http
                .httpBasic(httpBasic -> httpBasic
                    .securityContextRepository(new HttpSessionSecurityContextRepository()))
                .logout(Customizer.withDefaults())
                .authorizeHttpRequests(authorize -> authorize
                    .requestMatchers("/index.html", "/", "/home", "/login").permitAll()
                    .anyRequest().authenticated()
                )
                .csrf(csrf -> csrf
                    .csrfTokenRepository(CookieCsrfTokenRepository.withHttpOnlyFalse()));
            return http.build();
        }
    }

}
The key configuration here is the httpBasic customizer that sets the securityContextRepository to HttpSessionSecurityContextRepository. This ensures that authentication state is properly stored in the session and shared via Redis with the resource server.
As long as redis is still running in the background (use the docker-compose.yml if you like to start it) then the system will work. Load the homepage for the UI at http://localhost:8080 and login and you will see the message from the backend rendered on the homepage.
How Does it Work?
What is going on behind the scenes now? First we can look at the HTTP requests in the UI server (and API Gateway):
| Verb | Path | Status | Response |
|---|---|---|---|
|
GET |
/ |
200 |
index.html |
|
GET |
/*.js |
200 |
Assets from angular |
|
GET |
/user |
401 |
Unauthorized (ignored) |
|
GET |
/resource |
401 |
Unauthenticated access to resource |
|
GET |
/user |
200 |
JSON authenticated user |
|
GET |
/resource |
200 |
(Proxied) JSON greeting |
That’s identical to the sequence at the end of Part II except for the fact that the cookie names are slightly different ("SESSION" instead of "JSESSIONID") because we are using Spring Session. But the architecture is different and that last request to "/resource" is special because it was proxied to the resource server.
We can see the reverse proxy in action by enabling debug logging for Spring Cloud Gateway. Add the following to your application.yml:
application.yml
logging:
  level:
org.springframework.cloud.gateway: DEBUG| Try to use a different browser so that there is no chance of authentication crossover (e.g. use Firefox if you used Chrome for testing the UI) - it won’t stop the app from working, but it will make the logs harder to read if they contain a mixture of authentication from the same browser. |
When you make a request to /resource, you can observe both the incoming request and the proxied request. Using your browser’s developer tools (Network tab), you’ll see the client’s request:
Client Request to Gateway
GET /resource/ HTTP/1.1
Host: localhost:8080
Accept: application/json, text/plain, */*
X-Requested-With: XMLHttpRequest
X-XSRF-TOKEN: 542c7005-309c-4f50-8a1d-d6c74afe8260
Cookie: SESSION=c18846b5-f805-4679-9820-cd13bd83be67; XSRF-TOKEN=542c7005-309c-4f50-8a1d-d6c74afe8260

Response:
Content-Type: application/json;charset=UTF-8
Status: 200
The gateway then proxies this request to the resource server. In the debug logs, you’ll see the routing decision and the forwarded request:
Gateway Proxy to Resource Server
DEBUG o.s.c.g.s.m.HandlerFunctions : Matched route: resource
DEBUG o.s.c.g.s.m.HandlerFunctions : Mapping [/resource/] to http://localhost:9000

Forwarded Request:
  method: GET
  path: /
  headers:
    accept: application/json, text/plain, */*
    x-xsrf-token: 542c7005-309c-4f50-8a1d-d6c74afe8260
    cookie: SESSION=c18846b5-f805-4679-9820-cd13bd83be67; XSRF-TOKEN=542c7005-309c-4f50-8a1d-d6c74afe8260
    x-forwarded-prefix: /resource
    x-forwarded-host: localhost:8080

Response:
  Content-Type: application/json;charset=UTF-8
  Status: 200
Notice a few important things in the proxied request:
-
The path changed from
/resource/to/(theStripPrefix=1filter removed the prefix) -
The
x-forwarded-prefixandx-forwarded-hostheaders were added so the backend knows the original request context -
The cookies (
SESSION,XSRF-TOKEN) and the CSRF header (x-xsrf-token) were all forwarded
Without Spring Session these cookies would be meaningless to the resource server, but the way we have set it up it can now use those headers to re-constitute a session with authentication and CSRF token data. The resource server looks up the session in Redis using the SESSION cookie value, finds the authenticated principal, and permits the request. So the request is allowed and we are in business!
Conclusion
We covered quite a lot in this section but we got to a really nice place where there is a minimal amount of boilerplate code in our two servers, they are both nicely secure and the user experience isn’t compromised. That alone would be a reason to use the API Gateway pattern, but really we have only scratched the surface of what that might be used for. Read up on Spring Cloud to find out more on how to make it easy to add more features to the gateway. The next section in this series will extend the application architecture a bit by extracting the authentication responsibilities to a separate server (the Single Sign On pattern).
Single Sign On with OAuth2
In this section we continue our discussion of how to use Spring Security with Angular in a "single page application". Here we show how to use Spring Authorization Server together with Spring Cloud Gateway to extend our API Gateway to do Single Sign On and OAuth2 token authentication to backend resources. This is the fifth in a series of sections, and you can catch up on the basic building blocks of the application or build it from scratch by reading the first section, or you can just go straight to the source code in Github. In the last section we built a small distributed application that used Spring Session to authenticate the backend resources and Spring Cloud to implement an embedded API Gateway in the UI server. In this section we extract the authentication responsibilities to a separate server to make our UI server the first of potentially many Single Sign On applications to the authorization server. This is a common pattern in many applications these days, both in the enterprise and in social startups. We will use an OAuth2 server as the authenticator, so that we can also use it to grant tokens for the backend resource server. Spring Cloud Gateway will automatically relay the access token to our backend, and enable us to further simplify the implementation of both the UI and resource servers.
Reminder: if you are working through this section with the sample application, be sure to clear your browser cache of cookies and HTTP Basic credentials. In Chrome the best way to do that for a single server is to open a new incognito window.
Creating an OAuth2 Authorization Server
Our first step is to create a new server to handle authentication and token management. Following the steps in Part I we can begin with Spring Boot Initializr. E.g. using curl on a UN*X like system:
$ curl https://start.spring.io/starter.tgz -d dependencies=web,security -d name=authserver | tar -xzvf -You can then import that project (it’s a normal Maven Java project by default) into your favourite IDE, or just work with the files and "mvn" on the command line.
Adding the OAuth2 Dependencies
We need to add the Spring Authorization Server dependency, so in our POM we add:
pom.xml
<dependency>
  <groupId>org.springframework.security</groupId>
  <artifactId>spring-security-oauth2-authorization-server</artifactId>
</dependency>
The authorization server requires some configuration. We need two security filter chains (one for OAuth2 endpoints, one for user authentication), a registered client, JWT signing keys, and user details:
AuthserverApplication.java
package demo;

import java.security.KeyPair;
import java.security.KeyPairGenerator;
import java.security.Principal;
import java.security.interfaces.RSAPrivateKey;
import java.security.interfaces.RSAPublicKey;
import java.util.UUID;

import org.springframework.boot.SpringApplication;
import org.springframework.boot.autoconfigure.SpringBootApplication;
import org.springframework.context.annotation.Bean;
import org.springframework.context.annotation.Configuration;
import org.springframework.core.annotation.Order;
import org.springframework.security.config.Customizer;
import org.springframework.security.config.annotation.web.builders.HttpSecurity;
import org.springframework.security.core.userdetails.User;
import org.springframework.security.core.userdetails.UserDetailsService;
import org.springframework.security.crypto.factory.PasswordEncoderFactories;
import org.springframework.security.crypto.password.PasswordEncoder;
import org.springframework.security.oauth2.core.AuthorizationGrantType;
import org.springframework.security.oauth2.core.ClientAuthenticationMethod;
import org.springframework.security.oauth2.server.authorization.client.InMemoryRegisteredClientRepository;
import org.springframework.security.oauth2.server.authorization.client.RegisteredClient;
import org.springframework.security.oauth2.server.authorization.client.RegisteredClientRepository;
import org.springframework.security.oauth2.server.authorization.config.annotation.web.configuration.OAuth2AuthorizationServerConfiguration;
import org.springframework.security.oauth2.server.authorization.config.annotation.web.configurers.OAuth2AuthorizationServerConfigurer;
import org.springframework.security.oauth2.server.authorization.settings.AuthorizationServerSettings;
import org.springframework.security.provisioning.InMemoryUserDetailsManager;
import org.springframework.security.web.SecurityFilterChain;
import org.springframework.web.bind.annotation.RequestMapping;
import org.springframework.web.bind.annotation.RestController;

import com.nimbusds.jose.jwk.JWKSet;
import com.nimbusds.jose.jwk.RSAKey;
import com.nimbusds.jose.jwk.source.ImmutableJWKSet;
import com.nimbusds.jose.jwk.source.JWKSource;
import com.nimbusds.jose.proc.SecurityContext;

@SpringBootApplication
@RestController
public class AuthserverApplication {

	@RequestMapping("/user")
	public Principal user(Principal user) {
		return user;
	}

	public static void main(String[] args) {
		SpringApplication.run(AuthserverApplication.class, args);
	}

	@Configuration
	public static class SecurityConfig {

		@Bean
		@Order(1)
		public SecurityFilterChain authorizationServerSecurityFilterChain(HttpSecurity http) throws Exception {
			OAuth2AuthorizationServerConfiguration.applyDefaultSecurity(http);
			http.getConfigurer(OAuth2AuthorizationServerConfigurer.class)
				.oidc(Customizer.withDefaults());
			http.formLogin(Customizer.withDefaults());
			return http.build();
		}

		@Bean
		@Order(2)
		public SecurityFilterChain defaultSecurityFilterChain(HttpSecurity http) throws Exception {
			http
				.authorizeHttpRequests(authorize -> authorize.anyRequest().authenticated())
				.formLogin(Customizer.withDefaults());
			return http.build();
		}

		@Bean
		public PasswordEncoder passwordEncoder() {
			return PasswordEncoderFactories.createDelegatingPasswordEncoder();
		}

		@Bean
		public UserDetailsService userDetailsService(PasswordEncoder encoder) {
			return new InMemoryUserDetailsManager(
				User.withUsername("user").password(encoder.encode("password")).roles("USER").build()
			);
		}

		@Bean
		public RegisteredClientRepository registeredClientRepository(PasswordEncoder encoder) {
			RegisteredClient client = RegisteredClient.withId(UUID.randomUUID().toString())
				.clientId("acme")
				.clientSecret(encoder.encode("acmesecret"))
				.clientAuthenticationMethod(ClientAuthenticationMethod.CLIENT_SECRET_BASIC)
				.authorizationGrantType(AuthorizationGrantType.AUTHORIZATION_CODE)
				.authorizationGrantType(AuthorizationGrantType.REFRESH_TOKEN)
				.redirectUri("http://localhost:8080/login/oauth2/code/acme")
				.scope("openid")
				.build();
			return new InMemoryRegisteredClientRepository(client);
		}

		@Bean
		public JWKSource<SecurityContext> jwkSource() {
			KeyPair keyPair = generateRsaKey();
			RSAPublicKey publicKey = (RSAPublicKey) keyPair.getPublic();
			RSAPrivateKey privateKey = (RSAPrivateKey) keyPair.getPrivate();
			RSAKey rsaKey = new RSAKey.Builder(publicKey)
				.privateKey(privateKey)
				.keyID(UUID.randomUUID().toString())
				.build();
			JWKSet jwkSet = new JWKSet(rsaKey);
			return new ImmutableJWKSet<>(jwkSet);
		}

		private static KeyPair generateRsaKey() {
			try {
				KeyPairGenerator keyPairGenerator = KeyPairGenerator.getInstance("RSA");
				keyPairGenerator.initialize(2048);
				return keyPairGenerator.generateKeyPair();
			} catch (Exception ex) {
				throw new IllegalStateException(ex);
			}
		}

		@Bean
		public AuthorizationServerSettings authorizationServerSettings() {
			return AuthorizationServerSettings.builder().build();
		}
	}
}
The key components are:
-
Two
SecurityFilterChainbeans: Order 1 applies OAuth2 authorization server defaults and enables OIDC; Order 2 handles form-based user authentication -
RegisteredClientRepository: Registers the "acme" client with its secret, grant types, redirect URI, and scopes -
JWKSource: Provides RSA keys for signing JWT tokens -
UserDetailsService: Defines in-memory users for authentication
Now let’s get it running on port 9999, with a predictable password for testing:
application.properties
server.port: 9999
spring.security.user.password: password
logging.level.org.springframework.security: DEBUG
server.servlet.session.cookie.name: AUTHSESSIONID
We set server.servlet.session.cookie.name=AUTHSESSIONID so that the authorization server’s session cookie doesn’t collide with the UI application’s JSESSIONID cookie, since both run on localhost. |
So, let’s get the server running and we can make sure it is working:
$ mvn spring-boot:runor start the main() method in your IDE.
Testing the Authorization Server
Our server is using form-based login, so it will be protected and show a login page. To initiate an authorization code token grant you visit the authorization endpoint, e.g. at http://localhost:9999/oauth2/authorize?response_type=code&client_id=acme&scope=openid&redirect_uri=http://localhost:8080/login/oauth2/code/acme once you have authenticated you will get a redirect with an authorization code attached, e.g. ?code=jYWioI.
| for the purposes of this sample application we have created a client "acme" with a specific registered redirect URI. In a production application you should always register redirect URIs (and use HTTPS). |
The code can be exchanged for an access token using the "acme" client credentials on the token endpoint:
$ curl acme:acmesecret@localhost:9999/oauth2/token  \
-d grant_type=authorization_code -d client_id=acme     \
-d redirect_uri=http://localhost:8080/login/oauth2/code/acme -d code=jYWioI
{"access_token":"eyJra...","token_type":"Bearer","expires_in":299,...}
The access token is a JWT, backed by the RSA keys configured in the server. We also get a refresh token that we can use to get a new access token when the current one expires.
Changing the Resource Server
If we follow on from Part IV, our resource server is using Spring Session for authentication, so we can take that out and replace it with Spring OAuth2 Resource Server. We also need to remove the Spring Session and Redis dependencies, so replace this:
pom.xml
<dependency>
  <groupId>org.springframework.session</groupId>
  <artifactId>spring-session</artifactId>
</dependency>
<dependency>
  <groupId>org.springframework.boot</groupId>
  <artifactId>spring-boot-starter-redis</artifactId>
</dependency>
with this:
pom.xml
<dependency>
  <groupId>org.springframework.boot</groupId>
  <artifactId>spring-boot-starter-oauth2-resource-server</artifactId>
</dependency>
and then configure the security filter chain to use JWT validation:
ResourceApplication.java
package demo;

import java.util.UUID;

import org.springframework.boot.SpringApplication;
import org.springframework.boot.autoconfigure.SpringBootApplication;
import org.springframework.context.annotation.Bean;
import org.springframework.security.config.Customizer;
import org.springframework.security.config.annotation.web.builders.HttpSecurity;
import org.springframework.security.web.SecurityFilterChain;
import org.springframework.web.bind.annotation.RequestMapping;
import org.springframework.web.bind.annotation.RestController;

@SpringBootApplication
@RestController
public class ResourceApplication {

	@RequestMapping("/")
	public Message home() {
		return new Message("Hello World");
	}

	@Bean
	public SecurityFilterChain filterChain(HttpSecurity http) throws Exception {
		http
			.authorizeHttpRequests(authorize -> authorize
				.anyRequest().authenticated())
			.oauth2ResourceServer(oauth2 -> oauth2.jwt(Customizer.withDefaults()));
		return http.build();
	}

	public static void main(String[] args) {
		SpringApplication.run(ResourceApplication.class, args);
	}

}

class Message {
	private String id = UUID.randomUUID().toString();
	private String content;

	Message() {
	}

	public Message(String content) {
		this.content = content;
	}

	public String getId() {
		return id;
	}

	public String getContent() {
		return content;
	}
}
With that change the app is ready to challenge for an access token instead of HTTP Basic, but we need a config change to actually finish the process. We are going to add a small amount of external configuration (in "application.properties") to allow the resource server to validate the tokens it is given:
application.properties
server.port: 9000
server.address: 127.0.0.1
spring.security.oauth2.resourceserver.jwt.jwk-set-uri: http://localhost:9999/oauth2/jwks
This tells the server to use the authorization server’s JWK Set endpoint to obtain the public keys for validating JWT signatures.
Run the application and hit the home page with a command line client:
$ curl -v localhost:9000
> GET / HTTP/1.1
> User-Agent: curl/7.35.0
> Host: localhost:9000
> Accept: */*
>
< HTTP/1.1 401 Unauthorized
...
< WWW-Authenticate: Bearer
...
and you will see a 401 with a "WWW-Authenticate" header indicating that it wants a bearer token.
| JWT validation using a JWK Set URI is efficient because the resource server can validate tokens locally using the public key, without making a network call for each request. The keys are cached and refreshed periodically. |
Implementing the User Endpoint
On the authorization server we can easily add that endpoint:
AuthserverApplication.java
@SpringBootApplication
@RestController
public class AuthserverApplication {

  @RequestMapping("/user")
  public Principal user(Principal user) {
    return user;
  }

  ...

}
We added a @RequestMapping the same as the UI server in Part II.
With that endpoint in place we can test it and the greeting resource, since they both now accept bearer tokens that were created by the authorization server:
$ TOKEN=eyJra...
$ curl -H "Authorization: Bearer $TOKEN" localhost:9000
{"id":"03af8be3-2fc3-4d75-acf7-c484d9cf32b1","content":"Hello World"}
$ curl -H "Authorization: Bearer $TOKEN" localhost:9999/user
{"details":...,"principal":{"username":"user",...},"name":"user"}
(substitute the value of the access token that you obtain from your own authorization server to get that working yourself).
The UI Server
The final piece of this application we need to complete is the UI server, extracting the authentication part and delegating to the authorization server. So, as with the resource server, we first need to remove the Spring Session and Redis dependencies and replace them with Spring OAuth2 Client. We also need Spring Cloud Gateway to proxy requests to the backend:
pom.xml
<dependency>
  <groupId>org.springframework.boot</groupId>
  <artifactId>spring-boot-starter-oauth2-client</artifactId>
</dependency>
<dependency>
  <groupId>org.springframework.cloud</groupId>
  <artifactId>spring-cloud-starter-gateway-server-webmvc</artifactId>
</dependency>
Once that is done we can configure the application to use OAuth2 login and set up the security filter chain:
UiApplication.java
package demo;

import jakarta.servlet.FilterChain;
import jakarta.servlet.ServletException;
import jakarta.servlet.http.HttpServletRequest;
import jakarta.servlet.http.HttpServletResponse;
import java.io.IOException;

import org.springframework.boot.SpringApplication;
import org.springframework.boot.autoconfigure.SpringBootApplication;
import org.springframework.context.annotation.Bean;
import org.springframework.security.config.Customizer;
import org.springframework.security.config.annotation.web.builders.HttpSecurity;
import org.springframework.security.web.SecurityFilterChain;
import org.springframework.security.web.authentication.www.BasicAuthenticationFilter;
import org.springframework.security.web.csrf.CookieCsrfTokenRepository;
import org.springframework.security.web.csrf.CsrfToken;
import org.springframework.security.web.csrf.CsrfTokenRequestAttributeHandler;
import org.springframework.web.filter.OncePerRequestFilter;

@SpringBootApplication
public class UiApplication {

    public static void main(String[] args) {
        SpringApplication.run(UiApplication.class, args);
    }

    @Bean
    public SecurityFilterChain filterChain(HttpSecurity http) throws Exception {
        CsrfTokenRequestAttributeHandler requestHandler = new CsrfTokenRequestAttributeHandler();
        http
            .oauth2Login(Customizer.withDefaults())
            .logout(logout -> logout.logoutSuccessUrl("/"))
            .authorizeHttpRequests(authorize -> authorize
                .requestMatchers("/index.html", "/", "/login", "/*.js", "/*.css", "/assets/**", "/favicon.ico").permitAll()
                .anyRequest().authenticated())
            .csrf(csrf -> csrf
                .csrfTokenRepository(CookieCsrfTokenRepository.withHttpOnlyFalse())
                .csrfTokenRequestHandler(requestHandler))
            .addFilterAfter(new CsrfCookieFilter(), BasicAuthenticationFilter.class);
        return http.build();
    }

    private static final class CsrfCookieFilter extends OncePerRequestFilter {
        @Override
        protected void doFilterInternal(HttpServletRequest request, HttpServletResponse response,
                FilterChain filterChain) throws ServletException, IOException {
            CsrfToken csrfToken = (CsrfToken) request.getAttribute(CsrfToken.class.getName());
            if (csrfToken != null) {
                csrfToken.getToken();
            }
            filterChain.doFilter(request, response);
        }
    }
}
The main features are:
-
oauth2Login(): Enables OAuth2/OIDC login - Spring Security handles the entire authorization code flow -
Static resources permitted: Angular’s compiled assets (
.js,.css) must be accessible without authentication -
CSRF configuration: Uses
CsrfTokenRequestAttributeHandlerto disable BREACH protection, andCsrfCookieFilterto eagerly load the CSRF token for the Angular app
The explicit logout() configuration explicitly adds a success url that is unprotected, so that an XHR request to /logout will return successfully.
There is also mandatory external configuration for the OAuth2 client to be able to contact and authenticate with the right authorization server. So we need this in application.yml:
application.yml
spring:
  aop:
    proxy-target-class: true
  web:
    resources:
      static-locations: classpath:/static/browser/
  security:
    oauth2:
      client:
        registration:
          acme:
            client-id: acme
            client-secret: acmesecret
            authorization-grant-type: authorization_code
            redirect-uri: "{baseUrl}/login/oauth2/code/{registrationId}"
            scope: openid
        provider:
          acme:
            authorization-uri: http://localhost:9999/oauth2/authorize
            token-uri: http://localhost:9999/oauth2/token
            jwk-set-uri: http://localhost:9999/oauth2/jwks
            user-info-uri: http://localhost:9999/userinfo
  cloud:
    gateway:
      mvc:
        routes:
          - id: resource
            uri: http://localhost:9000
            predicates:
              - Path=/resource/**
            filters:
              - StripPrefix=1
              - TokenRelay
          - id: user
            uri: http://localhost:9999
            predicates:
              - Path=/user/**
            filters:
              - TokenRelay

logging:
  level:
    org.springframework.security: DEBUG
    org.springframework.web: DEBUG
The bulk of that is about the OAuth2 client ("acme") and the authorization server locations. The gateway routes configuration proxies /resource/ to the resource server and /user/ to the authorization server, using the TokenRelay filter to forward the access token.
In the Client
There are some tweaks to the UI application on the front end that we still need to make to trigger the redirect to the authorization server. In this simple demo we can strip the Angular app down to its bare essentials so you can see what is going on more clearly. So we forgo, for now, the use of forms or routes, and we go back to a single Angular component:
app.component.ts
import { Component, inject } from '@angular/core';
import { HttpClient } from '@angular/common/http';
import { finalize } from 'rxjs/operators';

@Component({
  selector: 'app-root',
  standalone: true,
  templateUrl: './app.component.html',
  styleUrls: ['./app.component.css']
})
export class AppComponent {
  private http = inject(HttpClient);

  title = 'Demo';
  authenticated = false;
  greeting: { id?: string; content?: string } = {};

  constructor() {
    this.authenticate();
  }

  authenticate() {
    this.http.get<{ name?: string }>('user').subscribe({
      next: (response) => {
        if (response['name']) {
          this.authenticated = true;
          this.http.get<{ id?: string; content?: string }>('resource').subscribe(data => this.greeting = data);
        } else {
          this.authenticated = false;
        }
      },
      error: () => {
        this.authenticated = false;
      }
    });
  }

  logout() {
    this.http.post('logout', {}).pipe(
      finalize(() => {
        this.authenticated = false;
      })
    ).subscribe();
  }
}
The AppComponent handles everything, fetching the user details and, if successful, the greeting. It also provides the logout function.
Now we need to create the template for this new component:
app.component.html
<div class="container">
  <ul class="nav nav-pills">
    <li class="nav-item"><a class="nav-link">Home</a></li>
    <li class="nav-item"><a class="nav-link" href="login">Login</a></li>
    <li class="nav-item"><a class="nav-link" (click)="logout()">Logout</a></li>
  </ul>
</div>
<div class="container">
<h1>Greeting</h1>
<div [hidden]="!authenticated">
	<p>The ID is {{greeting.id}}</p>
	<p>The content is {{greeting.content}}</p>
</div>
<div [hidden]="authenticated">
	<p>Login to see your greeting</p>
</div>
and include it in the home page as <app-root/>.
Note that the navigation link for "Login" is a regular link with an href (not an Angular route). The "/login" endpoint that this goes to is handled by Spring Security and if the user is not authenticated it will result in a redirect to the authorization server.
How Does it Work?
Run all the servers together now, and visit the UI in a browser at http://localhost:8080. Click on the "login" link and you will be redirected to the authorization server to authenticate (form login) and approve the token grant, before being redirected to the home page in the UI with the greeting fetched from the OAuth2 resource server using the same token as we authenticated the UI with.
The interactions between the browser and the backend can be seen in your browser if you use some developer tools (usually F12 opens this up, works in Chrome by default, may require a plugin in Firefox). Here’s a summary:
| Verb | Path | Status | Response |
|---|---|---|---|
|
GET |
/ |
200 |
index.html |
|
GET |
/*.js |
200 |
Assets from angular |
|
GET |
/user |
302 |
Redirect to login page |
|
GET |
/login |
302 |
Redirect to auth server |
|
GET |
(authserver)/oauth2/authorize |
302 |
Redirect to login form |
|
GET |
(authserver)/login |
200 |
Login form |
|
POST |
(authserver)/login |
302 |
Redirect to authorize |
|
GET |
(authserver)/oauth2/authorize |
302 |
User approves grant, redirect to /login/oauth2/code/acme |
|
GET |
/login/oauth2/code/acme |
302 |
Exchange code for token, redirect to home page |
|
GET |
/user |
200 |
(Proxied) JSON authenticated user |
|
GET |
/resource |
200 |
(Proxied) JSON greeting |
The requests prefixed with (authserver) are to the authorization server. The TokenRelay filter in Spring Cloud Gateway takes care of forwarding the access token to the proxied backends.
| Try to use a different browser for testing so that there is no chance of authentication crossover (e.g. use Firefox if you used Chrome for testing the UI). |
The Logout Experience
If you click on the "logout" link you will see that the home page changes (the greeting is no longer displayed) so the user is no longer authenticated with the UI server. Click back on "login" though and you actually don’t need to go back through the authentication and approval cycle in the authorization server (because you haven’t logged out of that). Opinions will be divided as to whether that is a desirable user experience, and it’s a notoriously tricky problem (Single Sign Out: Science Direct article and Shibboleth docs). The ideal user experience might not be technically feasible, and you also have to be suspicious sometimes that users really want what they say they want. "I want 'logout' to log me out" sounds simple enough, but the obvious response is, "Logged out of what? Do you want to be logged out of all the systems controlled by this SSO server, or just the one that you clicked the 'logout' link in?" If you are interested then there is a later section of this tutorial where it is discussed in more depth.
Conclusion
This is almost the end of our shallow tour through the Spring Security and Angular stack. We have a nice architecture now with clear responsibilities in three separate components, UI/API Gateway, resource server and authorization server/token granter. The amount of non-business code in all layers is now minimal, and it’s easy to see where to extend and improve the implementation with more business logic. The next steps will be to tidy up the UI in our authorization server, and probably add some more tests, including tests on the JavaScript client. Another interesting task is to extract all the boiler plate code and put it in a library (e.g. "spring-security-angular") containing Spring Security and Spring Session autoconfiguration and some webjars resources for the navigation controller in the Angular piece. Having read the sections in this series, anyone who was hoping to learn the inner workings of either Angular or Spring Security will probably be disappointed, but if you wanted to see how they can work well together and how a little bit of configuration can go a long way, then hopefully you will have had a good experience.
The next section in the series is about access decisions (beyond authentication) and employs multiple UI applications behind the same proxy.
Addendum: Bootstrap UI and JWT Tokens for the Authorization Server
You will find another version of this application in the source code in Github which has a pretty login page and user approval page implemented similarly to the way we did the login page in Part II. It also uses JWT to encode the tokens, so instead of using the "/user" endpoint, the resource server can pull enough information out of the token itself to do a simple authentication. The browser client still uses it, proxied through the UI server, so that it can determine if a user is authenticated (it doesn’t need to do that very often, compared to the likely number of calls to a resource server in a real application).
Multiple UI Applications and a Gateway
In this section we continue our discussion of how to use Spring Security with Angular in a "single page application". Here we show how to use Spring Session together with Spring Cloud Gateway to combine the features of the systems we built in parts II and IV, and actually end up building three single page applications with quite different responsibilities. The aim is to build a Gateway (like in part IV) that is used not only for API resources but also to load the UI from a backend server. We simplify the token-wrangling bits of part II by using the Gateway to pass through the authentication to the backends. Then we extend the system to show how we can make local, granular access decisions in the backends, while still controlling identity and authentication at the Gateway. This is a very powerful model for building distributed systems in general, and has a number of benefits that we can explore as we introduce the features in the code we build.
Reminder: if you are working through this section with the sample application, be sure to clear your browser cache of cookies and HTTP Basic credentials. In Chrome the best way to do that is to open a new incognito window.
Target Architecture
Here’s a picture of the basic system we are going to build to start with:
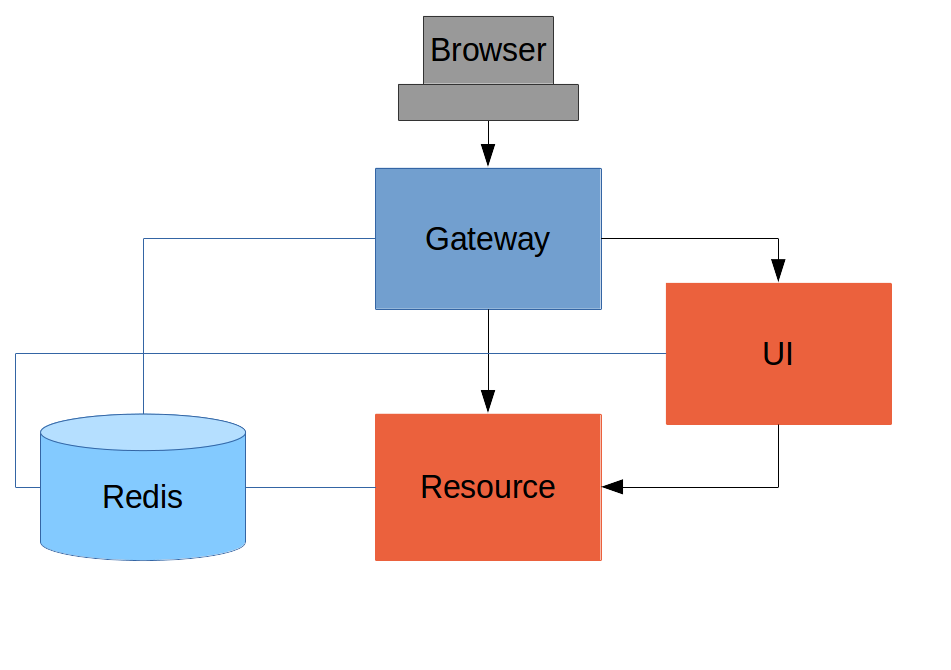
Like the other sample applications in this series it has a UI (HTML and JavaScript) and a Resource server. Like the sample in Section IV it has a Gateway, but here it is separate, not part of the UI. The UI effectively becomes part of the backend, giving us even more choice to re-configure and re-implement features, and also bringing other benefits as we will see.
The browser goes to the Gateway for everything and it doesn’t have to know about the architecture of the backend (fundamentally, it has no idea that there is a back end). One of the things the browser does in this Gateway is authentication, e.g. it sends a username and password like in Section II, and it gets a cookie in return. On subsequent requests it presents the cookie automatically and the Gateway passes it through to the backends. No code needs to be written on the client to enable the cookie passing. The backends use the cookie to authenticate and because all components share a session they share the same information about the user. Contrast this with Section V where the cookie had to be converted to an access token in the Gateway, and the access token then had to be independently decoded by all the backend components.
As in Section IV the Gateway simplifies the interaction between clients and servers, and it presents a small, well-defined surface on which to deal with security. For example, we don’t need to worry about Cross Origin Resource Sharing, which is a welcome relief since it is easy to get wrong.
The source code for the complete project we are going to build is in Github here, so you can just clone the project and work directly from there if you want. There is an extra component in the end state of this system ("double-admin") so ignore that for now.
How Shared Session Authentication Works
Before diving into the code, let’s understand the key architectural concept: shared session authentication.
-
The Gateway authenticates users (via HTTP Basic in this example) and stores the authenticated
SecurityContextin a Redis-backed session. -
A SESSION cookie is sent to the browser containing the session ID.
-
When the browser makes requests through the Gateway to backend services, the SESSION cookie is forwarded.
-
Backend services use Spring Session with the same Redis instance to look up the shared session and find the already-authenticated user.
-
No credentials are forwarded to backends - they simply read the
SecurityContextfrom the shared session.
This approach requires some specific configuration in Spring Security 6, which we’ll cover below.
Prerequisites
You’ll need Redis running locally for session storage:
docker run -p 6379:6379 redisThe Gateway
The Gateway is a Spring Boot application with Spring Cloud Gateway MVC that proxies requests to backend services and handles authentication.
Dependencies
The Gateway needs these key dependencies:
-
spring-boot-starter-web- for servlet-based web application -
spring-cloud-starter-gateway-server-webmvc- for routing/proxying -
spring-boot-starter-security- for authentication -
spring-session-data-redis- for shared sessions
Route Configuration
Routes are configured in application.yml using Spring Cloud Gateway MVC properties:
gateway/src/main/resources/application.yml
spring:
  session:
    store-type: redis
  cloud:
    gateway:
      mvc:
        routes:
          - id: ui
            uri: http://localhost:8081
            predicates:
              - Path=/ui/**
            filters:
              - StripPrefix=1
          - id: admin
            uri: http://localhost:8082
            predicates:
              - Path=/admin/**
            filters:
              - StripPrefix=1
          - id: resource
            uri: http://localhost:9000
            predicates:
              - Path=/resource/**
            filters:
              - StripPrefix=1
There are three routes in the proxy: one each for the UI, Admin, and Resource server. The StripPrefix=1 filter removes the first path segment (e.g., /ui/user becomes /user when forwarded to the UI backend).
Security Configuration
The Gateway’s security configuration handles authentication and CSRF for the Angular SPA:
gateway/src/main/java/demo/GatewayApplication.java (Security Configuration)
@Configuration
protected static class SecurityConfiguration {

  @Bean
  public PasswordEncoder passwordEncoder() {
    return PasswordEncoderFactories.createDelegatingPasswordEncoder();
  }

  @Bean
  public UserDetailsService userDetailsService(PasswordEncoder encoder) {
    InMemoryUserDetailsManager manager = new InMemoryUserDetailsManager();
    manager.createUser(User.withUsername("user").password(encoder.encode("password")).roles("USER").build());
    manager.createUser(User.withUsername("admin").password(encoder.encode("admin")).roles("USER", "ADMIN", "READER", "WRITER").build());
    manager.createUser(User.withUsername("audit").password(encoder.encode("audit")).roles("USER", "ADMIN", "READER").build());
    return manager;
  }

  @Bean
  public SecurityFilterChain filterChain(HttpSecurity http) throws Exception {
    http
      .httpBasic((basic) -> basic
        .securityContextRepository(new HttpSessionSecurityContextRepository())
      )
      .logout(Customizer.withDefaults())
      .authorizeHttpRequests(authorize -> authorize
        .requestMatchers("/index.html", "/", "/*.js", "/*.css", "/*.ico", "/*.txt", "/*.json").permitAll()
        .anyRequest().authenticated())
      .csrf(csrf -> csrf
        .csrfTokenRepository(CookieCsrfTokenRepository.withHttpOnlyFalse())
        .csrfTokenRequestHandler(new CsrfTokenRequestAttributeHandler()))
      .addFilterAfter(new CsrfCookieFilter(), CsrfFilter.class);
    return http.build();
  }

}
Key points:
-
HttpSessionSecurityContextRepository: In Spring Security 6, theSecurityContextis no longer automatically saved to the session. We explicitly configure this to ensure the authenticated user is stored in the Redis-backed session. -
CsrfTokenRequestAttributeHandler: Disables BREACH protection for CSRF tokens, allowing the Angular app to read the token directly from the cookie. -
CsrfCookieFilter: In Spring Security 6, CSRF tokens are lazily loaded. This filter eagerly loads the token so it’s written to the cookie on every response.
The CsrfCookieFilter is a simple filter that forces the CSRF token to be loaded:
gateway/src/main/java/demo/GatewayApplication.java (CSRF Filter)
/**
 * Filter that eagerly loads the CSRF token, causing it to be written to the cookie.
 * Required for SPAs in Spring Security 6 where the token is lazily loaded by default.
 */
final class CsrfCookieFilter extends OncePerRequestFilter {

  @Override
  protected void doFilterInternal(HttpServletRequest request, HttpServletResponse response, FilterChain filterChain)
      throws ServletException, IOException {
    CsrfToken csrfToken = (CsrfToken) request.getAttribute(CsrfToken.class.getName());
    if (csrfToken != null) {
      // Render the token value to a cookie by causing the deferred token to be loaded
      csrfToken.getToken();
    }
    filterChain.doFilter(request, response);
  }
}
User Accounts
For this sample, user accounts are defined in-memory in the Gateway:
gateway/src/main/java/demo/GatewayApplication.java (User Details)
public UserDetailsService userDetailsService(PasswordEncoder encoder) {
  InMemoryUserDetailsManager manager = new InMemoryUserDetailsManager();
  manager.createUser(User.withUsername("user").password(encoder.encode("password")).roles("USER").build());
  manager.createUser(User.withUsername("admin").password(encoder.encode("admin")).roles("USER", "ADMIN", "READER", "WRITER").build());
  manager.createUser(User.withUsername("audit").password(encoder.encode("audit")).roles("USER", "ADMIN", "READER").build());
  return manager;
}| In a production system the user account data would be managed in a backend database (most likely a directory service), not hard coded in the Spring configuration. |
The /user Endpoint
The Gateway exposes a /user endpoint that returns the authenticated user’s name and roles:
gateway/src/main/java/demo/GatewayApplication.java
@RequestMapping("/user")
@ResponseBody
public Map<String, Object> user(Principal user) {
  Map<String, Object> map = new LinkedHashMap<String, Object>();
  map.put("name", user.getName());
  map.put("roles", AuthorityUtils.authorityListToSet(((Authentication) user).getAuthorities()));
  return map;
}
The UI Backend
The UI backend is a simple Spring Boot application that serves an Angular SPA and provides a /user endpoint.
Security Configuration
The UI backend does NOT authenticate users itself. Instead, it reads the authenticated user from the shared Redis session:
ui/src/main/java/demo/UiApplication.java
@Configuration
protected static class SecurityConfiguration {

  @Bean
  public SecurityFilterChain filterChain(HttpSecurity http) throws Exception {
    http
      .sessionManagement(session -> session.sessionCreationPolicy(SessionCreationPolicy.NEVER))
      .authorizeHttpRequests(authorize -> authorize
        .requestMatchers("/", "/index.html").permitAll()
        .anyRequest().hasRole("USER")
      );
    return http.build();
  }
}
Key points:
-
No
httpBasic(): The UI doesn’t authenticate - it relies on the Gateway. -
SessionCreationPolicy.NEVER: The UI never creates sessions; it only reads existing ones from Redis.
Application Configuration
ui/src/main/resources/application.yml
server:
  port: 8081
spring:
  session:
    store-type: redis
  web:
    resources:
      static-locations: classpath:/static/browser/
logging:
  level:
    org.springframework.security: DEBUG
The spring.session.store-type: redis is essential - it tells Spring Session to use the same Redis instance as the Gateway.
Angular Application
The UI’s Angular application checks if the user is authenticated and fetches a greeting from the Resource server:
ui/src/app/app.component.ts
import { Component, inject } from '@angular/core';
import { HttpClient } from '@angular/common/http';

@Component({
  selector: 'app-root',
  standalone: true,
  templateUrl: './app.component.html',
  styleUrls: ['./app.component.css']
})
export class AppComponent {
  private http = inject(HttpClient);

  title = 'Demo';
  greeting: { id?: string; content?: string } = {};
  authenticated = false;
  user = '';

  constructor() {
    this.http.get<{ name?: string }>('/user').subscribe({
      next: (data) => {
        if (data['name']) {
          this.authenticated = true;
          this.user = data['name'];
          this.http.get<{ id?: string; content?: string }>('/resource').subscribe(response => this.greeting = response);
        } else {
          this.authenticated = false;
        }
      },
      error: () => {
        this.authenticated = false;
      }
    });
  }
}
The Resource Server
The Resource server provides API endpoints and also reads authentication from the shared session:
resource/src/main/java/demo/ResourceApplication.java (Security Configuration)
@Bean
public SecurityFilterChain filterChain(HttpSecurity http) throws Exception {
	http
		// No httpBasic - rely on shared session from Gateway
		.sessionManagement(session -> session.sessionCreationPolicy(SessionCreationPolicy.NEVER))
		.csrf(csrf -> csrf
			.csrfTokenRepository(CookieCsrfTokenRepository.withHttpOnlyFalse())
			.csrfTokenRequestHandler(new CsrfTokenRequestAttributeHandler())
		)
		.authorizeHttpRequests(authorize -> authorize
			.requestMatchers(HttpMethod.POST, "/**").hasRole("WRITER")
			.anyRequest().authenticated());
	return http.build();
}
The Resource server uses SessionCreationPolicy.NEVER and relies on the shared session for authentication.
Up and Running
We now have three components running on three ports:
-
Gateway: http://localhost:8080
-
UI: http://localhost:8081 (accessed via Gateway at /ui/)
-
Resource: http://localhost:9000 (accessed via Gateway at /resource/)
Start Redis and all three applications, then point your browser at http://localhost:8080. You should see a login form. Authenticate as "user/password" and you’ll see links to the UI interface.
| Verb | Path | Status | Response |
|---|---|---|---|
|
GET |
/ |
200 |
Gateway home page with login form |
|
POST |
/login |
302 |
Authenticate and redirect |
|
GET |
/ui/ |
200 |
UI Angular app (proxied from port 8081) |
|
GET |
/ui/user |
200 |
Authenticated user info |
|
GET |
/resource/ |
200 |
JSON greeting (proxied from port 9000) |
The Gateway Angular Application
The Gateway has its own Angular application that provides a login form and navigation to the backend UIs:
gateway/src/app/app.component.ts
import { Component, inject } from '@angular/core';
import { FormsModule } from '@angular/forms';
import { HttpClient, HttpHeaders } from '@angular/common/http';

@Component({
  selector: 'app-root',
  standalone: true,
  imports: [FormsModule],
  templateUrl: './app.component.html',
  styleUrls: ['./app.component.css']
})
export class AppComponent {
  private http = inject(HttpClient);

  admin = false;
  user = '';
  title = 'Demo';
  credentials = { username: '', password: '' };
  authenticated = false;
  error = false;

  constructor() {
    this.login();
  }

  login() {
    const headers = this.credentials.username
      ? new HttpHeaders().set('authorization', 'Basic ' + btoa(this.credentials.username + ':' + this.credentials.password))
      : new HttpHeaders();

    this.http.get<{ name?: string; roles?: string[] }>('user', { headers }).subscribe({
      next: (data) => {
        this.authenticated = !!(data && data['name']);
        this.user = this.authenticated ? data['name'] || '' : '';
        this.admin = this.authenticated && !!data['roles'] && data['roles'].indexOf('ROLE_ADMIN') > -1;
        this.error = false;
      },
      error: () => {
        this.authenticated = false;
        this.admin = false;
        this.error = true;
      }
    });
    return false;
  }

  logout() {
    this.http.post('logout', {}).subscribe({
      next: () => {
        this.authenticated = false;
        this.admin = false;
      }
    });
  }
}
gateway/src/app/app.component.html
<nav class="navbar navbar-light bg-light">
  <div class="container">
    <a class="navbar-brand" href='#/'>Home</a>
    <div class="ml-auto">
      <a class="btn btn-primary" href="#/login">login</a> <a
        class="btn btn-primary" [hidden]="!authenticated"
        (click)="logout(); $event.preventDefault()">logout</a>
      <span [hidden]="!authenticated">
        Signed in as <a href="#/">{{user}}</a>
      </span>
    </div>
  </div>
</nav>
<div class="alert alert-danger" [hidden]="!error">There was a
problem logging in. Please try again.</div>
<div class="container" [hidden]="authenticated">
  <form role="form" (submit)="login()">
    <div class="form-group">
      <label for="username">Username:</label> <input type="text"
        class="form-control" id="username" name="username"
        [(ngModel)]="credentials.username" />
    </div>
    <div class="form-group">
      <label for="password">Password:</label> <input type="password"
        class="form-control" id="password" name="password"
        [(ngModel)]="credentials.password" />
    </div>
    <button type="submit" class="btn btn-primary">Submit</button>
  </form>
</div>
<div class="container" [hidden]="!authenticated">
  <a class="btn btn-primary" href="/ui/">Go To User Interface</a>
</div>
<br />
<div class="container" [hidden]="!authenticated || !admin">
  <a class="btn btn-primary" href="/admin/">Go To Admin Interface</a>
</div>
The login() function sends credentials via HTTP Basic authentication. On success, the Gateway creates a session and subsequent requests use the SESSION cookie.
Granular Access Decisions in the Backend
Now let’s add an Admin application that requires the "ADMIN" role.
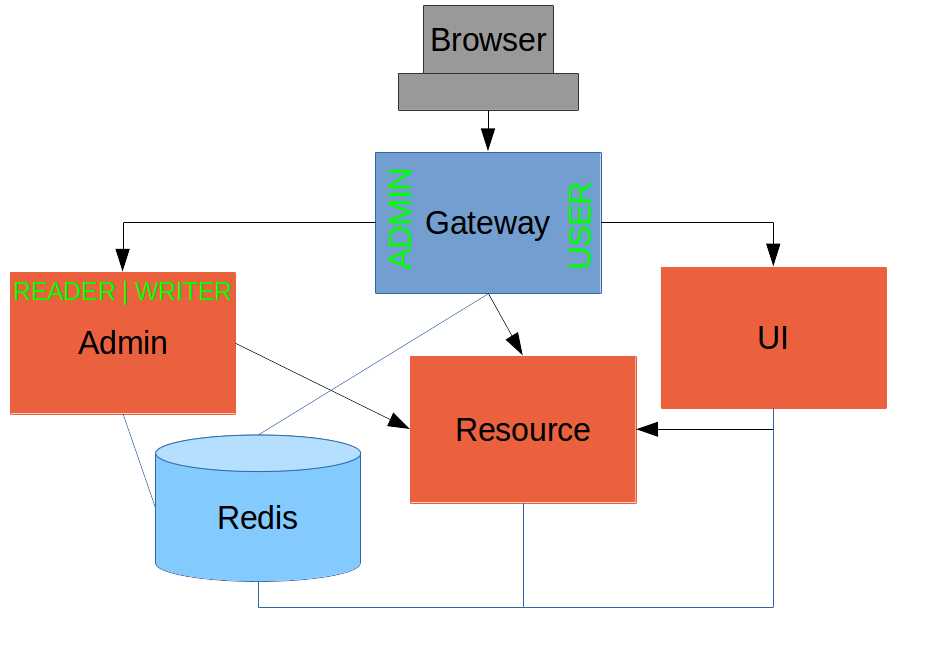
Admin Security Configuration
The Admin application requires the "ADMIN" role in the following way:
admin/src/main/java/demo/AdminApplication.java
@Configuration
protected static class SecurityConfiguration {
  @Bean
  public SecurityFilterChain filterChain(HttpSecurity http) throws Exception {
    http
      .sessionManagement(session -> session.sessionCreationPolicy(SessionCreationPolicy.NEVER))
      .authorizeHttpRequests(authorize -> authorize
        .requestMatchers("/", "/index.html").permitAll()
        .anyRequest().hasRole("ADMIN")
      )
      .csrf(csrf -> csrf.disable());
    return http.build();
  }
}
The /user Endpoint with Roles
The Admin application’s /user endpoint returns roles so the Angular app can make client-side access decisions:
admin/src/main/java/demo/AdminApplication.java
@GetMapping("/user")
@ResponseBody
public Map<String, Object> user(Principal user) {
  Map<String, Object> map = new LinkedHashMap<String, Object>();
  map.put("name", user.getName());
  map.put("roles", AuthorityUtils.authorityListToSet(((Authentication) user).getAuthorities()));
  return map;
}| Role names come back from the "/user" endpoint with the "ROLE_" prefix so we can distinguish them from other kinds of authorities (it’s a Spring Security thing). |
Why are we Here?
Now we have a nice little system with two independent user interfaces and a backend Resource server, all protected by the same authentication in a Gateway. The fact that the Gateway acts as a micro-proxy makes the implementation of the backend security concerns extremely simple, and they are free to concentrate on their own business concerns. The use of Spring Session has (again) avoided a huge amount of hassle and potential errors.
A powerful feature is that the backends can independently have any kind of authentication they like (e.g. you can go directly to the UI if you know its physical address and a set of local credentials). The Gateway imposes a completely unrelated set of constraints, as long as it can authenticate users and assign metadata to them that satisfy the access rules in the backends. This is an excellent design for being able to independently develop and test the backend components.
A bonus feature of this architecture (single Gateway controlling authentication, and shared session token across all components) is that "Single Logout", a feature we identified as difficult to implement in Section V, comes for free. To be more precise, one particular approach to the user experience of single logout is automatically available in our finished system: if a user logs out of any of the UIs (Gateway, UI backend or Admin backend), they are logged out of all the others, assuming that each individual UI implemented a "logout" feature the same way (invalidating the session).
Spring Security 6 Migration Notes
If you’re migrating from an older version of this tutorial, here are the key changes for Spring Security 6:
-
SecurityContext is not automatically saved: You must explicitly configure
HttpSessionSecurityContextRepositoryon authentication mechanisms. -
CSRF tokens are lazily loaded: SPAs need to trigger token loading via a filter like
CsrfCookieFilter. -
BREACH protection is enabled by default: Use
CsrfTokenRequestAttributeHandlerinstead ofXorCsrfTokenRequestAttributeHandlerif your SPA reads the CSRF cookie directly. -
WebSecurityConfigurerAdapteris removed: UseSecurityFilterChainbeans instead. -
security.sessionsproperty is removed: UseSessionCreationPolicyin theSecurityFilterChainconfiguration.
Testing an Angular Application
In this section we continue our discussion of how to use Spring Security with Angular in a "single page application". Here we show how to write and run unit tests for the client-side code using the Angular test framework. You can catch up on the basic building blocks of the application or build it from scratch by reading the first section, or you can just go straight to the source code in Github (the same source code as Part I, but with tests now added). This section actually has very little code using Spring or Spring Security, but it covers the client-side testing in a way that might not be so easy to find in the usual Angular community resources, and one which we feel will be comfortable for the majority of Spring users.
Reminder: if you are working through this section with the sample application, be sure to clear your browser cache of cookies and HTTP Basic credentials. In Chrome the best way to do that for a single server is to open a new incognito window.
Writing a Specification
Our "app" component in the "basic" application is very simple, so it won’t take a lot to test it thoroughly. Here’s a reminder of the code:
app.component.ts
include::basic/src/app/app.component.tsThe main challenge we face is to provide the http object in the test, so we can make assertions about how they are used in the component. Actually, even before we face that challenge we need to be able to create a component instance, so we can test what happens when it loads. Here’s how you can do that.
The Angular build in an app created from ng new already has a spec and some configuration to run it. The generated spec is in "src/app", and it starts like this:
app.component.ts
import { TestBed, async } from '@angular/core/testing';
import { AppComponent } from './app.component';
describe('AppComponent', () => {
  beforeEach(async(() => {
    TestBed.configureTestingModule({
      imports: [],
      declarations: [
        AppComponent
      ]
    }).compileComponents();
  }));
  it('should create the app', async(() => {
    const fixture = TestBed.createComponent(AppComponent);
    const app = fixture.debugElement.componentInstance;
    expect(app).toBeTruthy();
  }));
  ...
}
In this very basic test suite we have these important elements:
-
We
describe()the thing that is being tested (the "AppComponent" in this case) with a function. -
Inside that function we provide a
beforeEach()callback, which loads the Angular component. -
Behaviour is expressed through a call to
it(), where we state in words what the expectation is, and then provide a function that makes assertions. -
The test environment is initialized before anything else happens. This is boilerplate for most Angular apps.
The test function here is so trivial it actually only asserts that the component exists, so if that fails then the test will fail.
Improving the Unit Test: Mocking HTTP Backend
To improve the spec to production grade we need to actually assert something about what happens when the controller loads. Since it makes a call to http.get() we need to mock that call to avoid having to run the whole application just for a unit test. To do that we use the Angular HttpClientTestingModule:
app.component.spec
Unresolved directive in testing.adoc - include::basic/src/app/app.component.spec[indent=0]The new pieces here are:
-
The declaration of the
HttpClientTestingModuleas an imports in theTestBedinbeforeEach(). -
In the test function we set expectations for the backend before we create the component, telling it to expect a call to 'resource/',and what the response should be.
Running the Specs
To run our test" code we can do ./ng test (or ./ng build) using the convenience script created when the project was set up. It also runs as part of the Maven lifecycle, so ./mvnw install is also a good way to run the tests, and this is what will happen in your CI build.
End-to-End Tests
Angular also has a standard build set up for "end-to-end tests" using a browser and your generated JavaScript. These are written as "specs" in the top-level e2e directory. All the samples in this tutorial contain a really simple end-to-end test which run in the Maven lifecycle (hence you will see a browser window popup if you run mvn install in any of the "ui" apps).
Conclusion
Being able to run unit tests for Javascript is important in a modern web application and it’s a topic that we’ve ignored (or dodged) up to now in this series. With this installment we have presented the basic ingredients of how to write the tests, how to run them at development time and also, importantly, in a continuous integration setting. The approach we have taken is not going to suit everyone, so please don’t feel bad about doing it in a different way, but make sure you have all those ingredients. The way we did it here will probably feel comfortable to traditional Java enterprise developers, and integrates well with their existing tools and processes, so if you are in that category I hope you will find it useful as a starting point. More examples of testing with Angular and Jasmine can be found in plenty of places on the internet, but the first point of call might be the "single" sample from this series, which now has some up to date test code which is a bit less trivial than the code we needed to write for the "basic" sample in this tutorial.
Logout from an OAuth2 Client Application
In this section we continue our discussion of how to use Spring Security with Angular in a "single page application". Here we show how to take the OAuth2 samples and add a different logout experience. Many people who implement OAuth2 single sign on find that they have a puzzle to solve of how to logout "cleanly"? The reason it’s a puzzle is that there isn’t a single correct way to do it, and the solution you choose will be determined by the user experience you are looking for, and also the amount of complexity you are willing to take on. The reasons for the complexity stem from the fact that there are potentially multiple browser sessions in the system, all with different backend servers, so when a user logs out from one of them, what should happen to the others? This is the ninth section of a tutorial, and you can catch up on the basic building blocks of the application or build it from scratch by reading the first section, or you can just go straight to the source code in Github.
Logout Patterns
The user experience with logout of the oauth2 sample in this tutorial is that you logout of the UI app, but not from the authserver, so when you log back into the UI app the authserver does not challenge again for credentials. This is completely expected, normal, and desirable when the authserver is external - Google and other external authserver providers neither want nor allow you to logout from their servers from an untrusted application - but it isn’t the best user experience if the authserver is really part of the same system as the UI.
There are, broadly speaking, three patterns for logout from a UI app that is authenticated as an OAuth2 client:
-
External Authserver (EA, the original sample). The user perceives the authserver as a 3rd party (e.g. using Facebook or Google to authenticate). You don’t want to log out of the authserver when the app session ends. You do want approval for all grants. The
oauth2(andoauth2-vanilla) sample from this tutorial implement this pattern. -
Gateway and Internal Authserver (GIA). You only need to log out of 2 apps, and they are part of the same system, as perceived by the user. Usually you want to autoapprove all grants.
-
Single Logout (SL). One authserver and multiple UI apps all with their own authentication, and when the user logs out of one, you want them all to follow suit. Likely to fail with a naive implementation because of network partitions and server failures - you basically need globally consistent storage.
Sometimes, even if you have an external authserver, you want to control the authentication and add an internal layer of access control (e.g. scopes or roles that the authserver doesn’t support). Then it’s a good idea to use the EA for authentication, but have an internal authserver that can add the additional details you need to the tokens. The auth-server sample from this other OAuth2 Tutorial shows you how to do that in a very simple way. You can then apply the GIA or SL patterns to the system that includes the internal authserver.
Here are some options if you don’t want EA:
-
Log out from authserver as well as UI app in browser client. Simple approach and works with some careful CSRF and CORS configuration. No SL.
-
Logout from authserver as soon as a token is available. Hard to implement in the UI, where the token is acquired, because you don’t have the session cookie for the authserver there. An interesting approach is to invalidate the session in the authserver as soon as an auth code is generated. No SL.
-
Proxy authserver through the same gateway as UI and hope that one cookie is enough to manage the state for the whole system. Doesn’t work because unless there is a shared session, which defeats the object to some extent (otherwise there is no session storage for the authserver). SL only if the session is shared between all apps.
-
Cookie relay in gateway. You are using the gateway as the source of truth for authentication, and the authserver has all the state it needs because the gateway manages the cookie instead of the browser. The browser never has a cookie from more than one server. No SL.
-
Use the token as global authentication and invalidate it when user logs out of the UI app. Downside: requires tokens to be invalidated by client apps, which isn’t really what they were designed to do. SL possible, but usual constraints apply.
-
Create and manage a global session token (in addition to the user token) in the authserver. This is the approach taken by OpenId Connect, and it does provide some options for SL, at the cost of some extra machinery. None of the options is immune from the usual distributed system limitations: if networks and application nodes are not stable there are no guarantees that a logout signal is shared among all participants when needed. All of the logout specs are still in draft form, and here are some links to the specs: Session Management, Front Channel Logout, and Back Channel Logout.
Note that where SL is hard or impossible, it might be better to put all the UIs behind a single gateway anyway. Then you can use GIA, which is easier, to control logout from your whole estate.
The easiest two options, which apply nicely in the GIA pattern can be implemented in the tutorial sample as follows (take the oauth2 sample and work from there).
Logout of Both Servers from Browser
It’s quite easy to add a couple of lines of code to the browser client that logout from the authserver as soon as the UI app is logged out:
ui/src/app/app.component.ts
import { Component, inject } from '@angular/core';
import { HttpClient } from '@angular/common/http';
import { finalize } from 'rxjs/operators';

@Component({
  selector: 'app-root',
  standalone: true,
  templateUrl: './app.component.html',
  styleUrls: ['./app.component.css']
})
export class AppComponent {
  private http = inject(HttpClient);

  title = 'Demo';
  authenticated = false;
  greeting: { id?: string; content?: string } = {};

  constructor() {
    this.authenticate();
  }

  authenticate() {
    this.http.get<{ name?: string }>('user').subscribe({
      next: (response) => {
        if (response['name']) {
          this.authenticated = true;
          this.http.get<{ id?: string; content?: string }>('resource').subscribe(data => this.greeting = data);
        } else {
          this.authenticated = false;
        }
      },
      error: () => {
        this.authenticated = false;
      }
    });
  }

  logout() {
    this.http.post('logout', {}).pipe(
      finalize(() => {
        this.authenticated = false;
        this.http.post('http://localhost:9999/logout', {}, {})
            .subscribe(() => {
                console.log('Logged out');
        });
      })
    ).subscribe();
  }
}
In this sample we hardcoded the authserver logout endpoint URL into the TypeScript, but it would be easy to externalize that if you needed to. It has to be a POST directly to the authserver because we want the session cookie to go along too. The XHR request will only go out from the browser with a cookie attached if we specifically ask for withCredentials:true.
Conversely, on the server we need some CORS configuration because the request is coming from a different domain. In the SecurityFilterChain:
authserver/src/main/java/demo/AuthserverApplication.java (Security Configuration)
		)
	*/;
	http.formLogin(Customizer.withDefaults());
	return http.build();
}

@Bean
@Order(2)
public SecurityFilterChain defaultSecurityFilterChain(HttpSecurity http) throws Exception {
	http
		.cors(cors -> cors.configurationSource(configurationSource()))
		.authorizeHttpRequests(authorize -> authorize.anyRequest().authenticated())
		.formLogin(Customizer.withDefaults())
		.oauth2ResourceServer((oauth2) -> oauth2.jwt(Customizer.withDefaults()))
		.csrf((csrf) -> csrf.ignoringRequestMatchers("/logout/**"));
	return http.build();
}

private CorsConfigurationSource configurationSource() {
	UrlBasedCorsConfigurationSource source = new UrlBasedCorsConfigurationSource();
	CorsConfiguration config = new CorsConfiguration();
	config.addAllowedOrigin("*");
The "/logout" endpoint has been given some special treatment. It is allowed to be called from any origin, and explicitly allows credentials (e.g. cookies) to be sent. The allowed headers are just the ones that Angular sends in the sample app.
In addition to the CORS configuration we also need to disable CSRF for the logout endpoint, because Angular will not send the X-XSRF-TOKEN header in a cross-domain request. This is done with .csrfcsrf) → csrf.ignoringRequestMatchers("/logout/**" in the security filter chain configuration shown above.
| Dropping CSRF protection is not really advisable, but you might be prepared to tolerate it for this restricted use case. |
With those two simple changes, one in the UI app client, and one in the authserver, you will find that once you logout of the UI app, when you log back in, you will always be prompted for a password.
Another useful change is to set the OAuth2 client to autoapprove, so that the user doesn’t have to approve the token grant. This is common in an internal authserver, where the user doesn’t perceive it as a separate system. In the RegisteredClientRepository you just need a flag when the client is initialized:
RegisteredClient client = RegisteredClient.withId(UUID.randomUUID().toString())
    .clientId("acme")
    ...
    .clientSettings(ClientSettings.builder().requireAuthorizationConsent(false).build())
    .build();
Invalidate Session in Authserver
If you don’t like to give up the CSRF protection on the logout endpoint, you can try the other easy approach, which is to invalidate the user session in the authserver as soon as a token is granted (actually as soon as an auth code is generated). This is also relatively easy to implement using Spring Authorization Server: customize the authorization endpoint’s success handler. The sample code includes this implementation as comments that you can uncomment to enable this behavior:
authserver/src/main/java/demo/AuthserverApplication.java (Authorization Endpoint Configuration)
// uncomment to invalidate session after issuing authorization code
/*
	.authorizationEndpoint((authorize) -> authorize
		.authorizationResponseHandler(new SessionInvalidatingSuccessHandler())
	)
*/;
authserver/src/main/java/demo/AuthserverApplication.java (Session Invalidating Success Handler)
// uncomment to invalidate session after issuing authorization code
/*
private static class SessionInvalidatingSuccessHandler implements AuthenticationSuccessHandler {
	@Override
	public void onAuthenticationSuccess(HttpServletRequest request, HttpServletResponse response,
										Authentication authentication) throws IOException, ServletException {
		OAuth2AuthorizationCodeRequestAuthenticationToken authCodeRequestAuth =
				(OAuth2AuthorizationCodeRequestAuthenticationToken) authentication;

		// Build the redirect URI with the authorization code
		UriComponentsBuilder uriBuilder = UriComponentsBuilder
				.fromUriString(authCodeRequestAuth.getRedirectUri())
				.queryParam("code", authCodeRequestAuth.getAuthorizationCode().getTokenValue());
		if (authCodeRequestAuth.getState() != null) {
			uriBuilder.queryParam("state", authCodeRequestAuth.getState());
		}
		String redirectUri = uriBuilder.build().toUriString();

		// Send the redirect
		response.sendRedirect(redirectUri);

		// Invalidate the session after the redirect is sent
		HttpSession session = request.getSession(false);
		if (session != null) {
			session.invalidate();
		}
	}
}
*/
This success handler fires when an authorization code is issued and the user is being redirected back to the client. It builds the redirect URI, sends the response, and then invalidates the session.
With this approach, as soon as you authenticate, the session in the authserver is already dead, so there’s no need to try and manage it from the client. When you log out of the UI app, and then log back in, the authserver doesn’t recognize you and prompts for credentials. The downside of this approach is that you don’t really have true single sign on any more - any other apps that are part of your system will find that the authserver session is dead and they have to prompt for authentication again - it isn’t a great user experience if there are multiple apps.
Conclusion
In this section we have seen how to implement a couple of different patterns for logout from an OAuth2 client application (taking as a starting point the application from section five of the tutorial), and some options for other patterns were discussed. These options are not exhaustive, but should give you a good idea of the trade offs involved, and some tools for thinking about the best solution for your use case. There were only couple of lines of TypeScript in this section, and that wasn’t really specific to Angular (it adds a flag to XHR requests), so all the lessons and patterns are applicable beyond the narrow scope of the sample apps in this guide. A recurring theme is that all approaches to single logout (SL) where there are multiple UI apps and a single authserver tend to be flawed in some way: the best you can do is choose the approach that makes your users the least uncomfortable. If you have an internal authserver and a system that is composed of many components, then possibly the only architecture that feels to the user like a single system is a gateway for all user interactions.
Want to write a new guide or contribute to an existing one? Check out our contribution guidelines.
| All guides are released with an ASLv2 license for the code, and an Attribution, NoDerivatives creative commons license for the writing. |