Spring Boot with Kotlin Coroutines and RSocket
The tutorial shows you how to build a simple chat application using Spring Boot and Kotlin. You will learn about the benefits of using Kotlin for server-side development from a syntax perspective.
We’ll start with a minimal implementation of the application, and we will evolve it step by step.At the start, the application will generate and display fake messages and use the classical blocking request-response model to get data to the UI.Through the tutorial, we are going to evolve the application by adding persistence and extensions, and migrating to a non-blocking streaming style for serving the data from the backend to the UI.
The tutorial consists of 5 parts:
-
Part 1: Initial setup and introduction to the project
-
Part 2: Adding persistence and integration tests
-
Part 3: Implementing extensions
-
Part 4: Refactoring to Spring WebFlux with Kotlin Coroutines
-
Part 5: Streaming with RSocket
This tutorial is designed for Java developers who have already had their hands on Spring MVC / WebFlux and want to see how to use Kotlin with Spring.
Part 1: Initial setup and introduction to the project
To start working on this tutorial, we’ll need one of the latest versions of IntelliJ IDEA – any version from 2018.1 onwards.You can download the latest free community version here.
This project is based on Spring Boot 2.4.0, which requires Kotlin 1.4.10. Make sure version 1.4+ of the Kotlin plugin is installed.To update the Kotlin plugin, use Tools | Kotlin | Configure Kotlin Plugin Updates.
Downloading the project
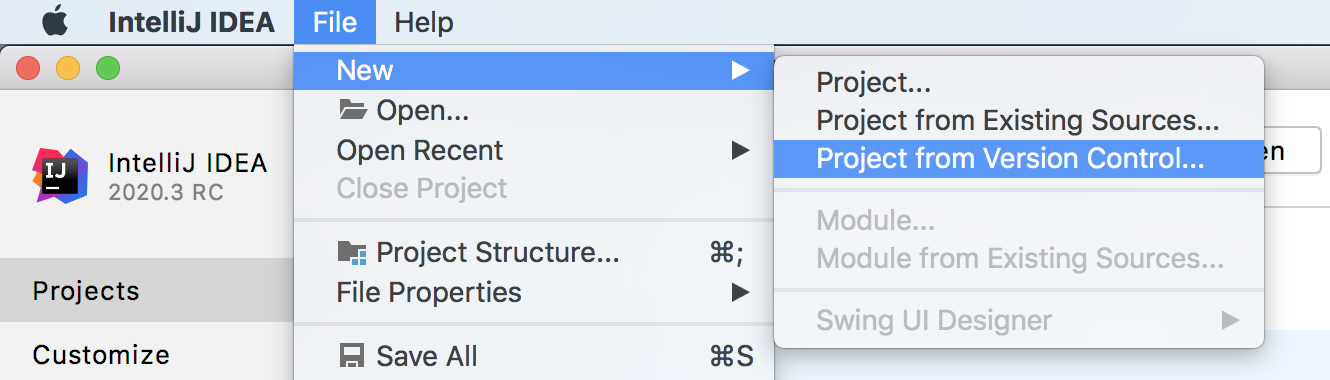
Clone the repository from IntelliJ IDEA by choosing File | New | Project from Version Control.
Specify the project path: https://github.com/kotlin-hands-on/kotlin-spring-chat.
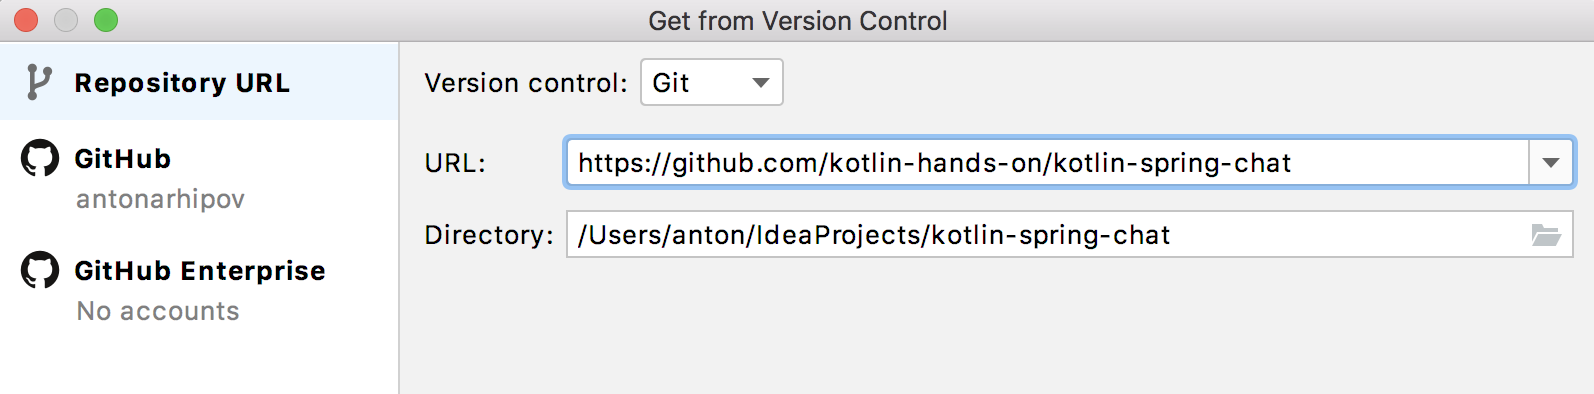
Once you clone the project, IntelliJ IDEA will import and open it automatically. Alternatively, you can clone the project with the command line:
$ git clone https://github.com/kotlin-hands-on/kotlin-spring-chatSolution branches
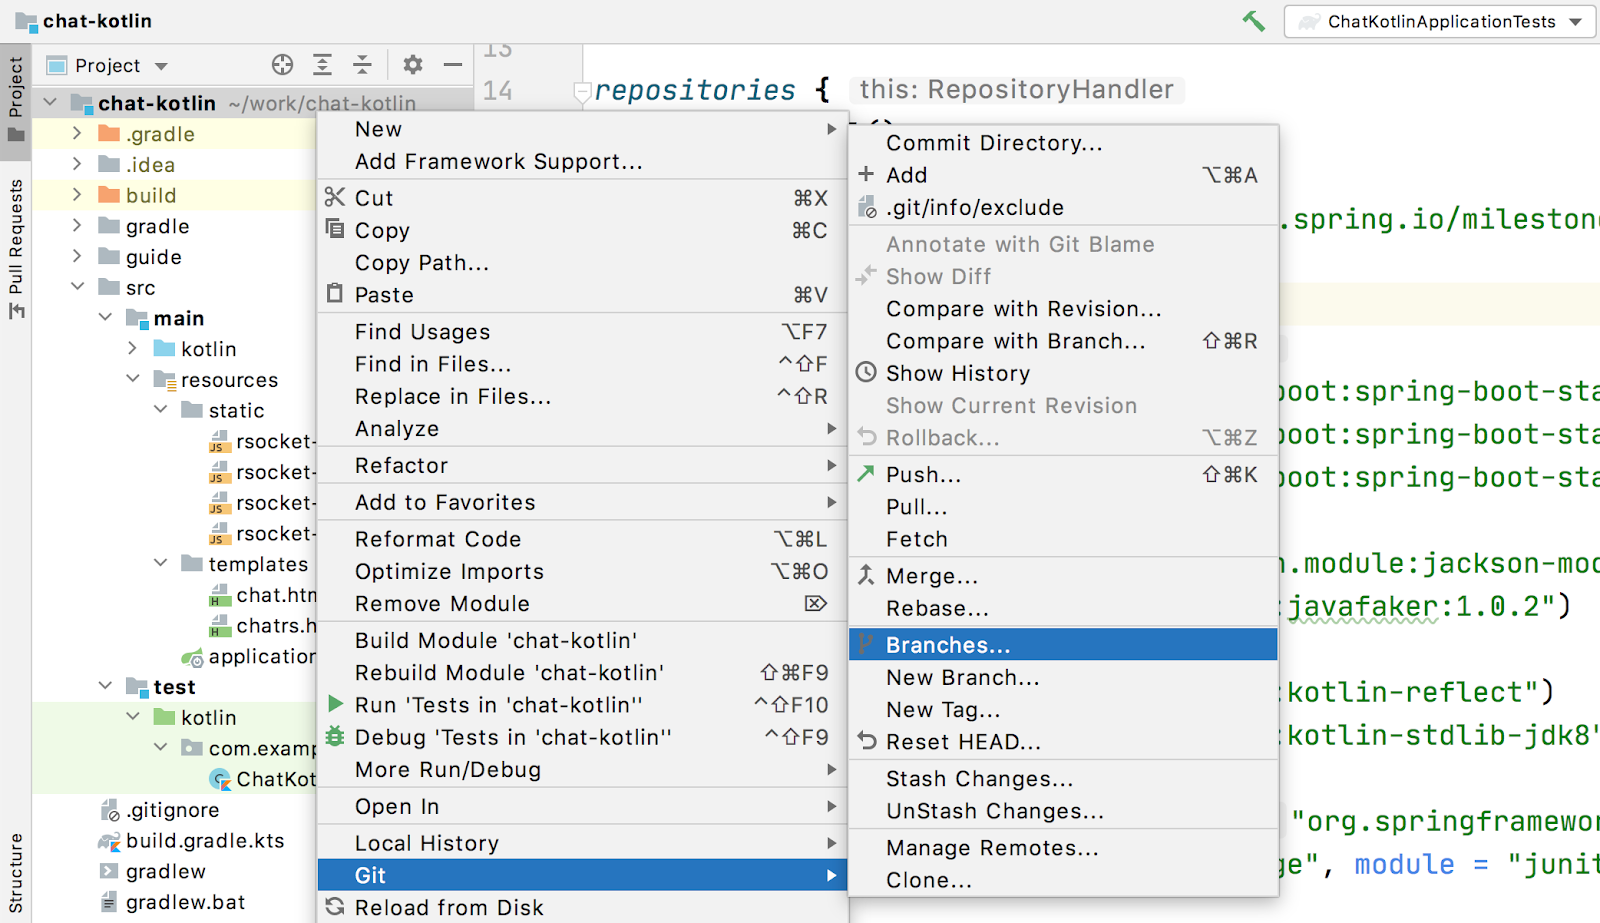
Note that the project includes solution branches for each part of the tutorial. You can browse all the branches in the IDE by invoking the Branches action:
Or you can use the command line:
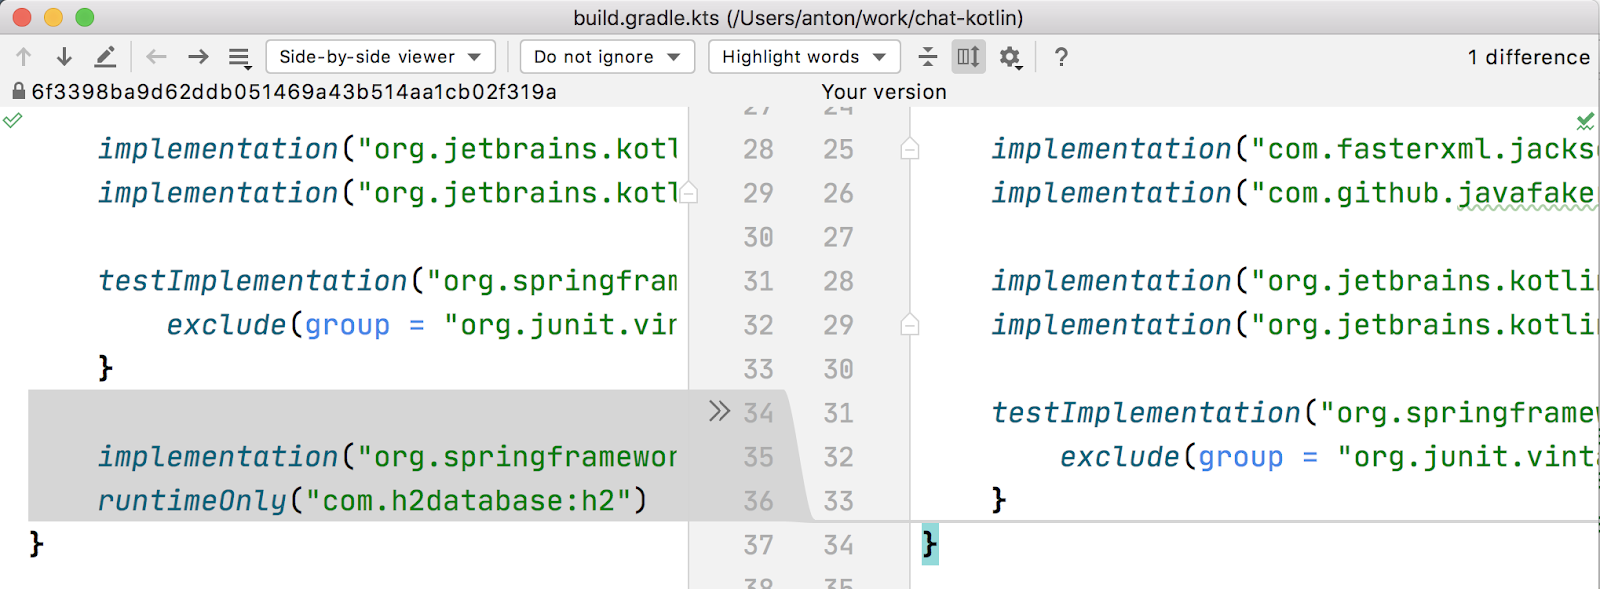
git branch -aIt is possible to use the Compare with branch command in IntelliJ IDEA to compare your solution with the proposed one.
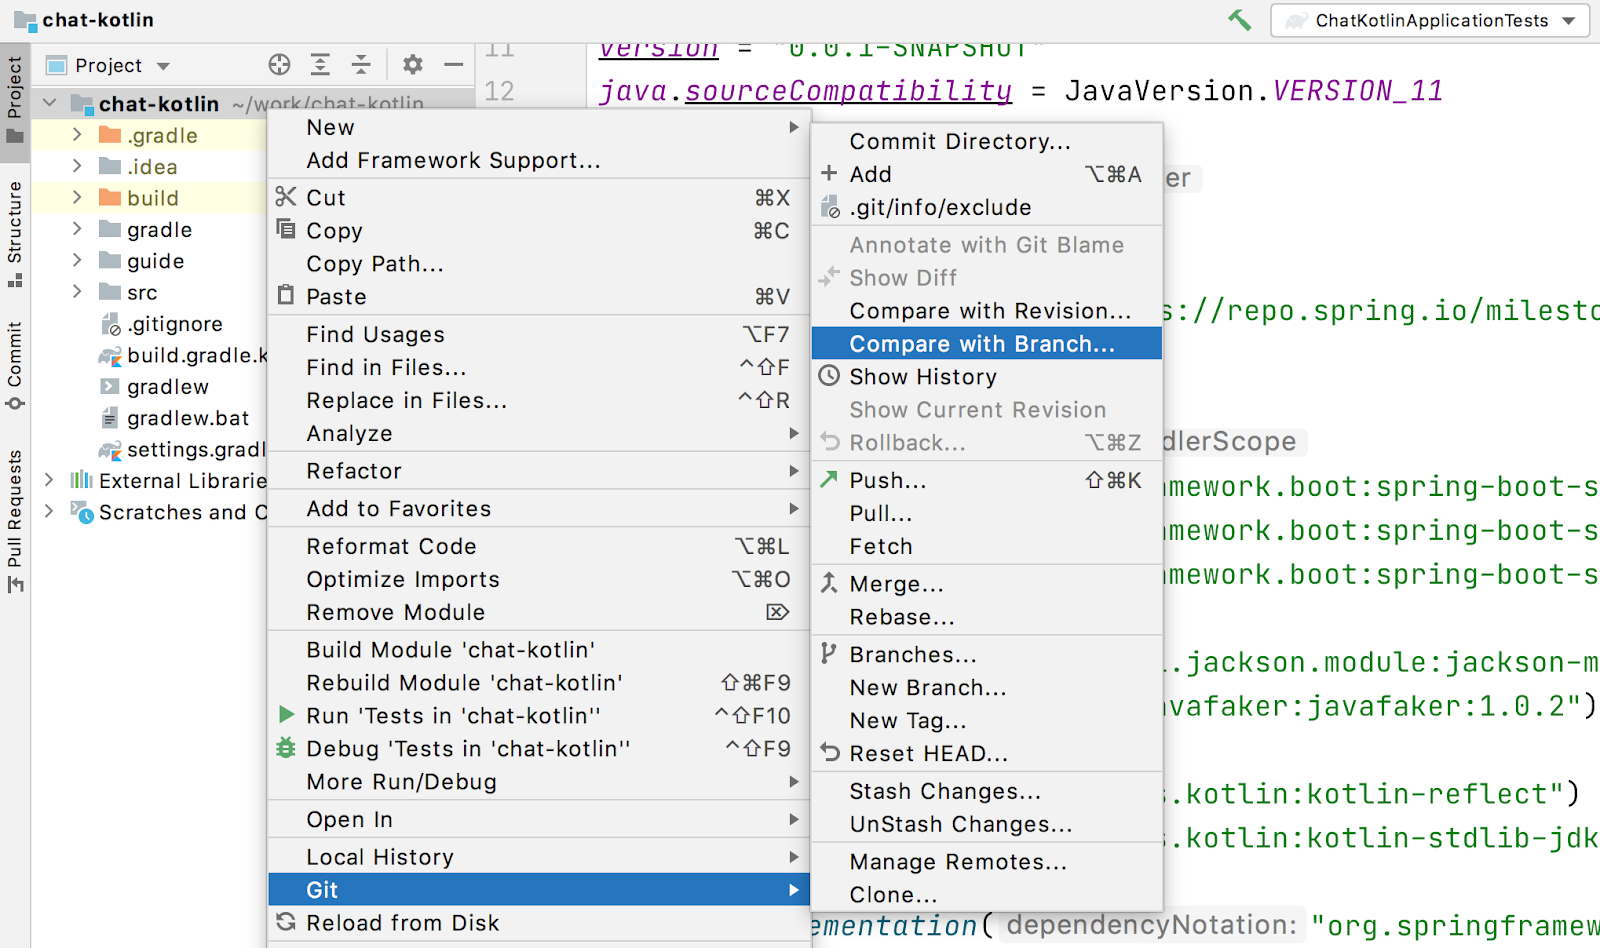
For instance, here is the list differences between the initial branch and part-2 branch:
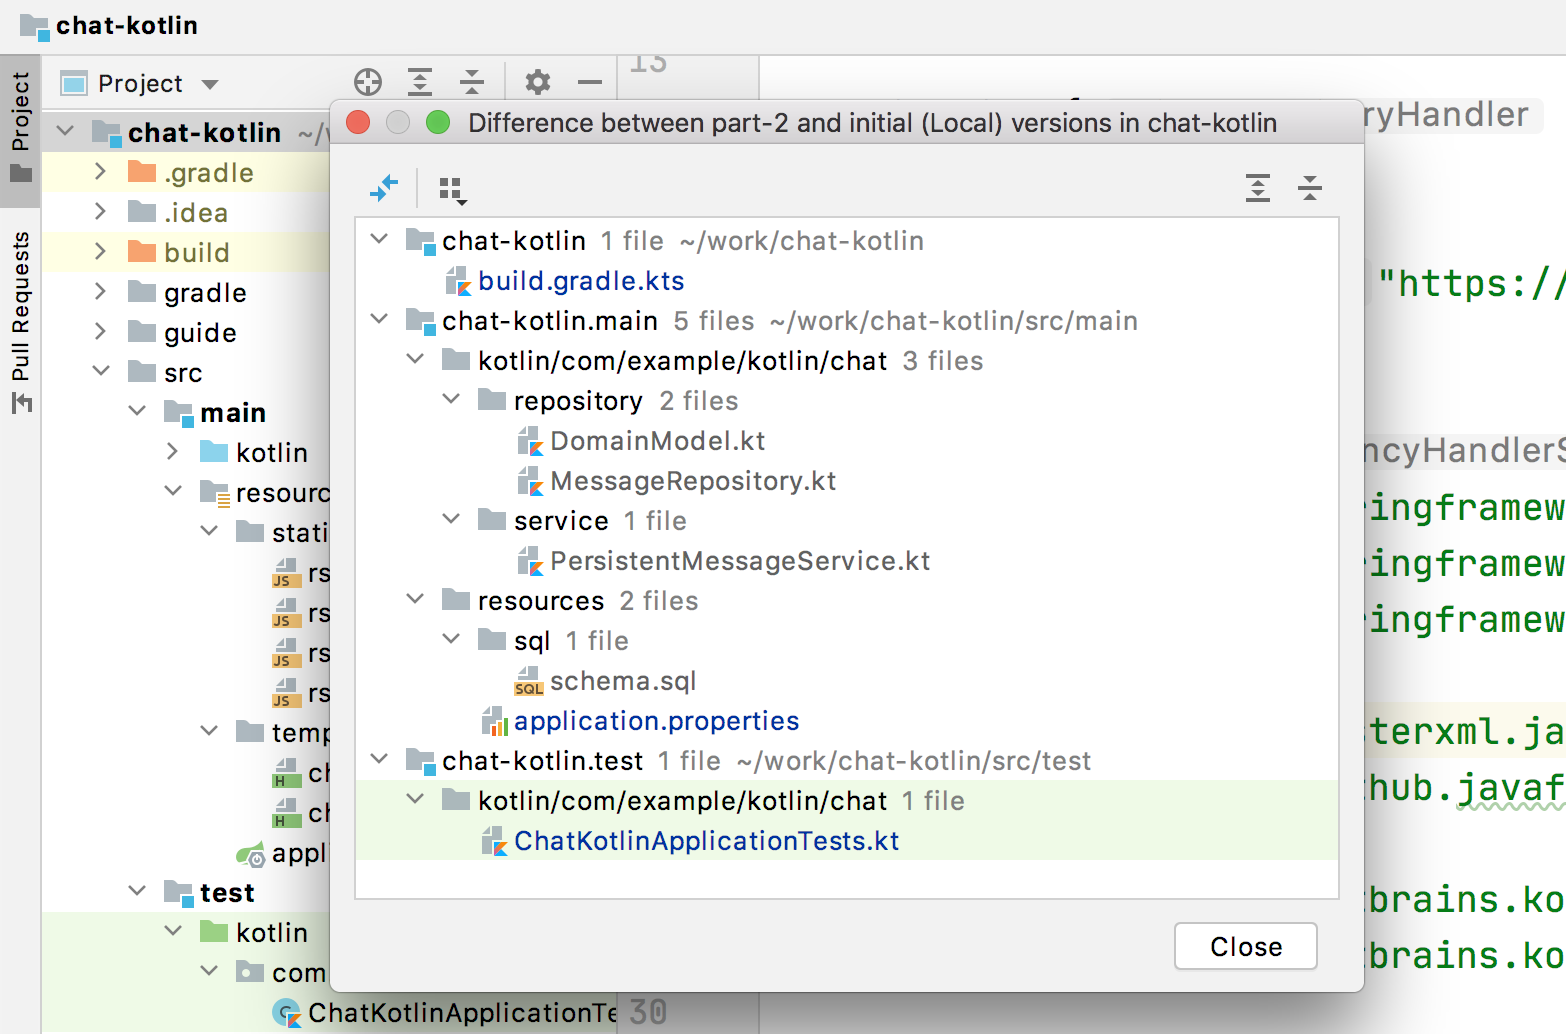
By clicking on the individual files, you can see the changes at a line level.
This should help you in the event that you have any trouble with the instructions at any stage of the tutorial.
Launching the application
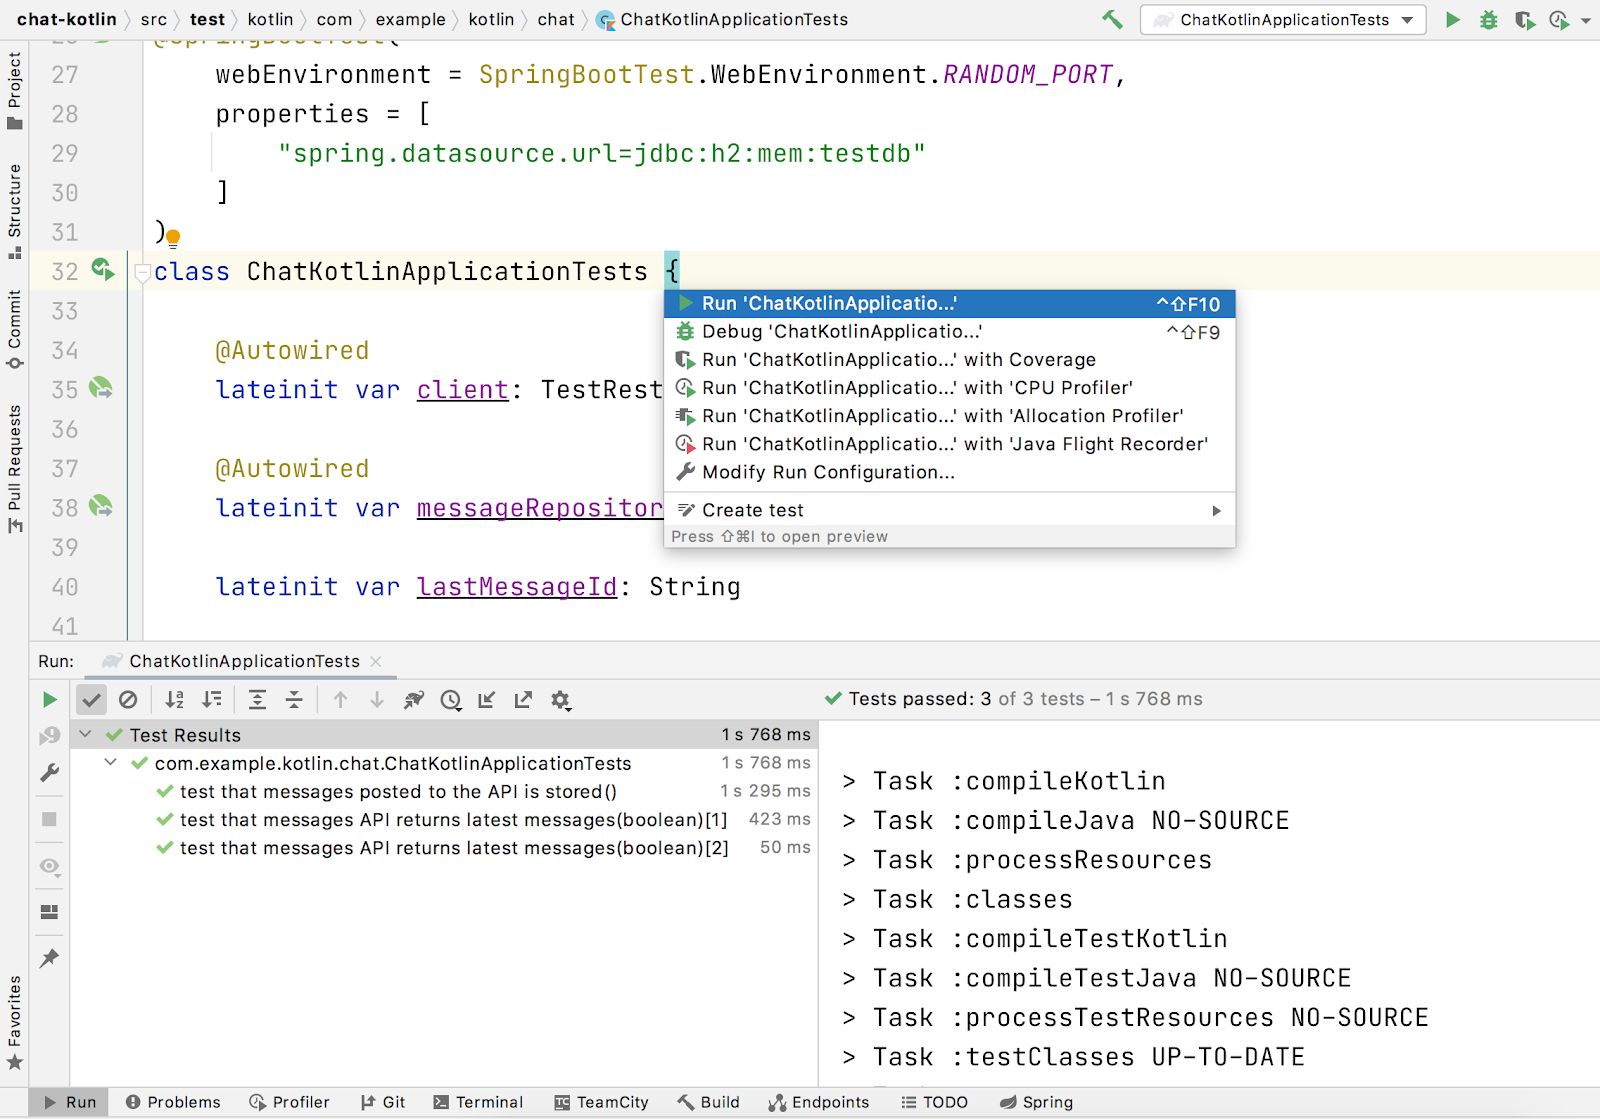
The main method for the application is located in the ChatKotlinApplication.kt file. Simply click on the gutter icon next to the main method or hit the Alt+Enter shortcut to invoke the launch menu in IntelliJ IDEA:
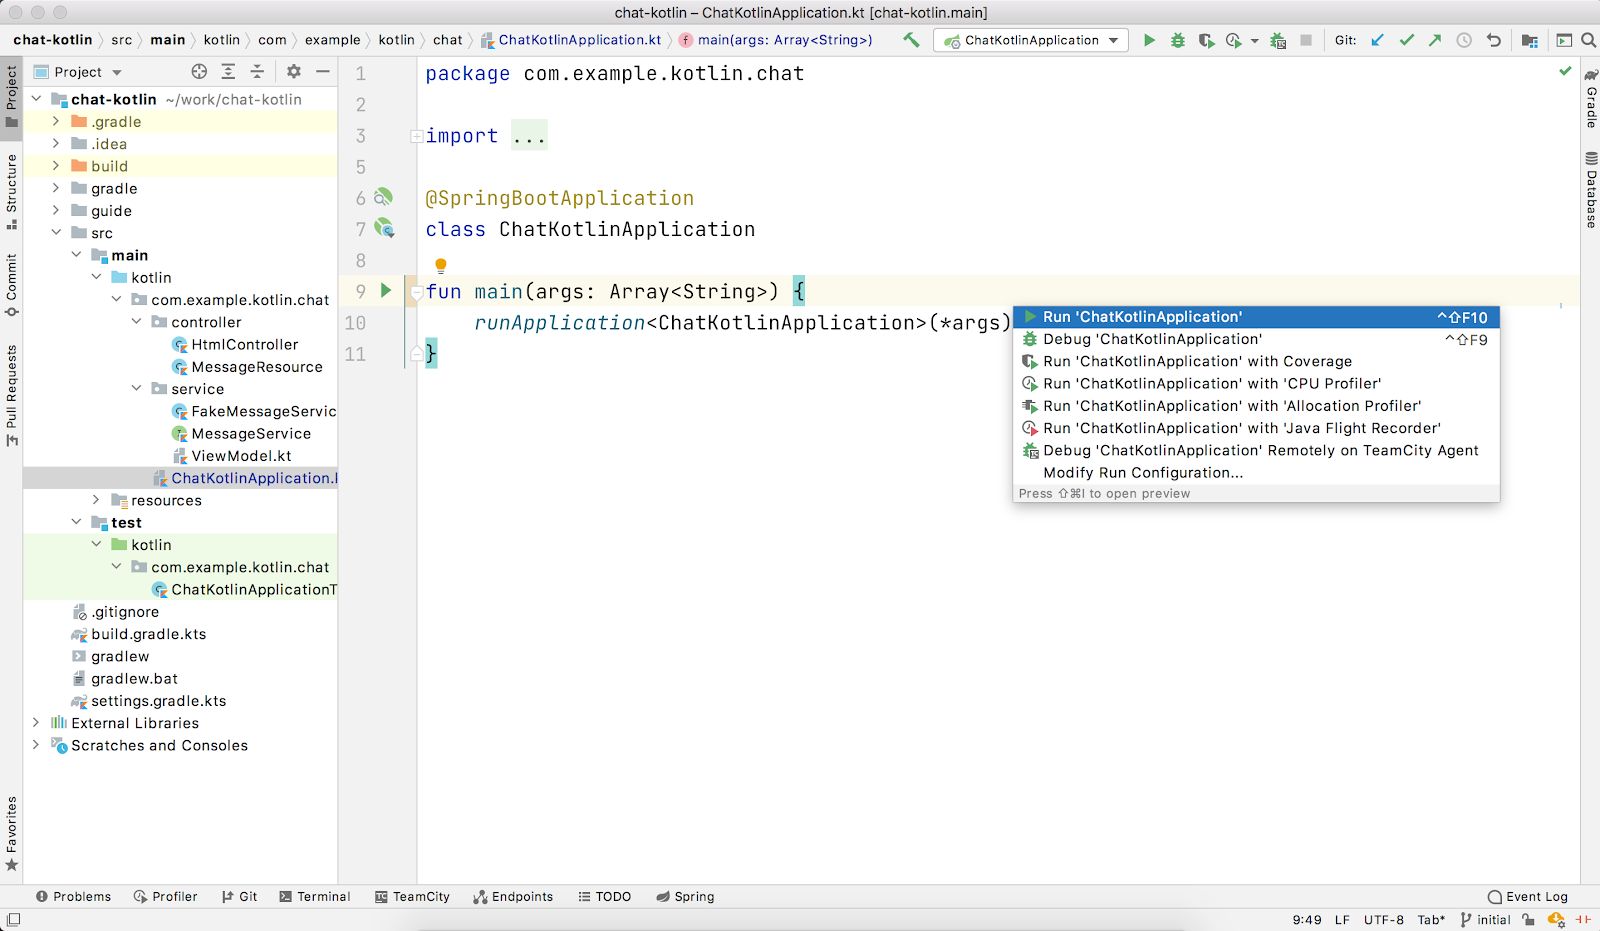
Alternatively, you can run the ./gradlew bootRun command in the terminal.
Once the application starts, open the following URL: http://localhost:8080. You will see a chat page with a collection of messages.
In the following step, we will demonstrate how to integrate our application with a real database to store the messages.
Project overview
Let’s take a look at the general application overview. In this tutorial, we are going to build a simple chat application that has the following architecture:
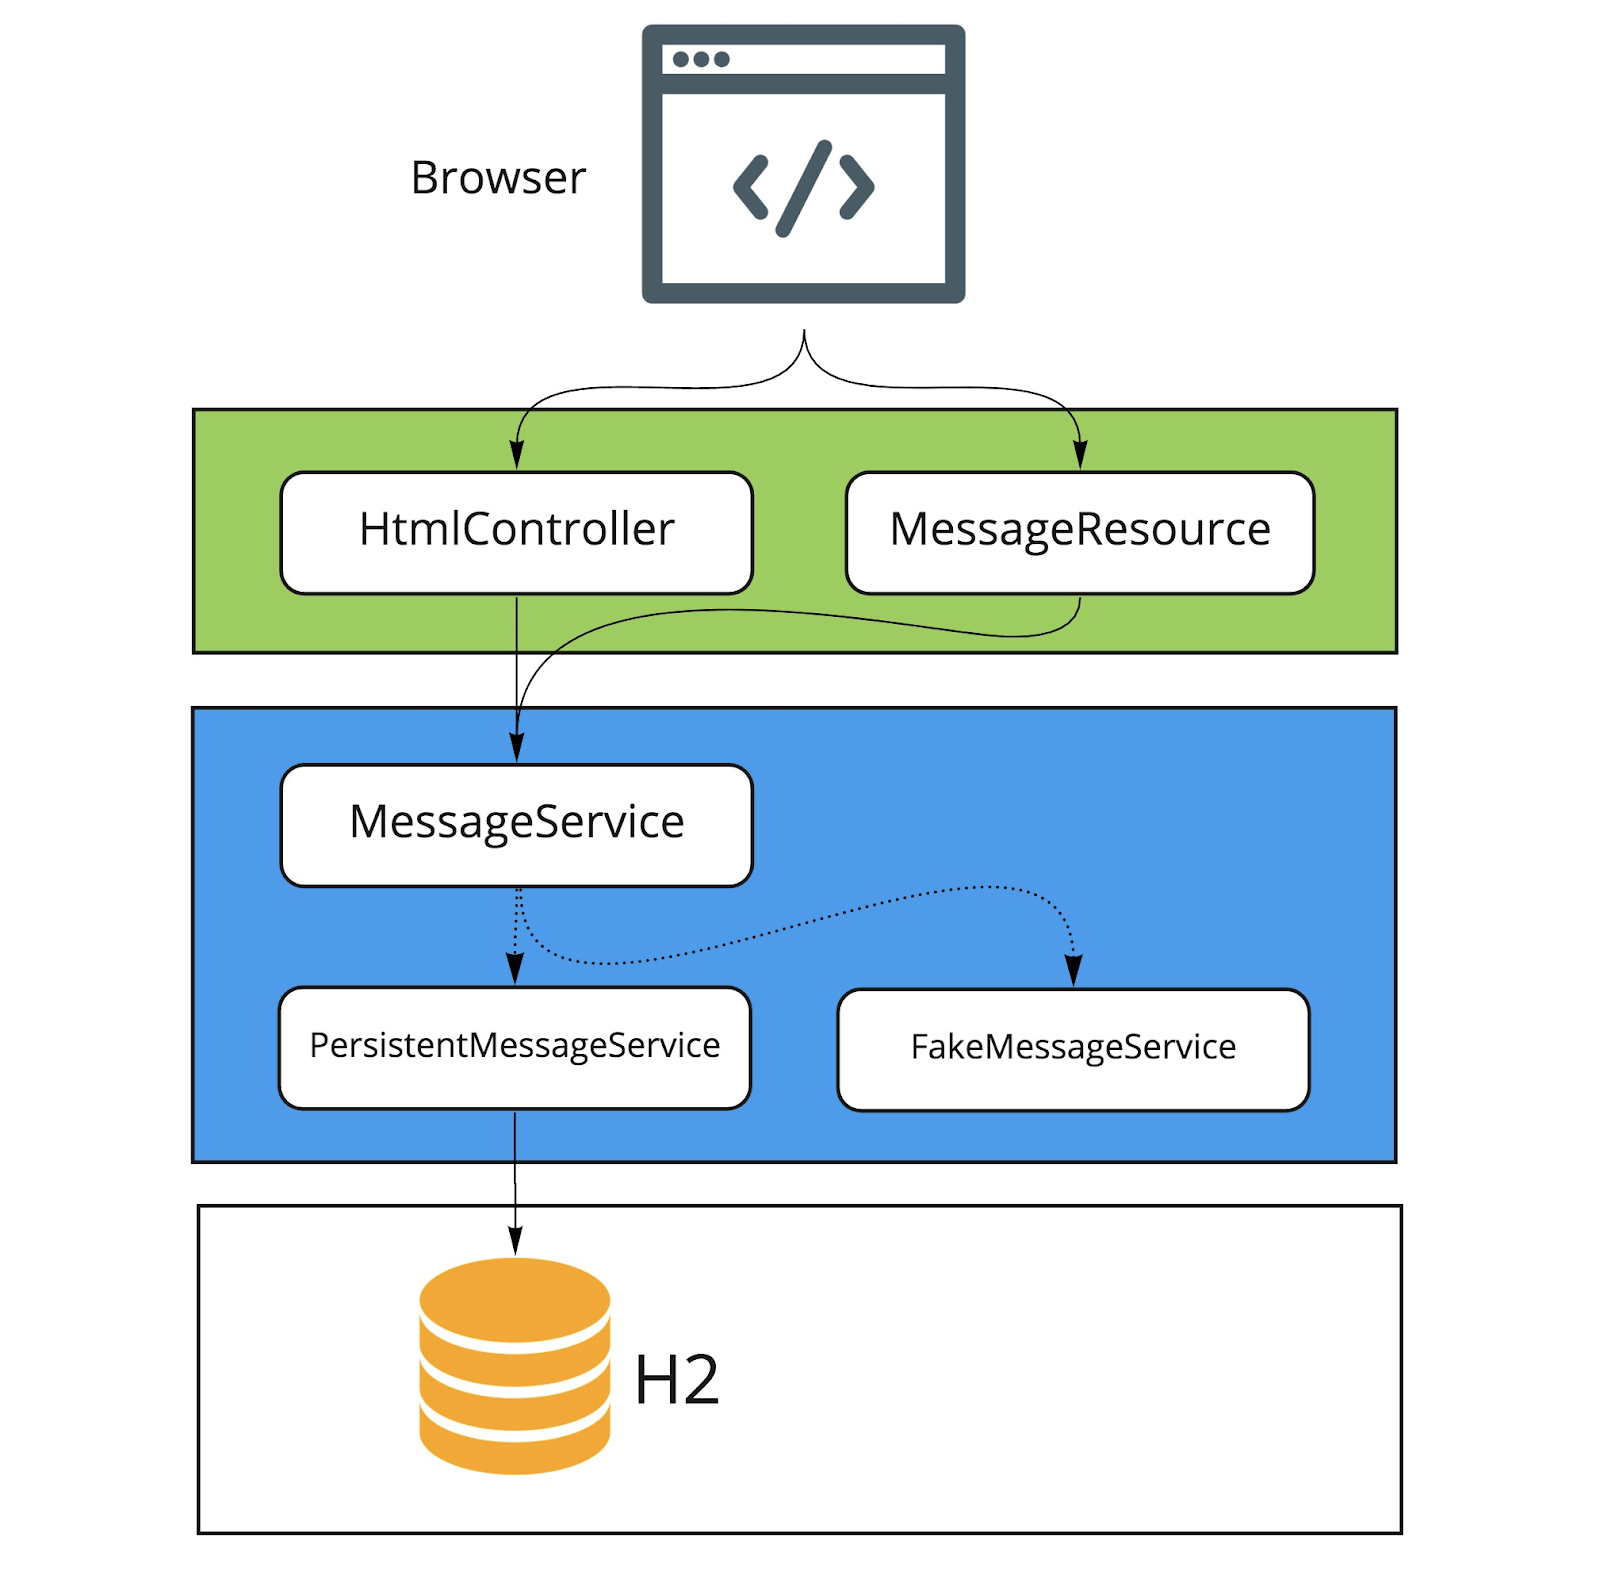
Our application is an ordinary 3-tier web application. The client facing tier is implemented by the HtmlController and MessagesResource classes. The application makes use of server-side rendering via the Thymeleaf template engine and is served by HtmlController. The message data API is provided by MessagesResource, which connects to the service layer.
The service layer is represented by MessagesService, which has two different implementations:
-
FakeMessageService– the first implementation, which produces random messages -
PersistentMessageService- the second implementation, which works with real data storage. We will add this implementation in part 2 of this tutorial.
The PersistentMessageService connects to a database to store the messages. We will use the H2 database and access it via the Spring Data Repository API.
After you have downloaded the project sources and opened them in the IDE, you will see the following structure, which includes the classes mentioned above.
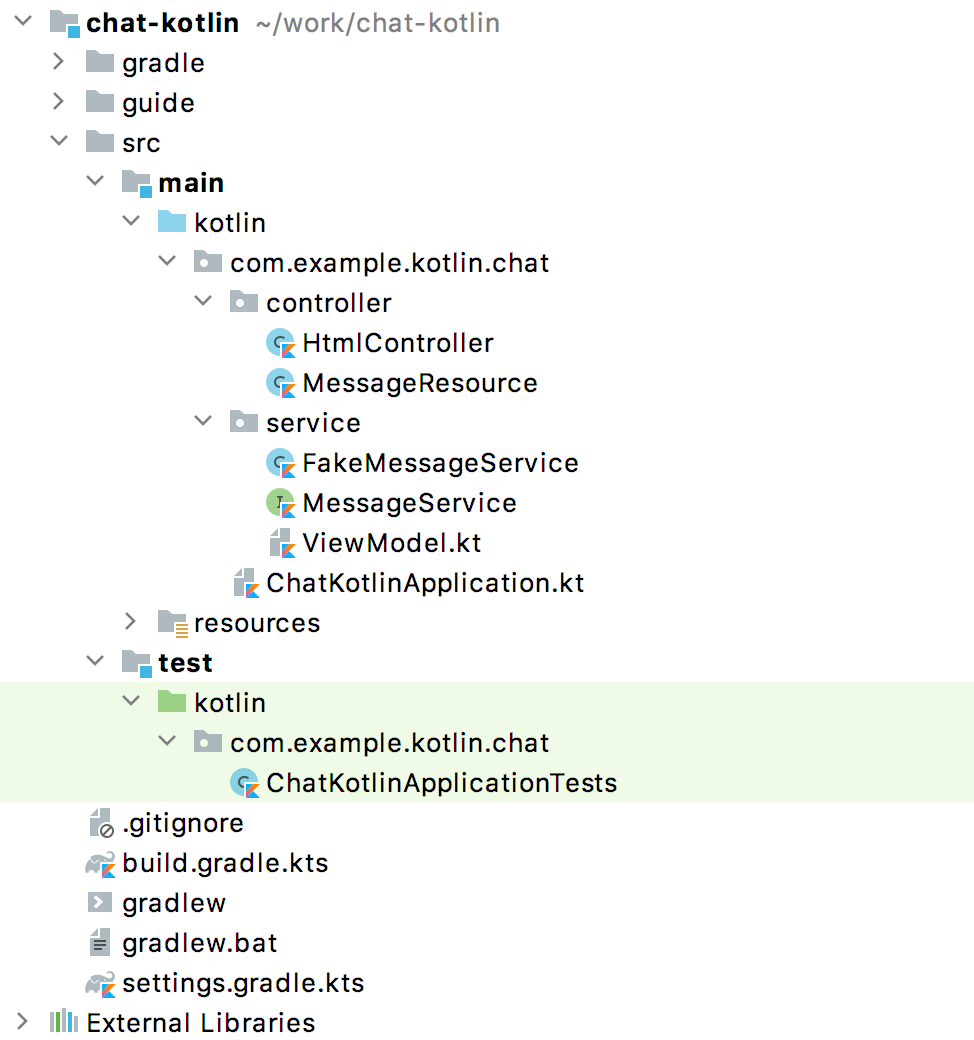
Under the main/kotlin folder there are packages and classes that belong to the application. In that folder, we are going to add more classes and make changes to the existing code to evolve the application.
In the main/resources folder you will find various static resources and configuration files.
The test/kotlin folder contains tests. We are going to make changes to the test sources accordingly with the changes to the main application.
The entry point to the application is the ChatKotlinApplication.kt file. This is where the main method is.
HtmlController
HtmlController is a @Controller annotated endpoint which will be exposing an HTML page generated using the Thymeleaf template engine
import com.example.kotlin.chat.service.MessageService
import com.example.kotlin.chat.service.MessageVM
import org.springframework.stereotype.Controller
import org.springframework.ui.Model
import org.springframework.ui.set
import org.springframework.web.bind.annotation.GetMapping

@Controller
class HtmlController(val messageService: MessageService) {
   @GetMapping("/")
   fun index(model: Model): String {
       val messages = messageService.latest()

       model["messages"] = messages
       model["lastMessageId"] = messages.lastOrNull()?.id ?: ""
       return "chat"
   }
}
💡One of the features you can immediately spot in Kotlin is the type inference. It means that some type of information in the code may be omitted, to be inferred by the compiler.
In our example above, the compiler knows that the type of the messages variable is List<MessageVM> from looking at the return type of the messageService.latest() function.
💡Spring Web users may notice that Model is used in this example as a Map even though it does not extend this API. This becomes possible with another Kotlin extension, which provides overloading for the set operator. For more information, please see the operator overloading documentation.
💡 Null safety is one of the most important features of the language. In the example above, you can see an application of this feature: messages.lastOrNull()?.id ?: "". First, ?. is the safe call operator, which checks whether the result of lastOrNull() is null and then gets an id. If the result of the expression is null, then we use an Elvis operator to provide a default value, which in our example is an empty string ("").
MessageResource
We need an API endpoint to serve polling requests. This functionality is implemented by the MessageResource class, which exposes the latest messages in JSON format.
If the lastMessageId query parameter is specified, the endpoint serves the latest messages after the specific message-id, otherwise, it serves all available messages.
@RestController
@RequestMapping("/api/v1/messages")
class MessageResource(val messageService: MessageService) {

   @GetMapping
   fun latest(@RequestParam(value = "lastMessageId", defaultValue = "") lastMessageId: String): ResponseEntity<List<MessageVM>> {
       val messages = if (lastMessageId.isNotEmpty()) {
           messageService.after(lastMessageId)
       } else {
           messageService.latest()
       }

       return if (messages.isEmpty()) {
           with(ResponseEntity.noContent()) {
               header("lastMessageId", lastMessageId)
               build<List<MessageVM>>()
           }
       } else {
           with(ResponseEntity.ok()) {
               header("lastMessageId", messages.last().id)
               body(messages)
           }
       }
   }

   @PostMapping
   fun post(@RequestBody message: MessageVM) {
       messageService.post(message)
   }
}
💡In Kotlin, if is an expression, and it returns a value. This is why we can assign the result of an if expression to a variable: val messages = if (lastMessageId.isNotEmpty()) { … }
💡 The Kotlin standard library contains scope functions whose sole purpose is to execute a block of code within the context of an object. In the example above, we use the with() function to build a response object.
FakeMessageService
FakeMessageService is the initial implementation of the MessageService interface. It supplies fake data to our chat. We use the Java Faker library to generate the fake data. The service generates random messages using famous quotes from Shakespeare, Yoda, and Rick & Morty:
@Service
class FakeMessageService : MessageService {

    val users: Map<String, UserVM> = mapOf(
        "Shakespeare" to UserVM("Shakespeare", URL("https://blog.12min.com/wp-content/uploads/2018/05/27d-William-Shakespeare.jpg")),
        "RickAndMorty" to UserVM("RickAndMorty", URL("http://thecircular.org/wp-content/uploads/2015/04/rick-and-morty-fb-pic1.jpg")),
        "Yoda" to UserVM("Yoda", URL("https://news.toyark.com/wp-content/uploads/sites/4/2019/03/SH-Figuarts-Yoda-001.jpg"))
    )

    val usersQuotes: Map<String, () -> String> = mapOf(
       "Shakespeare" to { Faker.instance().shakespeare().asYouLikeItQuote() },
       "RickAndMorty" to { Faker.instance().rickAndMorty().quote() },
       "Yoda" to { Faker.instance().yoda().quote() }
    )

    override fun latest(): List<MessageVM> {
        val count = Random.nextInt(1, 15)
        return (0..count).map {
            val user = users.values.random()
            val userQuote = usersQuotes.getValue(user.name).invoke()

            MessageVM(userQuote, user, Instant.now(),
                      Random.nextBytes(10).toString())
        }.toList()
    }

    override fun after(lastMessageId: String): List<MessageVM> {
        return latest()
    }

    override fun post(message: MessageVM) {
        TODO("Not yet implemented")
    }
}
💡 Kotlin features functional types, which we often use in a form of lambda expressions. In the example above, userQuotes is a map object where the keys are strings and the values are lambda expressions. A type signature of () → String says that the lambda expression takes no arguments and produces String as a result. Hence, the type of userQuotes is specified as Map<String, () → String>
💡 The mapOf function lets you create a map of Pair`s, where the pair’s definition is provided with an extension method `<A, B> A.to(that: B): Pair<A, B>.
💡 The TODO() function plays two roles: the reminder role and the stab role, as it always throws the NotImplementedError exception.
The main task of the FakeMessageService class is to generate a random number of fake messages to be sent to the chat’s UI. The latest() method is the place where this logic is implemented.
val count = Random.nextInt(1, 15)
return (0..count).map {
    val user = users.values.random()
    val userQuote = usersQuotes.getValue(user.name).invoke()

    MessageVM(userQuote, user, Instant.now(), Random.nextBytes(10).toString())
  }.toList()
In Kotlin, to generate a range of integers all we need to do is say (0..count). We then apply a map() function to transform each number into a message.
Notably, the selection of a random element from any collection is also quite simple. Kotlin provides an extension method for collections, which is called random(). We use this extension method to select and return a user from the list: users.values.random()
Once the user is selected, we need to acquire the user’s quote from the userQuotes map. The selected value from userQuotes is actually a lambda expression that we have to invoke in order to acquire a real quote: usersQuotes.getValue(user.name).invoke()
Next, we create an instance of the MessageVM class. This is a view model used to deliver data to a client:
data class MessageVM(val content: String, val user: UserVM, val sent: Instant, val id: String? = null)💡For data classes, the compiler automatically generates the toString, equals, and hashCode functions, minimizing the amount of utility code that you have to write.
Part 2: Adding persistence and integration tests
In this part, we will implement a persisting version of the MessageService interface using Spring Data JDBC and H2 as the database. We will introduce the following classes:
-
PersistentMessageService– an implementation of theMessageServiceinterface, which will interact with the real data storage via the Spring Data Repository API. -
MessageRepository– a repository implementation used byMessageService.
Adding new dependencies
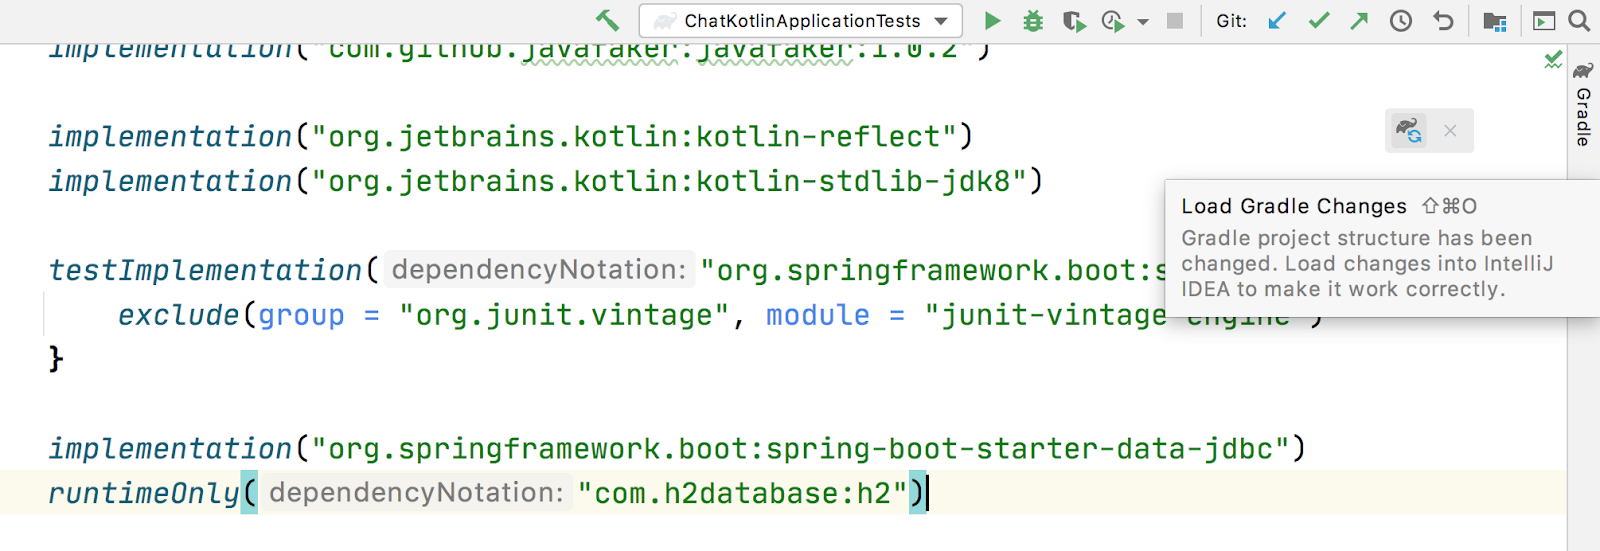
First of all, we have to add the required dependencies to the project. For that, we need to add to the following lines to the dependencies block in the` build.gradle.kts `file:
implementation("org.springframework.boot:spring-boot-starter-data-jdbc")
runtimeOnly("com.h2database:h2")
⚠️ Note, in this example, we use spring-data-jdbc as a lightweight and straightforward way to use JDBC in Spring Framework. If you wish to see an example of JPA usage, please see the following blog post.
⚠️ To refresh the list of the project dependencies, click on the little elephant icon that appears in the top right-hand corner of the editor.
Create database schema and configuration
Once the dependencies are added and resolved, we can start modeling our database schema. Since this is a demo project, we will not be designing anything complex and we’ll stick to the following structure:
CREATE TABLE IF NOT EXISTS messages (
id VARCHAR(60) DEFAULT RANDOM_UUID() PRIMARY KEY,
content VARCHAR NOT NULL,
content_type VARCHAR(128) NOT NULL,
sent TIMESTAMP NOT NULL,
username VARCHAR(60) NOT NULL,
user_avatar_image_link VARCHAR(256) NOT NULL
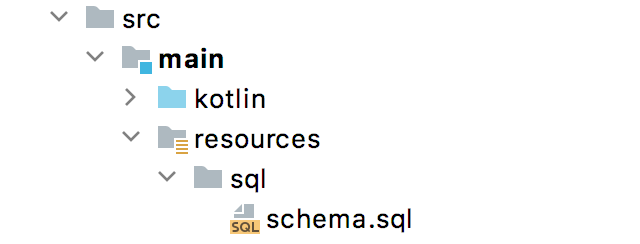
);⌨️ Create a new folder called sql in the src/main/resources directory. Then put the SQL code from above into the src/main/resources/sql/schema.sql file.
Also, you should modify application.properties so it contains the following attributes:
spring.datasource.schema=classpath:sql/schema.sql
spring.datasource.url=jdbc:h2:file:./build/data/testdb
spring.datasource.driverClassName=org.h2.Driver
spring.datasource.username=sa
spring.datasource.password=password
spring.datasource.initialization-mode=always
Working with data
Using Spring Data, the table mentioned above can be expressed using the following domain classes, which should be put in the `src/main/kotlin/com/example/kotlin/chat/repository/DomainModel.kt `file:
import org.springframework.data.annotation.Id
import org.springframework.data.relational.core.mapping.Table
import java.time.Instant

@Table("MESSAGES")
data class Message(
    val content: String,
    val contentType: ContentType,
    val sent: Instant,
    val username: String,
    val userAvatarImageLink: String,
    @Id var id: String? = null)

enum class ContentType {
    PLAIN
}
There are a few things here that require explanation. Fields like content, sent, and id mirror the MessageVM class. However, to decrease the number of tables and simplify the final relationship structure, we’ve flattened the User object and make its fields a part of the Message class. Apart from that, there is a new extra field called contentType, which indicates the content type of the stored message. Since most modern chats support different markup languages, it is common to support different message content encodings. At first we will just support PLAIN text, but later we will extend ContentType to support the MARKDOWN type, too.
Once we have the table representation as a class, we may introduce convenient access to the data via Repository.
⌨️ Put MessageRepository.kt in the src/main/kotlin/com/example/kotlin/chat/repository folder.
import org.springframework.data.jdbc.repository.query.Query
import org.springframework.data.repository.CrudRepository
import org.springframework.data.repository.query.Param

interface MessageRepository : CrudRepository<Message, String> {

    // language=SQL
    @Query("""
        SELECT * FROM (
            SELECT * FROM MESSAGES
            ORDER BY "SENT" DESC
            LIMIT 10
        ) ORDER BY "SENT"
    """)
    fun findLatest(): List<Message>

    // language=SQL
    @Query("""
        SELECT * FROM (
            SELECT * FROM MESSAGES
            WHERE SENT > (SELECT SENT FROM MESSAGES WHERE ID = :id)
            ORDER BY "SENT" DESC
        ) ORDER BY "SENT"
    """)
    fun findLatest(@Param("id") id: String): List<Message>
}
Our MessageRepository extends an ordinary CrudRepository and provides two different methods with custom queries for retrieving the latest messages and for retrieving messages associated with specific message IDs.
💡 Did you notice the multiline Strings used to express the SQL query in the readable format? Kotlin provides a set of useful additions for Strings. You can learn more about these additions in the Kotlin language documentation
Our next step is implementing the MessageService class that integrates with the MessageRepository class.
⌨️ Put the PersistentMessageService class into the src/main/kotlin/com/example/kotlin/chat/service folder, replacing the previous FakeMessageService implementation.
package com.example.kotlin.chat.service

import com.example.kotlin.chat.repository.ContentType
import com.example.kotlin.chat.repository.Message
import com.example.kotlin.chat.repository.MessageRepository
import org.springframework.context.annotation.Primary
import org.springframework.stereotype.Service
import java.net.URL

@Service
@Primary
class PersistentMessageService(val messageRepository: MessageRepository) : MessageService {

    override fun latest(): List<MessageVM> =
        messageRepository.findLatest()
            .map { with(it) { MessageVM(content, UserVM(username,
                              URL(userAvatarImageLink)), sent, id) } }

    override fun after(lastMessageId: String): List<MessageVM> =
        messageRepository.findLatest(lastMessageId)
            .map { with(it) { MessageVM(content, UserVM(username,
                              URL(userAvatarImageLink)), sent, id) } }

    override fun post(message: MessageVM) {
        messageRepository.save(
            with(message) { Message(content, ContentType.PLAIN, sent,
                         user.name, user.avatarImageLink.toString()) }
        )
    }
}
PersistentMessageService is a thin layer for the MessageRepository, since here we are just doing some simple object mapping. All business queries take place on the Repository level. On the other hand, the simplicity of this implementation is the merit of the Kotlin language, which provides extension functions like map and with.
If we now launch the application, we will once again see an empty chat page. However, if we type a message into the text input and send it, we will see it appear on the screen a few moments later. If we open a new browser page, we will see this message again as a part of the message history.
Finally, we can write a few integration tests to ensure that our code will continue to work properly over time.
Adding integration tests
To begin, we have to modify the ChatKotlinApplicationTests file in /src/test and add the fields we will need to use in the tests:
import com.example.kotlin.chat.repository.ContentType
import com.example.kotlin.chat.repository.Message
import com.example.kotlin.chat.repository.MessageRepository
import com.example.kotlin.chat.service.MessageVM
import com.example.kotlin.chat.service.UserVM
import org.assertj.core.api.Assertions.assertThat
import org.junit.jupiter.api.AfterEach
import org.junit.jupiter.api.BeforeEach
import org.junit.jupiter.api.Test
import org.junit.jupiter.params.ParameterizedTest
import org.junit.jupiter.params.provider.ValueSource
import org.springframework.beans.factory.annotation.Autowired
import org.springframework.boot.test.context.SpringBootTest
import org.springframework.boot.test.web.client.TestRestTemplate
import org.springframework.boot.test.web.client.postForEntity
import org.springframework.core.ParameterizedTypeReference
import org.springframework.http.HttpMethod
import org.springframework.http.RequestEntity
import java.net.URI
import java.net.URL
import java.time.Instant
import java.time.temporal.ChronoUnit.MILLIS

@SpringBootTest(
        webEnvironment = SpringBootTest.WebEnvironment.RANDOM_PORT,
        properties = [
            "spring.datasource.url=jdbc:h2:mem:testdb"
        ]
)
class ChatKotlinApplicationTests {

    @Autowired
    lateinit var client: TestRestTemplate

    @Autowired
    lateinit var messageRepository: MessageRepository

    lateinit var lastMessageId: String

    val now: Instant = Instant.now()
}
We use the lateinit keyword, which works perfectly for cases where the initialization of non-null fields has to be deferred. In our case, we use it to @Autowire the MessageRepository field and resolve TestRestTemplate.
For simplicity, we will be testing three general cases:
-
Resolving message when
lastMessageIdis not available. -
Resolving message when
lastMessageIdis present. -
And sending messages.
To test message resolution, we have to prepare some test messages, as well as clean up the storage after the completion of each case. Add the following to ChatKotlinApplicationTests:
@BeforeEach
fun setUp() {
    val secondBeforeNow = now.minusSeconds(1)
    val twoSecondBeforeNow = now.minusSeconds(2)
    val savedMessages = messageRepository.saveAll(listOf(
            Message(
                    "*testMessage*",
                    ContentType.PLAIN,
                    twoSecondBeforeNow,
                    "test",
                    "http://test.com"
            ),
            Message(
                    "**testMessage2**",
                    ContentType.PLAIN,
                    secondBeforeNow,
                    "test1",
                    "http://test.com"
            ),
            Message(
                    "`testMessage3`",
                    ContentType.PLAIN,
                    now,
                    "test2",
                    "http://test.com"
            )
    ))
    lastMessageId = savedMessages.first().id ?: ""
}

@AfterEach
fun tearDown() {
    messageRepository.deleteAll()
}
Once the preparation is done, we can create our first test case for message retrieval:
@ParameterizedTest
@ValueSource(booleans = [true, false])
fun `test that messages API returns latest messages`(withLastMessageId: Boolean) {
    val messages: List<MessageVM>? = client.exchange(
        RequestEntity<Any>(
            HttpMethod.GET,
            URI("/api/v1/messages?lastMessageId=${if (withLastMessageId) lastMessageId else ""}")
            ),
            object : ParameterizedTypeReference<List<MessageVM>>() {}).body

    if (!withLastMessageId) {
        assertThat(messages?.map { with(it) { copy(id = null, sent = sent.truncatedTo(MILLIS))}})
                .first()
                .isEqualTo(MessageVM(
                        "*testMessage*",
                        UserVM("test", URL("http://test.com")),
                        now.minusSeconds(2).truncatedTo(MILLIS)
                ))
    }

    assertThat(messages?.map { with(it) { copy(id = null, sent = sent.truncatedTo(MILLIS))}})
            .containsSubsequence(
                    MessageVM(
                            "**testMessage2**",
                            UserVM("test1", URL("http://test.com")),
                            now.minusSeconds(1).truncatedTo(MILLIS)
                    ),
                    MessageVM(
                            "`testMessage3`",
                            UserVM("test2", URL("http://test.com")),
                            now.truncatedTo(MILLIS)
                    )
            )
}
💡 All data classes have a copy method, which lets you make a full copy of the instance while customizing certain fields if necessary. This is very useful in our case, since we want to truncate the message sent time to the same time units so we can compare the timestamps.
💡 Kotlin’s support for String templates is an excellent addition for testing.
Once we have implemented this test, the last piece that we have to implement is a message posting test. Add the following code to ChatKotlinApplicationTests:
@Test
fun `test that messages posted to the API is stored`() {
    client.postForEntity<Any>(
            URI("/api/v1/messages"),
            MessageVM(
                    "`HelloWorld`",
                    UserVM("test", URL("http://test.com")),
                    now.plusSeconds(1)
            )
    )

    messageRepository.findAll()
            .first { it.content.contains("HelloWorld") }
            .apply {
                assertThat(this.copy(id = null, sent = sent.truncatedTo(MILLIS)))
                        .isEqualTo(Message(
                                "`HelloWorld`",
                                ContentType.PLAIN,
                                now.plusSeconds(1).truncatedTo(MILLIS),
                                "test",
                                "http://test.com"
                        ))
            }
}
💡 It’s acceptable to use function names with spaces enclosed in backticks in tests. See the related documentation.
The test above looks similar to the previous one, except we check that the posted messages are stored in the database. In this example, we can see the run scope function, which makes it possible to use the target object within the invocation scope as this.
Once we have implemented all these tests, we can run them and see whether they pass.
At this stage, we added message persistence to our chat application. The messages can now be delivered to all active clients that connect to the application. Additionally, we can now access the historical data, so everyone can read previous messages if they need to.
This implementation may look complete, but the code we wrote has some room for improvement. Therefore, we will see how our code can be improved with Kotlin extensions during the next step.
Part 3: Implementing extensions
In this part, we will be implementing extension functions to decrease the amount of code repetition in a few places.
For example, you may notice that the Message <-→ MessageVM conversion currently happens explicitly in the PersistableMessageService. We may also want to extend the support for a different content type by adding support for Markdown.
First, we create the extension methods for Message and MessageVM. The new methods implement the conversion logic from Message to MessageVM and vice versa:
import com.example.kotlin.chat.repository.ContentType
import com.example.kotlin.chat.repository.Message
import com.example.kotlin.chat.service.MessageVM
import com.example.kotlin.chat.service.UserVM
import java.net.URL

fun MessageVM.asDomainObject(contentType: ContentType = ContentType.PLAIN): Message = Message(
        content,
        contentType,
        sent,
        user.name,
        user.avatarImageLink.toString(),
        id
)

fun Message.asViewModel(): MessageVM = MessageVM(
        content,
        UserVM(username, URL(userAvatarImageLink)),
        sent,
        id
)
⌨️ We’ll store the above functions in the src/main/kotlin/com/example/kotlin/chat/Extensions.kt file.
Now that we have extension methods for MessageVM and Message conversion, we can use them in the PersistentMessageService:
@Service
class PersistentMessageService(val messageRepository: MessageRepository) : MessageService {

    override fun latest(): List<MessageVM> =
            messageRepository.findLatest()
                    .map { it.asViewModel() }

    override fun after(lastMessageId: String): List<MessageVM> =
            messageRepository.findLatest(lastMessageId)
                    .map { it.asViewModel() }

    override fun post(message: MessageVM) {
        messageRepository.save(message.asDomainObject())
    }
}
The code above is better than it was before. It is more concise and it reads better. However, we can improve even further. As we can see, we use the same map()`operators with the same function mapper twice. In fact, we can improve that by adding a custom `map function for a List with a specific generic type. Add the following line to the Extensions.kt file:
fun List<Message>.mapToViewModel(): List<MessageVM> = map { it.asViewModel() }With this line included, Kotlin will provide the mentioned extension method to any List whose generic type corresponds to the specified one:
@Service
class PersistentMessageService(val messageRepository: MessageRepository) : MessageService {

    override fun latest(): List<MessageVM> =
        messageRepository.findLatest()
            .mapToViewModel() // now we can use the mentioned extension on List<Message>

    override fun after(lastMessageId: String): List<MessageVM> =
        messageRepository.findLatest(lastMessageId)
            .mapToViewModel()
    //...
}
⚠️ Note that you cannot use the same extension name for the same class with a different generic type. The reason for this is type erasure, which means that at runtime, the same method would be used for both classes, and it would not be possible to guess which one should be invoked.
Once all the extensions are applied, we can do a similar trick and declare supportive extensions for usage in test classes. Put the following in the src/test/kotlin/com/example/kotlin/chat/TestExtensions.kt file
import com.example.kotlin.chat.repository.Message
import com.example.kotlin.chat.service.MessageVM
import java.time.temporal.ChronoUnit.MILLIS

fun MessageVM.prepareForTesting() = copy(id = null, sent = sent.truncatedTo(MILLIS))

fun Message.prepareForTesting() = copy(id = null, sent = sent.truncatedTo(MILLIS))
We can now move forward and implement support for the MARKDOWN content type. First of all, we need to add the utility for Markdown content rendering. For this purpose, we can add an official Markdown library from JetBrains to the build.gradle.kts file:
dependencies {
   ...
   implementation("org.jetbrains:markdown:0.2.2")
   ...
}
Since we have already learned how to use extensions, let’s create another one in the Extensions.kt file for the ContentType enum, so each enum value will know how to render a specific content.
fun ContentType.render(content: String): String = when (this) {
    ContentType.PLAIN -> content
}
In the example above, we use a when expression, which provides pattern-matching in Kotlin. If when is used as an expression, the else branch is mandatory. However, if the when expression is used with exhaustive values (e.g. enum with a constant number of outcomes or sealed classes with the defined number of subclasses), then the else branch is not required. The example above is precisely one of those cases where we know at compile-time all the possible outcomes (and all of them are handled), thus we don’t have to specify the else branch.
Now that we know how the when expression works, let’s finally add a second option to the ContentType enum:
enum class ContentType {
    PLAIN, MARKDOWN
}
The power of the when expression comes with the strong requirement to be exhaustive. Any timea new value is added to enum, we have to fix compilation issues before pushing our software to production:
fun ContentType.render(content: String): String = when (this) {
    ContentType.PLAIN -> content
    ContentType.MARKDOWN -> {
        val flavour = CommonMarkFlavourDescriptor()
        HtmlGenerator(content, MarkdownParser(flavour).buildMarkdownTreeFromString(content),
           flavour).generateHtml()
    }
}
Once we have fixed the render method to support the new ContentType, we can modify Message and MessageVM extensions methods to enable use of the MARKDOWN type and render its content accordingly:
fun MessageVM.asDomainObject(contentType: ContentType = ContentType.MARKDOWN): Message = Message(
        content,
        contentType,
        sent,
        user.name,
        user.avatarImageLink.toString(),
        id
)

fun Message.asViewModel(): MessageVM = MessageVM(
        contentType.render(content),
        UserVM(username, URL(userAvatarImageLink)),
        sent,
        id
)
We also need to modify the tests to ensure that the MARKDOWN content type is rendered correctly. For this purpose, we have to alter the ChatKotlinApplicationTests.kt and change the following:
@BeforeEach
fun setUp() {
    //...
            Message(
                    "*testMessage*",
                    ContentType.PLAIN,
                    twoSecondBeforeNow,
                    "test",
                    "http://test.com"
            ),
            Message(
                    "**testMessage2**",
                    ContentType.MARKDOWN,
                    secondBeforeNow,
                    "test1",
                    "http://test.com"
            ),
            Message(
                    "`testMessage3`",
                    ContentType.MARKDOWN,
                    now,
                    "test2",
                    "http://test.com"
            )
   //...
}

@ParameterizedTest
@ValueSource(booleans = [true, false])
fun `test that messages API returns latest messages`(withLastMessageId: Boolean) {
    //...

    assertThat(messages?.map { it.prepareForTesting() })
            .containsSubsequence(
                    MessageVM(
                            "<body><p><strong>testMessage2</strong></p></body>",
                            UserVM("test1", URL("http://test.com")),
                            now.minusSeconds(1).truncatedTo(MILLIS)
                    ),
                    MessageVM(
                            "<body><p><code>testMessage3</code></p></body>",
                            UserVM("test2", URL("http://test.com")),
                            now.truncatedTo(MILLIS)
                    )
            )
}

@Test
fun `test that messages posted to the API are stored`() {
    //...
    messageRepository.findAll()
            .first { it.content.contains("HelloWorld") }
            .apply {
                assertThat(this.prepareForTesting())
                        .isEqualTo(Message(
                                "`HelloWorld`",
                                ContentType.MARKDOWN,
                                now.plusSeconds(1).truncatedTo(MILLIS),
                                "test",
                                "http://test.com"
                        ))
            }
}
Once this is done, we will see that all tests are still passing, and the messages with the MARKDOWN content type are rendered as expected.
In this step, we learned how to use extensions to improve code quality. We also learned the when expression and how it can reduce human error when it comes to adding new business features.
Part 4: Refactoring to Spring WebFlux with Kotlin Coroutines
In this part of the tutorial, we will be modifying our codebase to add support for coroutines.
Essentially, coroutines are light-weight threads that make it possible to express asynchronous code in an imperative manner. This solves various problems associated with the callback (observer) pattern which was used above to achieve the same effect.
⚠️ In this tutorial, we will not look too closely at the coroutines and the standard kotlinx.coroutines library. To learn more about coroutines and their features, please take a look at the following tutorial.
Adding Coroutines
To start using Kotlin coroutines, we have to add three additional libraries to the build.gradle.kts:
dependencies {
    ...
    implementation("org.jetbrains.kotlinx:kotlinx-coroutines-core")
    implementation("org.jetbrains.kotlinx:kotlinx-coroutines-reactive")
    implementation("org.jetbrains.kotlinx:kotlinx-coroutines-reactor")
    ...
}
Once we’ve added the dependencies, we can start using the main coroutines-related keyword: suspend. The suspend keyword indicates that the function being called is an asynchronous one. Unlike in other languages where a similar concept is exposed via the async or await keywords, the suspend function must be handled in the coroutine context, which can be either another suspend function or an explicit coroutine Job created using the CoroutineScope.launch or runBlocking functions.
Thus, as our very first step in our move to bring coroutines into the project, we will add the suspend keyword to all of the project’s controllers and service methods. For example, after the modification, the MessageService interface should look like this:
interface MessageService {

    suspend fun latest(): List<MessageVM>

    suspend fun after(lastMessageId: String): List<MessageVM>

    suspend fun post(message: MessageVM)
}
The change above will also affect the places in our code where MessageService is used. All the functions in PersistentMessageService have to be updated accordingly by adding the suspend keyword.
@Service
class PersistentMessageService(val messageRepository: MessageRepository) : MessageService {

   override suspend fun latest(): List<MessageVM> =
       messageRepository.findLatest()
           .mapToViewModel()

   override suspend fun after(messageId: String): List<MessageVM> =
       messageRepository.findLatest(messageId)
           .mapToViewModel()

   override suspend fun post(message: MessageVM) {
       messageRepository.save(message.asDomainObject())
   }
}
Both request handlers, HtmlController and MessageResource, have to be adjusted as well:
// src/main/kotlin/com/example/kotlin/chat/controller/HtmlController.kt

@Controller
class HtmlController(val messageService: MessageService) {

   @GetMapping("/")
   suspend fun index(model: Model): String {
       //...
   }
}
// src/main/kotlin/com/example/kotlin/chat/controller/MessageResource.kt
@RestController
@RequestMapping("/api/v1/messages")
class MessageResource(val messageService: MessageService) {
@GetMapping
suspend fun latest(@RequestParam(value = "lastMessageId", defaultValue = "") lastMessageId: String): ResponseEntity<List<MessageVM>> {
//...
}
@PostMapping
suspend fun post(@RequestBody message: MessageVM) {
//...
}
}We have prepared our code for migration to the reactive Spring stack, Spring WebFlux. Read on!
Adding WebFlux and R2DBC
Although in most cases it is enough to add the org.jetbrains.kotlinx:kotlinx-coroutines-core dependency, to have proper integration with Spring Framework we need to replace the web and database modules:
dependencies {
    ...
    implementation("org.springframework.boot:spring-boot-starter-web")
    implementation("org.springframework.boot:spring-boot-starter-data-jdbc")
    ...
}
with the following:
dependencies {
    ...
    implementation("org.springframework.boot:spring-boot-starter-webflux")
    implementation("org.springframework.boot:spring-boot-starter-data-r2dbc")
    implementation("io.r2dbc:r2dbc-h2")
    ...
}
By adding the above dependencies, we replace the standard blocking Web MVC with the fully reactive and non-blocking WebFlux. Additionally, JDBC is replaced with a fully reactive and non-blocking R2DBC.
Thanks to the hard work of all the Spring Framework engineers, migration from Spring Web MVC to Spring WebFlux is seamless, and we don’t have to rewrite anything at all! For R2DBC, however, we have a few extra steps. First, we need to add a configuration class.
⌨️ We place this class into the com/example/kotlin/chat/ChatKotlinApplication.kt file, where the main() method of our application is.
@Configuration
class Config {

    @Bean
    fun initializer(connectionFactory: ConnectionFactory): ConnectionFactoryInitializer {
        val initializer = ConnectionFactoryInitializer()
        initializer.setConnectionFactory(connectionFactory)
        val populator = CompositeDatabasePopulator()
        populator.addPopulators(ResourceDatabasePopulator(ClassPathResource("./sql/schema.sql")))
        initializer.setDatabasePopulator(populator)
        return initializer
    }
}
The above configuration ensures that the table’s schema is initialized when the application starts up.
Next, we need to modify the properties in application.properties to include just one attribute:
spring.r2dbc.url=r2dbc:h2:file:///./build/data/testdb;USER=sa;PASSWORD=passwordOnce we have made a few basic configuration-related changes, we’ll perform the migration from Spring Data JDBC to Spring Data R2DBC. For this, we need to update the MessageRepository interface to derive from CoroutineCrudRepository and mark its methods with the suspend keyword. We do this as follows:
interface MessageRepository : CoroutineCrudRepository<Message, String> {

    // language=SQL
    @Query("""
        SELECT * FROM (
            SELECT * FROM MESSAGES
            ORDER BY "SENT" DESC
            LIMIT 10
        ) ORDER BY "SENT"
    """)
    suspend fun findLatest(): List<Message>

    // language=SQL
    @Query("""
        SELECT * FROM (
            SELECT * FROM MESSAGES
            WHERE SENT > (SELECT SENT FROM MESSAGES WHERE ID = :id)
            ORDER BY "SENT" DESC
        ) ORDER BY "SENT"
    """)
    suspend fun findLatest(@Param("id") id: String): List<Message>
}
All the methods of the CoroutineCrudRepository are designed with Kotlin coroutines in mind.
⚠️ Note that the @Query annotation is now in a different package, so it should be imported as the following:
import org.springframework.data.r2dbc.repository.QueryAt this stage, these changes should be sufficient to make your application asynchronous and non-blocking. Once the application is re-run, nothing should change from a functionality perspective, but the executions will now be asynchronous and non-blocking.
Finally, we need to apply a few more fixes to our tests, as well. Since our MessageRepository is now asynchronous, we need to change the datasource URL and run all the related operations in the coroutine context, enclosed within runBlocking as shown below (in the ChatKotlinApplicationTests.kt file):
// ...
// new imports
import kotlinx.coroutines.flow.first
import kotlinx.coroutines.runBlocking

@SpringBootTest(
        webEnvironment = SpringBootTest.WebEnvironment.RANDOM_PORT,
        properties = [
            "spring.r2dbc.url=r2dbc:h2:mem:///testdb;USER=sa;PASSWORD=password"
        ]
)
class ChatKotlinApplicationTests {
    //...

    @BeforeEach
    fun setUp() {
       runBlocking {
        //...
       }
    }

    @AfterEach
    fun tearDown() {
       runBlocking {
        //...
       }
    }

    //...

    @Test
    fun `test that messages posted to the API is stored`() {
       runBlocking {
        //...
       }
    }
}
Our application is now asynchronous and non-blocking. But it still uses polling to deliver the messages from the backend to the UI. In the next part, we will modify the application to use RSocket to stream the messages to all connected clients.
Part 5: Streaming with RSocket
We are going to use RSocket to convert message delivery to a streaming-like approach.
RSocket is a binary protocol for use on byte stream transports such as TCP and WebSockets. The API is provided for various programming languages, including Kotlin. However, in our example we do not need to use the API directly. Instead, we are going to use Spring Messaging, which integrates with RSocket and provides a convenient annotation based approach to configuration.
To start using RSocket with Spring, we need to add and import a new dependency to build.gradle.kts:
dependencies {
    ....
     implementation("org.springframework.boot:spring-boot-starter-rsocket")
    ....
}
Next, we’ll update MessageRepository to return an asynchronous stream of messages exposed through Flow<Messages> instead of `List`s.
interface MessageRepository : CoroutineCrudRepository<Message, String> {

    //...
    fun findLatest(): Flow<Message>

    //...
    fun findLatest(@Param("id") id: String): Flow<Message>
}
We need to make similar changes to the MessageService interface to prepare it for streaming. We no longer need the suspend keyword. Instead, we are going to use the Flow interface that represents the asynchronous data stream. Any function that produced a List as a result will now produce a Flow instead. The post method will receive the Flow type as an argument, as well.
import kotlinx.coroutines.flow.Flow

interface MessageService {

   fun latest(): Flow<MessageVM>

   fun after(messageId: String): Flow<MessageVM>

   fun stream(): Flow<MessageVM>

   suspend fun post(messages: Flow<MessageVM>)
}
Now we can connect the dots and update the PersistentMessageService class to integrate the above changes.
import com.example.kotlin.chat.asDomainObject
import com.example.kotlin.chat.asRendered
import com.example.kotlin.chat.mapToViewModel
import com.example.kotlin.chat.repository.MessageRepository
import kotlinx.coroutines.flow.Flow
import kotlinx.coroutines.flow.MutableSharedFlow
import kotlinx.coroutines.flow.map
import kotlinx.coroutines.flow.onEach
import kotlinx.coroutines.flow.collect
import org.springframework.stereotype.Service

@Service
class PersistentMessageService(val messageRepository: MessageRepository) : MessageService {

   val sender: MutableSharedFlow<MessageVM> = MutableSharedFlow()

   override fun latest(): Flow<MessageVM> =
       messageRepository.findLatest()
           .mapToViewModel()

   override fun after(messageId: String): Flow<MessageVM> =
       messageRepository.findLatest(messageId)
           .mapToViewModel()

   override fun stream(): Flow<MessageVM> = sender

   override suspend fun post(messages: Flow<MessageVM>) =
       messages
           .onEach { sender.emit(it.asRendered()) }
           .map {  it.asDomainObject() }
           .let { messageRepository.saveAll(it) }
           .collect()
}
First, since the MessageService interface has been changed, we need to update the method signatures in the corresponding implementation. Consequently, the mapToViewModel `extension method that we defined previously in the `Extension.kt file for the List type is now needed for the Flow type, instead.
import kotlinx.coroutines.flow.Flow
import kotlinx.coroutines.flow.map

fun Flow<Message>.mapToViewModel(): Flow<MessageVM> = map { it.asViewModel() }
For better readability we also added the asRendered extension function for the MessageVM class. In Extensions.kt file:
fun MessageVM.asRendered(contentType: ContentType = ContentType.MARKDOWN): MessageVM =
   this.copy(content = contentType.render(this.content))
Next, we will use the MutableSharedFlow from the Coroutines API to broadcast messages to the connected clients.
We are getting closer to the desired UI with the changes. Next, we are going to update MessageResource and HtmlController.
MessageResource gets a totally new implementation. First of all, we are going to use this class to support messaging by applying the @MessageMapping annotation instead of @RequestMapping. The new methods, send() and receive(), are mapped to the same endpoint by @MessageMapping("stream") for duplex communication.
@Controller
@MessageMapping("api.v1.messages")
class MessageResource(val messageService: MessageService) {

   @MessageMapping("stream")
   suspend fun receive(@Payload inboundMessages: Flow<MessageVM>) =
       messageService.post(inboundMessages)

   @MessageMapping("stream")
   fun send(): Flow<MessageVM> = messageService
       .stream()
       .onStart {
           emitAll(messageService.latest())
       }
}
To send the messages to the UI, we open the stream from the messageService, implemented by the PersistentMessageService `class, and call the `onStart method to start streaming the events. When a new client connects to the service, it will first receive the messages from the history thanks to the block of code that is supplied to the onStart method as an argument: emitAll(messageService.latest()). The channel then stays open to stream new messages.
The HtmlController class no longer needs to to handle any of the streaming logic. Its purpose is now to serve the static page, so the implementation becomes trivial:
@Controller
class HtmlController() {

   @GetMapping("/")
   fun index(): String {
       // implemented in src/main/resources/templates/chatrs.html
       return "chatrs"
   }
}
Note that the UI template is now chatrs.html instead of chat.html. The new template includes the JavaScript code that configures a WebSocket connection and interacts directly with the api.v1.messages.stream endpoint implemented by the MessageResource class.
We need to make one last change to the application.properties file for RSocket to work properly. Add the following properties to the configuration:
spring.rsocket.server.transport=websocket
spring.rsocket.server.mapping-path=/rsocket
The application is ready to start! Messages are now delivered to the chat UI without polling thanks to RSocket. Additionally, the backend of the application is fully asynchronous and non-blocking thanks to Spring WebFlux and Kotlin Coroutines.
The final step for us in this tutorial is to update the tests.
We are going to add one more dependency specifically for tests. Turbine is a small testing library. It simplifies testing by providing a few useful extensions to the Flow interface of kotlinx.coroutines.
dependencies {
    ...
    testImplementation("app.cash.turbine:turbine:0.4.1")
    ...
}
The entrypoint for the library is the test() extension for Flow<T>, which accepts a block of code that implements the validation logic. The test() extension is a suspending function that will not return until the flow is complete or canceled. We will look at its application in a moment.
Next, update the test dependencies. Instead of autowiring via fields, we’ll use a constructor to inject the dependencies.
class ChatKotlinApplicationTests {

   @Autowired
   lateinit var client: TestRestTemplate

   @Autowired
   lateinit var messageRepository: MessageRepository

class ChatKotlinApplicationTests(
   @Autowired val rsocketBuilder: RSocketRequester.Builder,
   @Autowired val messageRepository: MessageRepository,
   @LocalServerPort val serverPort: Int
) {
We use RSocketRequest.Builder instead of TestRestTemplate since the endpoint that is implemented by MessageResource talks over RSocket protocol. In the tests, we need to construct an instance of RSocketRequester and use it to make requests. Replace the old tests with the new code below:
@ExperimentalTime
@ExperimentalCoroutinesApi
@Test
fun `test that messages API streams latest messages`() {
   runBlocking {
       val rSocketRequester =
            rsocketBuilder.websocket(URI("ws://localhost:${serverPort}/rsocket"))

       rSocketRequester
           .route("api.v1.messages.stream")
           .retrieveFlow<MessageVM>()
           .test {
               assertThat(expectItem().prepareForTesting())
                   .isEqualTo(
                       MessageVM(
                           "*testMessage*",
                           UserVM("test", URL("http://test.com")),
                           now.minusSeconds(2).truncatedTo(MILLIS)
                       )
                   )

               assertThat(expectItem().prepareForTesting())
                   .isEqualTo(
                       MessageVM(
                           "<body><p><strong>testMessage2</strong></p></body>",
                           UserVM("test1", URL("http://test.com")),
                           now.minusSeconds(1).truncatedTo(MILLIS)
                       )
                   )
               assertThat(expectItem().prepareForTesting())
                   .isEqualTo(
                       MessageVM(
                           "<body><p><code>testMessage3</code></p></body>",
                           UserVM("test2", URL("http://test.com")),
                           now.truncatedTo(MILLIS)
                       )
                   )

               expectNoEvents()

               launch {
                   rSocketRequester.route("api.v1.messages.stream")
                       .dataWithType(flow {
                           emit(
                               MessageVM(
                                   "`HelloWorld`",
                                   UserVM("test", URL("http://test.com")),
                                   now.plusSeconds(1)
                               )
                           )
                       })
                       .retrieveFlow<Void>()
                       .collect()
               }

               assertThat(expectItem().prepareForTesting())
                   .isEqualTo(
                       MessageVM(
                           "<body><p><code>HelloWorld</code></p></body>",
                           UserVM("test", URL("http://test.com")),
                           now.plusSeconds(1).truncatedTo(MILLIS)
                       )
                   )

               cancelAndIgnoreRemainingEvents()
           }
   }
}

@ExperimentalTime
@Test
fun `test that messages streamed to the API is stored`() {
   runBlocking {
       launch {
           val rSocketRequester =
                rsocketBuilder.websocket(URI("ws://localhost:${serverPort}/rsocket"))

           rSocketRequester.route("api.v1.messages.stream")
               .dataWithType(flow {
                   emit(
                       MessageVM(
                           "`HelloWorld`",
                           UserVM("test", URL("http://test.com")),
                           now.plusSeconds(1)
                       )
                   )
               })
               .retrieveFlow<Void>()
               .collect()
       }

       delay(2.seconds)

       messageRepository.findAll()
           .first { it.content.contains("HelloWorld") }
           .apply {
               assertThat(this.prepareForTesting())
                   .isEqualTo(
                       Message(
                           "`HelloWorld`",
                           ContentType.MARKDOWN,
                           now.plusSeconds(1).truncatedTo(MILLIS),
                           "test",
                           "http://test.com"
                       )
                   )
           }
   }
}
Summary
This was the final part in the tutorial. We started with a simple chat application in which the UI was polling for new messages while the backend was blocking when running the database queries. We gradually added features to the application and migrated it to the reactive Spring stack. The backend is now fully asynchronous, making use of Spring WebFlux and Kotlin coroutines.