Get ahead
VMware offers training and certification to turbo-charge your progress.
Learn moreUPDATE - Feb 21 '12: Spring Framework has moved to GitHub, and for 3.2.x development has moved from Ant to Gradle. Take a look at the building from source section of the README there for (greatly simplified!) instructions.
As Juergen announced last week, Spring 3.0 Milestone 2 is now available. In this post, I'll show you in six steps how to download and build the latest Spring 3 sources and get a development environment up and running in Eclipse.
We'll wrap up by discussing the best ways to follow Spring 3 development, how to file bugs and improvement requests, and considerations for compiling against locally-built Spring 3 binaries in a Maven environment.
Make sure you've got each of the following before beginning the steps below:
As you may already be aware, Spring sources are now hosted at springsource.org and, unlike previous versions of Spring that were controlled under CVS, Spring 3 is now managed using Subversion.
Before we check out the sources, let's take a quick look at the layout of the repository.
cbeams@kaizen:~>$ svn ls https://src.springsource.org/svn/spring-framework
branches/
tags/
trunk/
As you can see, the repository is laid out in conventional Subversion form, with branches, tags and trunk directories. Should you need to sync up to a particular milestone or release, you can always find them in the tags/ directory:
cbeams@kaizen:~>$ svn ls https://src.springsource.org/svn/spring-framework/tags
spring-framework-3.0.0.M1/
spring-framework-3.0.0.M2/
Let's sync up to the latest and greatest under trunk/:
cbeams@kaizen:~>$ svn co https://src.springsource.org/svn/spring-framework/trunk spring-framework
...
When the checkout is complete, you'll find the following directory listing:
cbeams@kaizen:~>$ cd spring-framework
cbeams@kaizen:~/spring-framework>$ ls -1
build-spring-framework
build.properties
ci-build.properties
org.springframework.agent
org.springframework.aop
org.springframework.aspects
org.springframework.beans
org.springframework.config.java
org.springframework.context
org.springframework.context.support
org.springframework.core
org.springframework.expression
org.springframework.instrument
org.springframework.instrument.classloading
org.springframework.integration-tests
org.springframework.jdbc
org.springframework.jms
org.springframework.orm
org.springframework.oxm
org.springframework.samples.petclinic
org.springframework.spring-library
org.springframework.test
org.springframework.transaction
org.springframework.web
org.springframework.web.portlet
org.springframework.web.servlet
spring-build
spring-framework.ipr
spring-framework.psf
Experienced Spring hackers will notice right away that the directory structure looks a bit different than in previous versions. Spring's internal structure is much more modular now - each of the org.springframework.* directories represents an individual project or module, each with its own respective source directory, test suite and build artifact. This is good news when you're working on the framework: for example, a change to org.springframework.core can be unit tested independent of the thousands of unrelated unit tests in the other modules. This makes for a much more expedient and pleasurable development experience. It also means that finding existing unit tests tends to be a more intuitive process. Poke around for yourself and see what you think!
Along with many of the other Spring projects, Spring 3 is built using a combination of Ant and Ivy that we refer to simply as 'Spring Build'. Details of the build infrastructure aside, kicking off a build is simple:
cbeams@kaizen:~/spring-framework>$ cd build-spring-framework
cbeams@kaizen:~/spring-framework/build-spring-framework>$ ant
[...]
BUILD SUCCESSFUL
This initial build will take 20 minutes or more, depending on your connection speed. You'll notice that Ivy downloads all dependencies transitively and automatically from the SpringSource Enterprise Bundle Repository and this can take some time.
While the build progresses, move on and complete steps 3-5 to set up your Eclipse/STS workspace.
Because we'll be changing the default JRE and introducing a new classpath variable, it's recommended that you set up a new workspace in Eclipse dedicated to Spring 3, but it's not strictly required. If you wish to skip this step and use an existing workspace, move on to step 4.
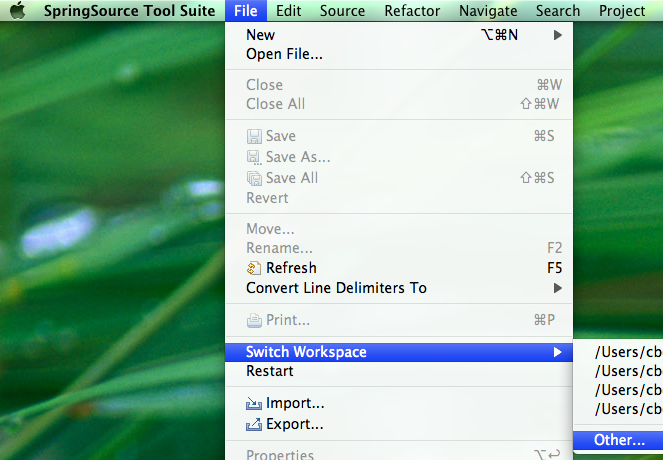
Go File > Switch Workspace > Other ...
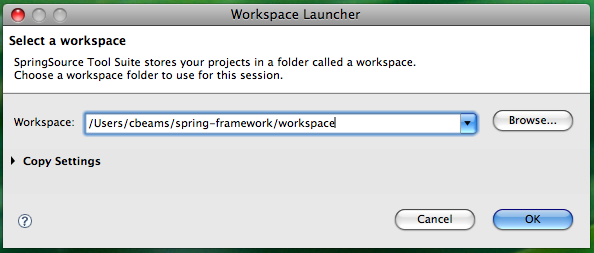
Specify a new location for your Spring 3 workspace. You may choose any directory; as you can see below, I've chosen to create a 'workspace' directory right within my spring checkout, just for convenience.
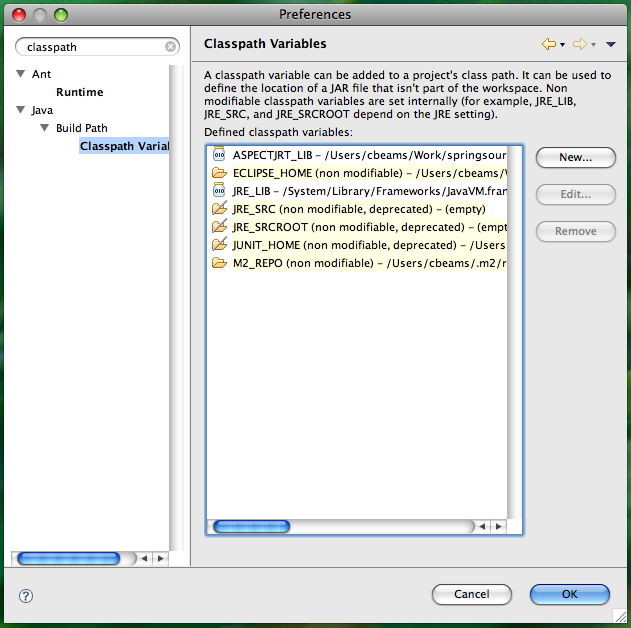
In this step, we'll create a classpath variable in Eclipse that the various Spring 3 projects will use to determine the location of the jars they depend on. As we noticed earlier when watching the Ant build progress, Ivy is downloading a number of jars - those jars are being downloaded into the ivy-cache/repository directory under the root of your Spring checkout.
Open the global Preferences dialog

Type 'classpath' to narrow the list of menu items and choose 'Classpath Variables'
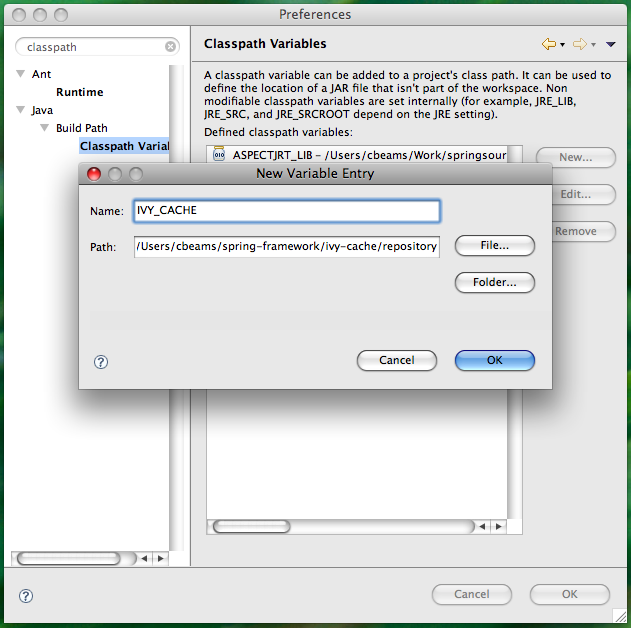
Click 'New' to create a new classpath variable, and type in the following values
Name: IVY_CACHE Path: [your-checkout-root]/ivy-cache/repository
As mentioned above, Spring 3 requires Java 6 to build. The easiest way to ensure this dependency is handled is to simply set the default JRE for your Eclipse workspace to Java 6. If this is already the case for your Eclipse installation, you may of course skip this step.
Once again, open the global Preferences dialog. This time, type in "installed JRE" to narrow down the options.
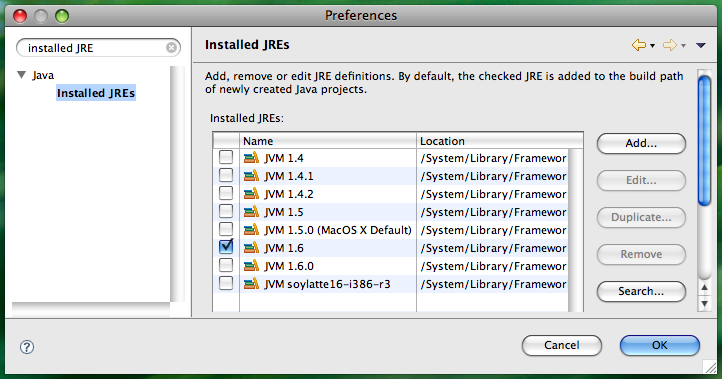
Make sure that a 1.6 JVM is selected. If there is no 1.6 JVM listed in your Installed JREs, click 'Add...' and point Eclipse to the location of Java 6 on your system.
We're almost ready to import Spring sources; first let's make sure the build is complete. Look back at the window in which you started the build. It may still be progressing; if so, wait until it completes. When it finishes you should see the following:

Remember, your time will vary depending on your connection speed. Don't be surprised if the initial build takes a while!
When the build is complete, import the projects into Eclipse:
Go File > Import and type in "existing" to narrow the options
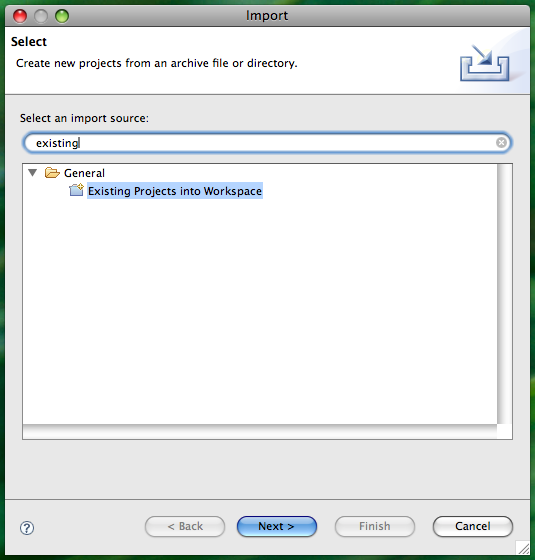
Choose "Existing Projects into Workspace". A file selection dialog will appear. Choose the root directory of your Spring 3 checkout. Eclipse will recurse through the directory and detect the .project files for each of the Spring 3 projects. When finished, you should see the following dialog:
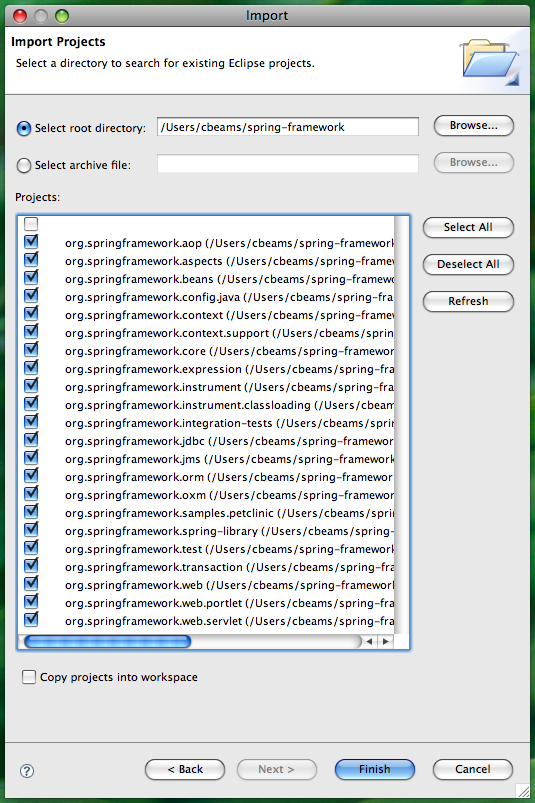
Uncheck the first, unlabeled checkbox and click Finish.
Wait while Eclipse imports the projects. When complete, you should see your Package Explorer populated as below, with 22 projects and no errors.
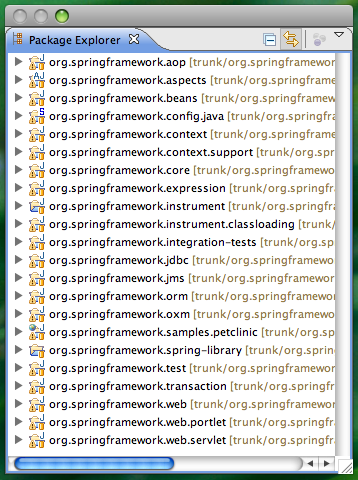
That's it! You've now got the Spring 3 sources at your fingertips and you can browse and edit at will. Have fun!
The best way to stay in touch with Spring development is to follow the subversion commits via RSS using SpringSource's Fisheye service.
Go to https://fisheye.springsource.org/browse/spring-framework/trunk, and click the RSS icon in the upper right.
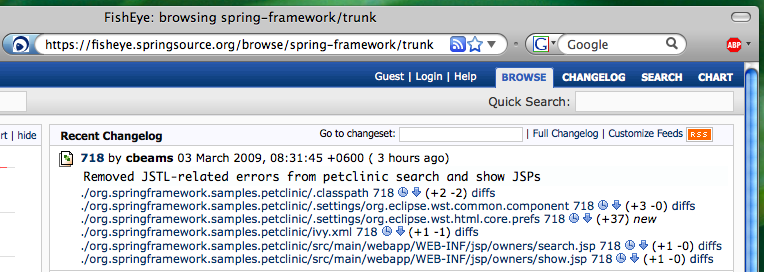
Note that you can subscribe to any node within the Spring source tree. So if there's a particular module or even individual package that you care about, you can receive notifications at any granularity you choose.
For quick reference, the RSS feed URL to follow all Spring 3 commits is https://fisheye.springsource.org/changelog/~rss/spring-framework/trunk/rss.xml. Add that to your feed reader and you're good to go.
As the milestones progress and we get closer to Spring 3.0 GA, your feedback is ever more important. Should you find a bug or have an improvement request for an existing feature, please take a moment to visit http://jira.springsource.org and create a new issue against the Spring Framework project.
If possible, please attach a simple JUnit test case that reproduces any bug. In the absence of that, please provide detailed reproduction steps.
Also, when reporting bugs or improvements, please don't hesitate to take a shot at implementing the change yourself and attaching a patch file. We love getting contributions from the community!
If you're using the Subclipse Subversion plugin for Eclipse, it's quite easy to generate patch files:
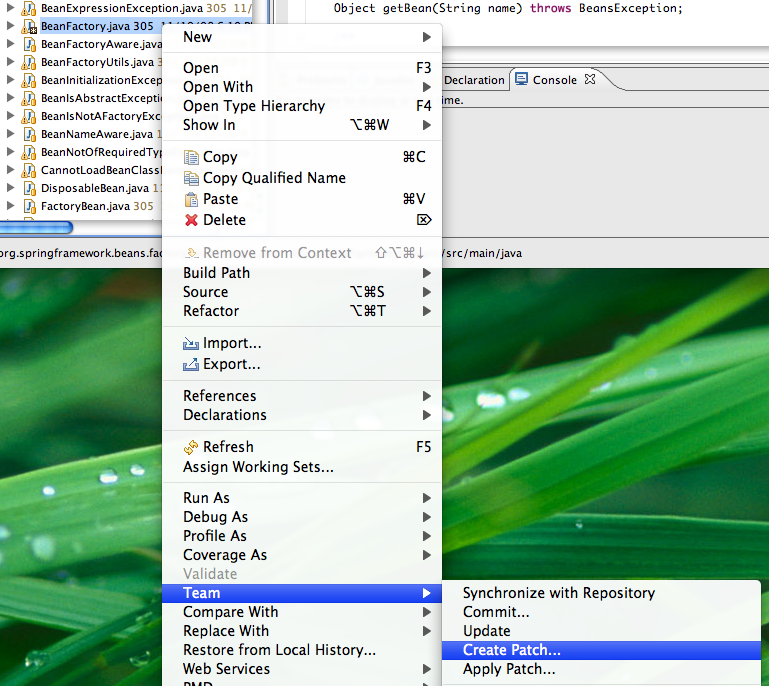
From the context menu in the package explorer, go Team > Create Patch...
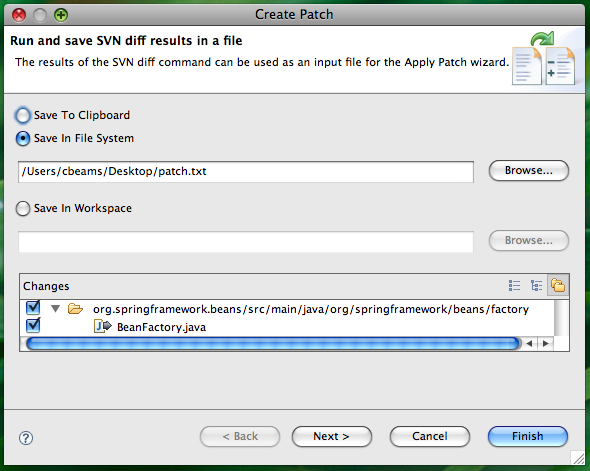
In the Create Patch dialog, choose 'Save In File System' and specify a file
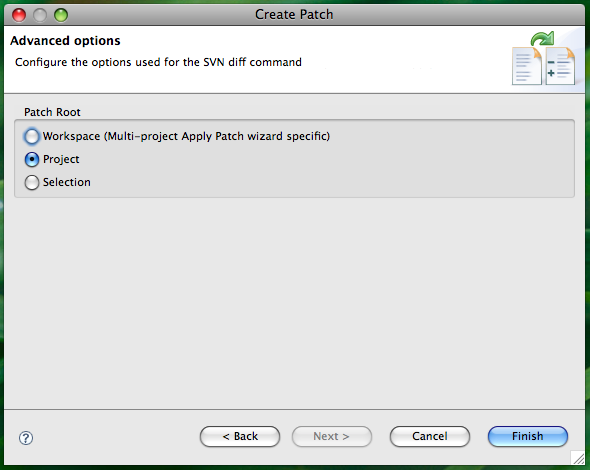
Click Next for advanced options and choose 'Project' as the patch root.
Then attach the resulting patch file to your JIRA issue. You can rest assured that issues with patches have a natural kind of precedence ;)
As a final note, Maven users will want to know how to most effectively install their locally built Spring 3 binaries into their local Maven repository.
From the root of your Spring checkout directory, or from within any individual module, you can use the 'install-maven-central' target to automate copying artifacts from target/ to your local m2 repository.
cbeams@kaizen:~/spring-framework/org.springframework.core>$ ant install-maven-central
Buildfile: build.xml
[... snipped ...]
install-maven-central:
[maven:install] [INFO] Installing /Users/cbeams/spring-framework/org.springframework.core/target/artifacts/org.springframework.core.jar to /Users/cbeams/.m2/repository/org/springframework/org.springframework.core/3.0.0.BUILD-20090302225538/org.springframework.core-3.0.0.BUILD-20090302225538.jar
[maven:install] [INFO] Installing /Users/cbeams/spring-framework/org.springframework.core/target/artifacts/org.springframework.core-sources.jar to /Users/cbeams/.m2/repository/org/springframework/org.springframework.core/3.0.0.BUILD-20090302225538/org.springframework.core-3.0.0.BUILD-20090302225538-sources.jar
BUILD SUCCESSFUL
Total time: 4 seconds
You can combine the 'test' and 'install-maven-central' targets to achieve functionality roughly equivalent to 'mvn install':
cbeams@kaizen:~/spring-framework/org.springframework.core>$ ant test install-maven-central
Note: 'install-maven-central' assumes that your local repository is in the default location of $HOME/.m2/repository
I hope you've enjoyed this walk through the world of Spring 3 development, and I think you'll find that after the one-time setup detailed above it's easy to develop against Spring 3 sources. We encourage you to follow development and stay in touch with us via JIRA. Your feedback is and always has been the lifeblood of Spring, and we thank you for it. Keep it coming!