Get ahead
VMware offers training and certification to turbo-charge your progress.
Learn moreSpring Integration is a POJO-based light weight, embeddable messaging framework with a loosely coupled programming model aimed to simplify integration of heterogeneous systems based on Enterprise Integration Patterns and without requiring a separate ESB-like engine or proprietary development and deployment environment. On the other hand, OSGi is a paradigm that allows one to compose loosely coupled systems from independent modules called OSGi Bundles. Composing systems from the set of independently developed modules might not be such a new paradigm, we've been doing it (hopefully) for a number of years. Having said that, the realization of true benefit of OSGi modularization will come not from its static packaging model, but from understanding its deployment and run-time dynamics and how well it is positioned to address the dynamics of today's business processes.
So, let's see on the simple example how integration based on message exchange and dynamics of OSGi can complement each other allowing for realization of very powerful and dynamic system.
Spring Integration samples come with the distribution of Spring Integration. You can also download them independently from here. For simplicity these samples were developed as SpringSource Tool Suite (STS) projects while utilizing dm Server tools for quick integration with SpringSource dm Server - an OSGi and Spring based Enterprise Java Platform. However being OSGi compliant based projects these samples will adequately run on any properly configured OSGi platform.
To configure STS/dm Server environment follow these steps:
Download and unzip STS from here Download and unzip SpringSource dm Server from here
Spring Source Tool Suite v2.1.x will come with SpringSource dm Server already pre-configured, however understanding how to configure it manually still helps.Open STS and Configure dm Server: Open Server View -> Right Click on white spot in the Server view -> New -> Server
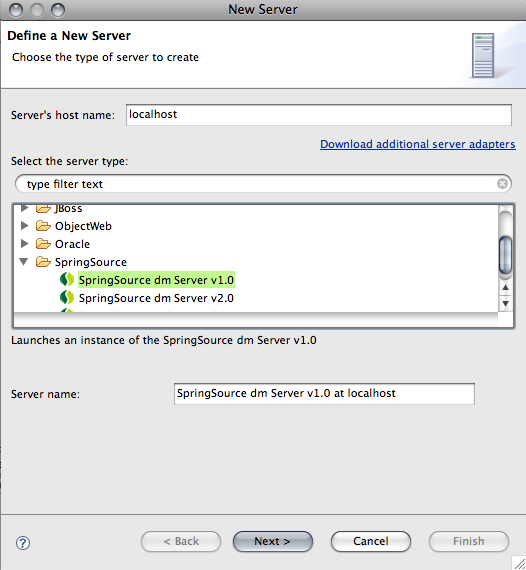
Select SpringSource -> SpringSource dm Server v1.0 -> Next
Point to the home the directory where you installed the server
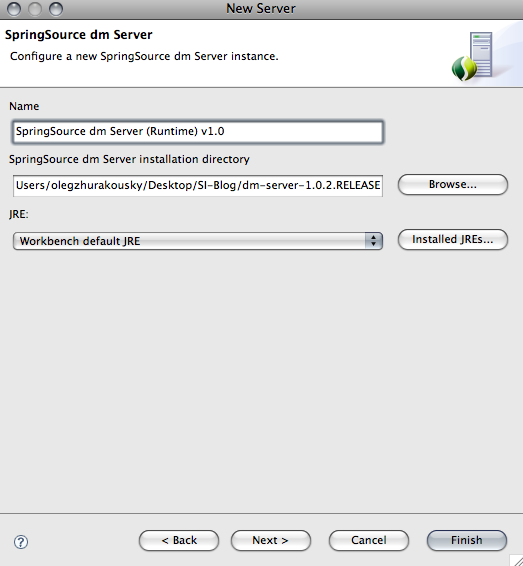
Click Finish

You now have SpringSource dm Server configured within STS environment. Start dm Server and make sure it starts successfully and that there are no errors.
It is assumed you already downloaded Spring Integration samples, so let's import the two sample projects into the workspace using Import Existing Projects into the workspace wizard provided by STS/Eclipse. File -> Import -> General -> Existing Projects into Workspace -> Next Browse to the location of the samples directory and select osgi-inbound and osgi-outbound projects
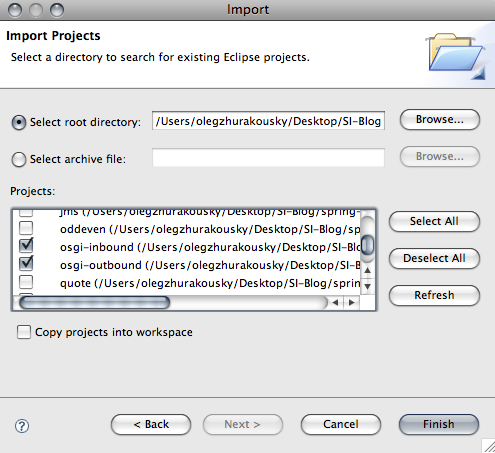
Click Finish You should see two projects with errors.
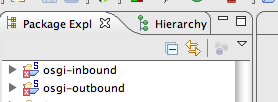
These errors are expected simply because our projects are not aware of dm Server Target Runtime and our dm Server Target Runtime is not aware of Spring Integration bundles. Let's solve one issue at a time. First lets make dm Server aware of the Spring Integration by deploying Spring Integration and dependent bundles into dm Server's repository. This is a very simple process. Copy org.springframework.integration-1.0.3.RELEASE.jar and org.springframework.integration.file-1.0.3.RELEASE.jar (the two bundles our samples depend on) into dm Server's repository/bundles/usr directory. Then in the STS's Server view double click on the instance of the dm Server -> Click on Repository tab and in the right top corner you'll find a Refresh button. Click on it and you should see the two bundles available in the dm Server's repository.

Now we need to make our bundle projects aware of our new Target Runtime. Right click on each project -> Properties -> Target Runtimes -> SpringSource dm Server (Runtime) v1.0
 Now all the errors should disappear.
You are ready to test these samples
Start dm Server by right clicking on the server instance -> Start
Deploy osgi-inbound by simply dragging and dropping osgi-inbound project onto the dm Server instance. In a few seconds you should see successful start message:
[2009-07-27 21:56:49.040] onnection(5)-172.16.12.1 <SPDE0010I> Deployment of 'org.springframework.integration.samples.osgi.inbound'
version '1.0.3' completed.
Then do the same for osgi-outbound bundle:
[2009-07-27 21:58:45.220] onnection(8)-172.16.12.1 <SPDE0010I> Deployment of 'org.springframework.integration.samples.osgi.outbound'
version '1.0.3' completed.
Now you are ready to test the functionality provided by these bundles. To make it more interesting we've enabled Command Line Interface (CLI) via OSGi console which allows you to interact with osgi-inbound bundle by providing a command, the message and the file name you want the message to be written. You can connect to OSGi console via:
telnet localhost 2401
or you can use Server Console tab of the Server view and type:
siSend "Hello World" hello.txt
and click Execute
You will see the following:
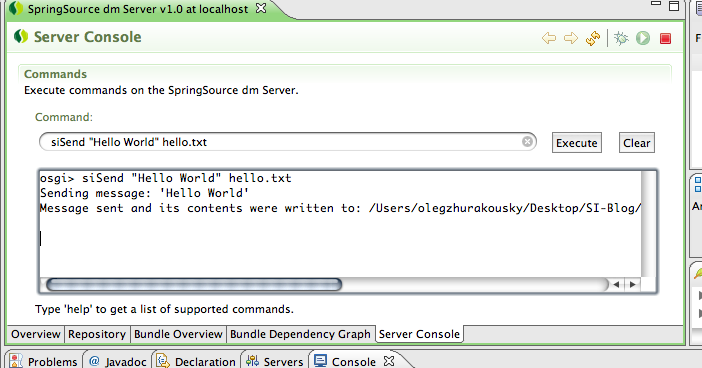
Go and verify that the your message has been written to a file.
This very simple and trivial concept demonstrates the loosely coupled integration between the two systems based on the messaging model provided by Spring Integration. However in the real world one of the issues that we have to face while trying to integrate the two systems is the independent life-cycle of such systems where change in their behavior, addition of new systems and/or end of life of the old systems is a normal occurrence. Typically such changes require, not only code changes, but redeployment of the entire monolithic (e.g., EAR, WAR ) application following the complete server restart. Spring integration's POJO programming model is very well suited to address loosely coupled nature of these system where change to one system rarely affects another one. However what about its life-cycle dynamics? Lets assume that the requirement (within the scope of our little sample) as to where or how the files have to be written has changed. Both "where" and "how" is the responsibility of the osgi-outbound bundle. Under normal circumstances, any change to the functionality of the osgi-outbound bundle would require complete refresh of the system (i.e., redeployment of the entire system and server restart). It might not be such a big problem when your system is comprised of only two bundles. But what if its more then two? Are you prepared to rebuild and redeploy the entire system packaged as WAR or EAR simply because the directory where messages have to be written has changed or a new sub-system which should log every incoming message was introduced?This is where OSGi and its Services layer and most importantly OSGi Service dynamics provide great help. So lets take the sample requirements described above and see how they could be realized based on extending current samples. First, lets review the Application Context configuration of the osgi-inbound bundle:
<osgi:service id="inboundService" ref="inboundChannel"
interface="org.springframework.integration.channel.SubscribableChannel"/>

<integration:publish-subscribe-channel id="inboundChannel"/>

<integration:gateway id="inboundGateway"
service-interface="org.springframework.integration.samples.osgi.inbound.InboundGateway"
default-request-channel="inboundChannel"/>
As you can see, a very simple configuration which defines a Gateway Proxy allowing for a POJO way of sending a message that will be deposited to an inbound channel configured as publish-subscribe channel. However what makes it even more interesting is that this channel has been exported as a service to the OSGi Service Registry via element, thus allowing for much loosely coupled yet dynamic cooperation model between the current and future bundles.
Let's also review the Application Context configuration of osgi-outbound bundle.
<osgi:reference id="filesIn"
interface="org.springframework.integration.channel.SubscribableChannel"/>

<file:outbound-gateway id="filesOut"
request-channel="filesIn"
directory="${java.io.tmpdir}/spring-integration-samples/output"
delete-source-files="true"/>
The goal of this bundle is to dynamically subscribe to a channel advertised by the osgi-inbound bundle as soon as this bundle comes up and write a message to a file in the directory configured by the <osgi:service/> element, thus accounting for a dynamics provided by OSGi Services layer. As you can see in this configuration the 'inboundChannel' OSGi service exported by the osgi-inbound bundle is now imported via <osgi:reference/> element. Now the inbound channel which is fronted by OSGi service is ready to accept and/or lose subscribers dynamically at runtime. Because of OSGi Service dynamics we can also update configuration or totally re-design/re-implement osgi-outbound bundle without affecting the producing part of the system (osgi-inbound). So lets go ahead and change the directory where the files will be written (Make sure the dm Server is still running. . . in fact forget about stopping it for the duration of this blog)
Open osgi-outbound project -> src -> META-INF -> spring -> osgi-outbound.xml and add a sub-directory to the 'directory' configuration (in this case its 'foo')
 Save the file. In the few seconds you'll see your osgi-outbound bundle was redeployed
Open up OSGi or Server Console and send another message as you did before and see if the new file was written to the directory you've just specified. Hopefully it was ;)
For more ideas and a more sophisticated example you might also enjoy reading this from Spring Integration team member Iwein Fuld
Most importantly - Happy Integration!!!