Get ahead
VMware offers training and certification to turbo-charge your progress.
Learn moreDeveloping, deploying, and operating cloud applications should be as easy as (if not easier than) local applications. That is and should be a governing principle behind any cloud platform, library, or tool. Spring Cloud--an open-source library--makes it easy to develop JVM applications for the cloud. With it, applications can connect to services and discover information about the cloud environment easily in multiple clouds such as Cloud Foundry and Heroku. Further, you can extend it to other cloud platforms and new services.
In this blog (first in a series), I will introduce Spring Cloud and show its usage from the application developer point of view. We will develop a simple application and deploy to Cloud Foundry and Heroku. In subsequent blogs, I will explore the extensibility angle.
One of the many advantages of running an application in the cloud is easy availability of a variety of services. Instead of managing hardware, installation, operation, backups, etc., you simply create and bind services with a click of a button or a shell command.
How do applications access these services? For example, if you have a relational database bound to your application, you will need to create a DataSource object based on that service. This is where Spring Cloud helps. It removes all the work needed to access and configure service connectors and lets you focus on using these services. It also exposes application instance information (host address, port, name, etc.).
Spring Cloud does all this in a cloud-independent manner through the concept of a Cloud Connector. While it provides implementations for Cloud Foundry and Heroku, you (or the cloud provider) can extend it to other clouds by implementing an interface and taking advantage of the rest of the library. Then, simply add the library containing the extension to your application's classpath; there is no need to fork and build Spring Cloud.
Spring Cloud also recognizes that it cannot possibly cater to every service on every cloud. Therefore, while supporting many common services out of the box, it allows you (or the service provider) to extend its functionality to other services. Just as extending for other clouds, you add the jar containing your service extensions to your application’s classpath.
Finally, it features a special support for Spring applications (in a separate module) including Spring Boot applications in the form of Java and XML configuration support and exposing application and services properties in an easy to consume form. This is the only module in Spring Cloud that depends on Spring. Other framework providers may contribute specific support for their frameworks in a similar manner.
Let’s see Spring Cloud in action.
We will start with a simple application (source code) based on Spring Boot (a traditional Spring MVC application would have worked fine, albeit at the expense of a lot more setup code). The application consists of a controller with beans injected representing bound services and a home page that prints information about the services bound to the application.
@Controller
public class HomeController {
    @Autowired(required = false) DataSource dataSource;
    @Autowired(required = false) RedisConnectionFactory redisConnectionFactory;
    @Autowired(required = false) MongoDbFactory mongoDbFactory;
    @Autowired(required = false) ConnectionFactory rabbitConnectionFactory;

    @Autowired ApplicationInstanceInfo instanceInfo;

    @RequestMapping("/")
    public String home(Model model) {
        Map<Class<?>, String> services = new LinkedHashMap<Class<?>, String>();
        services.put(dataSource.getClass(), toString(dataSource));
        services.put(mongoDbFactory.getClass(), toString(mongoDbFactory));
        services.put(redisConnectionFactory.getClass(), toString(redisConnectionFactory));
        services.put(rabbitConnectionFactory.getClass(), toString(rabbitConnectionFactory));
        model.addAttribute("services", services.entrySet());

        model.addAttribute("instanceInfo", instanceInfo);

        return "home";
    }

    // ... various toString() methods to create a string representation for each service

}
HomeController has four injected dependencies representing services that could be bound to the application and another one for the ApplicationInstanceInfo. The "/” route add a string representing each service along with its class to the model as well as the instance info. The associated view renders all this information.
For configuration, we add CloudConfig as follows:
@Configuration
@ServiceScan
@Profile("cloud")
public class CloudConfig extends AbstractCloudConfig {
    @Bean
    public ApplicationInstanceInfo applicationInfo() {
        return cloud().getApplicationInstanceInfo();
    }
}
The class extends AbstractCloudConfig, which is the way to use the Java config approach with Spring Cloud. We set @Profile(“cloud”) to ensure that this configuration is loaded only in a cloud environment. The @ServiceScan annotation scans for all bound services and create a bean for each (which then are autowired into HomeController). If you are wondering about the parallel between @ComponentScan and @ServiceScan, you are right. While the former scans for the candidate classes that could be instantiated as beans, the latter scans for bound services. We also create a bean corresponding application instance information.
We include the following manifest.yml that binds all four services we need for the illustration purpose (you will need to create these services using cf create-service commands):
---
applications:
- name: hello-spring-cloud
  memory: 512M
  instances: 1
  host: hello-spring-cloud-${random-word}
  domain: cfapps.io
  path: target/hello-spring-cloud-0.0.1-SNAPSHOT.jar
  services:
	- postgres-service
	- amqp-service
	- mongodb-service
	- redis-service
  env:
    SPRING_PROFILES_DEFAULT: cloud
Now all we need to do is build and push:
$ mvn package
$ cf push
```
Now when we visit the page, we see information about all four services:
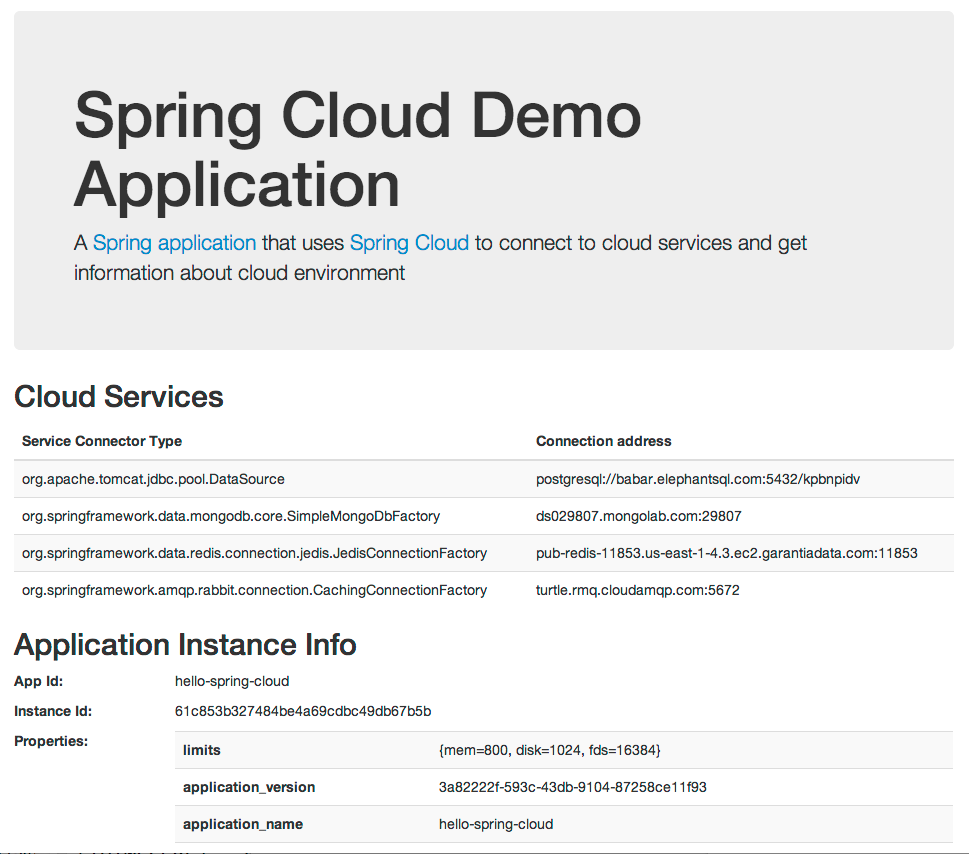
In a real app, you probably would inject these services into service beans and do something more useful that printing their connection information! Please head over to http://projects.spring.io/spring-cloud to see a list of sample apps that do more interesting things with Spring Cloud. Speaking of http://spring.io, it too uses Spring Cloud underneath.
# Deploying it to Heroku
We can deploy the same application to Heroku. We need to add a couple of files (neither are specific to Spring Cloud): `system.properties` to make Heroku use Java 7 and `Procfile` to make it execute the right command to start the application and enable the `cloud` profile. We push the application to Heroku as follows:
```sh
$ heroku apps:create
$ heroku addons:add mongolab
$ heroku addons:add rediscloud
$ heroku addons:add cloudamqp
$ heroku config:set SPRING_CLOUD_APP_NAME=hello-spring-cloud
$ git push heroku master
```
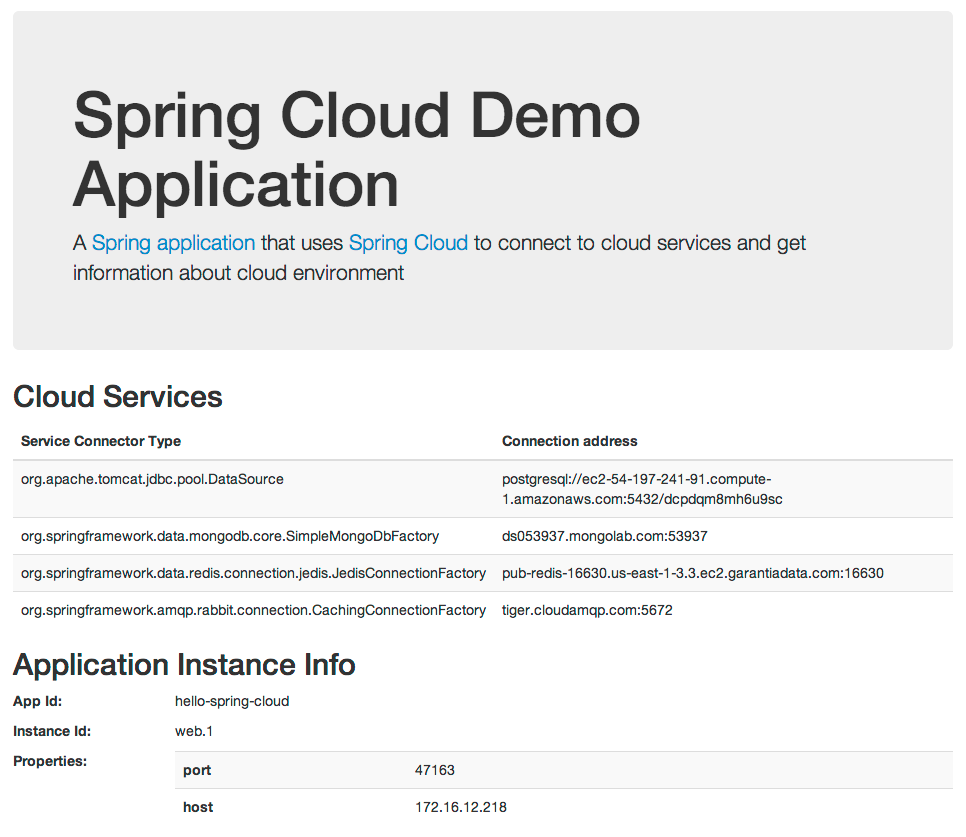
Here we create add-ons (similar to Cloud Foundry services) for a MongoDb, Redis, and AMQP service provider. Heroku automatically provisions a Postgres service, therefore we don’t need to explicitly add it. Heroku app’s environment, unlike Cloud Foundry, doesn’t expose the app name, so we use `heroku config:set` to explicitly set it (if not, Spring Cloud will set it to `<unknown>`). There are a few other differences in how Spring Cloud adapts to differences between these two clouds; we will cover those in a later blog.
That’s all we need to do. When we visit our application, it shows all services info much the same way it did on Cloud Foundry.
# Taking some control
The use of `@ServiceScan` made it easy to grab all services and start using them. But in practice, you often need more control over creating a service connector such as setting their pooling parameters. If that is the case, you can use Spring Cloud’s Java Config or XML config support. Let’s change the `CloudConfig` class as follows:
```java
@Configuration
@Profile("cloud")
public class CloudConfig extends AbstractCloudConfig {
@Bean
public ConnectionFactory rabbitConnectionFactory() {
return connectionFactory().rabbitConnectionFactory();
}
@Bean
public DataSource dataSource() {
return connectionFactory().dataSource();
}
@Bean
public MongoDbFactory mongoDb() {
return connectionFactory().mongoDbFactory();
}
@Bean
public RedisConnectionFactory redisConnectionFactory() {
return connectionFactory().redisConnectionFactory();
}
@Bean
public ApplicationInstanceInfo applicationInfo() {
return cloud().getApplicationInstanceInfo();
}
}
```
Compared to the first version, we removed the `@ServiceScan` annotation. Instead, we use the API exposed by `AbstractCloudConfig` to create beans for each of the services. For now, the beans created this way are identical to that created by `@ServiceScan`, but we now have a possibility of configuring it further. For example, if we wanted to bind the `DataSource` bean to a specific service (presumably among many bound to the app) and initialize it with a specific pool configuration, we can make the following change:
```java
@Bean
public DataSource dataSource() {
PoolConfig poolConfig = new PoolConfig(20, 200);
ConnectionConfig connectionConfig =
new ConnectionConfig("sessionVariables=sql_mode='ANSI';characterEncoding=UTF-8");
DataSourceConfig serviceConfig =
new DataSourceConfig(poolConfig, connectionConfig);
return connectionFactory().dataSource("my-service", serviceConfig);
}
```
The `DataSource` created this way will have max pool size of 20 and max wait time of 200 milliseconds along with a specific connection property string.
# Summary
Spring Cloud abstracts connecting to cloud services and makes it possible to have the same application deployed to multiple clouds with little extra effort. In this blog we merely scratched the surface of what Spring Cloud offers. In the next blog, we will explore more about the Java and XML config as well as how you can use its core API in non-spring apps. In the blogs that follow we will dive deeper into the extensibility angle of Spring Cloud.

VMware offers training and certification to turbo-charge your progress.
Learn moreTanzu Spring offers support and binaries for OpenJDK™, Spring, and Apache Tomcat® in one simple subscription.
Learn moreCheck out all the upcoming events in the Spring community.
View all