Get ahead
VMware offers training and certification to turbo-charge your progress.
Learn moreWith the new Helm chart for Spring Cloud Data Flow for Kubernetes, there is now a much simpler way of installing the software.
Helm is a package manager for Kubernetes, similar to apt, yum or homebrew. It is very easy to install and it greatly simplifies installation of an application and its dependencies into your Kubernetes cluster. The application package contents and configuration is defined in a chart. When you install it you can override any default configuration values. Helm will install any required services in addition to the ones defined in the chart. For Spring Cloud Data Flow, you have three required services: MySQL and Redis are used as the stores for Spring Cloud Data Flow state and RabbitMQ is used for the pipelines' messaging layer.
Once you have the Helm client installed on your local system, you can proceed with the cluster installation of Helm’s server portion called Tiller.
To install tiller, run helm init. Once this completes, you should be able to see the pod running via a kubectl get po --namespace kube-system command.
You are now ready to install the chart package for Spring Cloud Data Flow. Since the chart currently is in the incubator repository, you need to add this repository to our Helm install by running:
helm repo add incubator https://kubernetes-charts-incubator.storage.googleapis.com
helm repo update
Next, run the chart install using:
helm install --name my-release incubator/spring-cloud-data-flow
If you are running on a cluster without a load balancer, such as Minikube, then you should override the service type to use NodePort. Use the following command instead:
helm install --name my-release --set server.service.type=NodePort \\ incubator/spring-cloud-data-flow
You should see the following output:
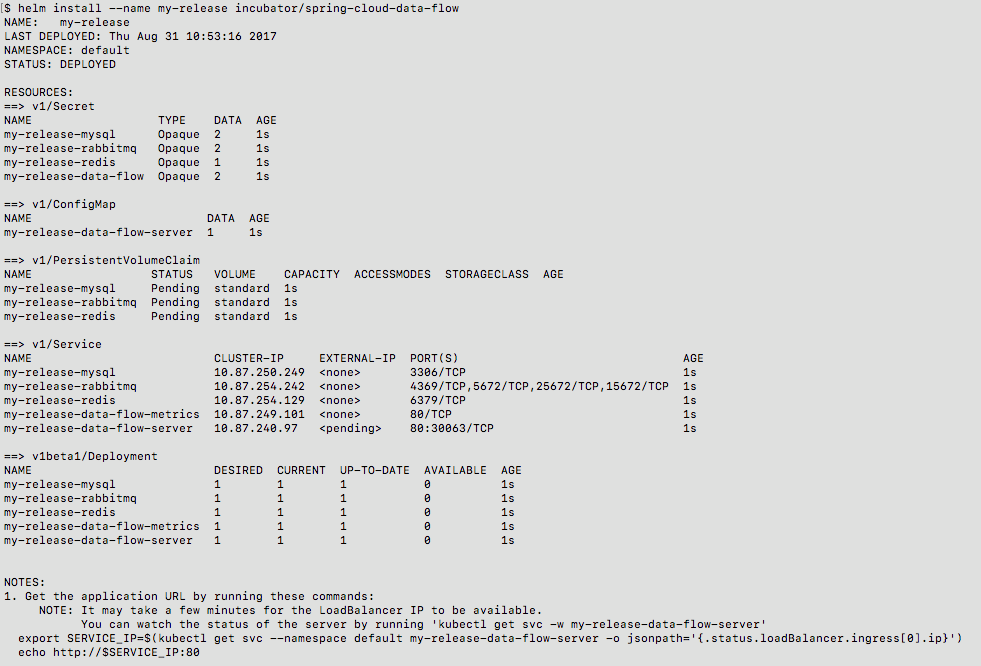
You have just created a new release in the default namespace of your Kubernetes cluster. The notes section gives instructions for connecting to the newly installed server. It takes a couple of minutes for the application and its required services to start up. You can check on the status by issuing a get pod -w command. Wait for the READY column to show "1/1" for all pods. Once that is done, you can connect to the Data Flow server using the external ip listed via a kubectl get svc my-release-data-flow-server command. The default username is user, and the password is password.
To see what Helm releases you have running, you can use the helm list command. When it is time to delete the release run helm delete my-release. This removes any resources created for the release but keeps release information so you can rollback any changes using a helm rollback my-release 1 command. To completely delete the release and purge any release metadata, use helm delete my-release --purge
There is an issue with generated secrets used for the required services getting rotated on chart upgrades. To avoid this set the password for these services when installing the chart. You can use:
helm install --name my-release \\
    --set rabbitmq.rabbitmqPassword=rabbitpwd \\
    --set mysql.mysqlRootPassword=mysqlpwd \\
    --set redis.redisPassword=redispwd incubator/spring-cloud-data-flow
Happy Helming!

VMware offers training and certification to turbo-charge your progress.
Learn moreTanzu Spring offers support and binaries for OpenJDK™, Spring, and Apache Tomcat® in one simple subscription.
Learn moreCheck out all the upcoming events in the Spring community.
View all