Get ahead
VMware offers training and certification to turbo-charge your progress.
Learn moreSo far in this series we have introduced the new stream applications based on Java functions, and function composition. We have also provided detailed examples of how to build a source from a supplier and a sink from a consumer. Here we continue the journey with the first of several case studies to follow. Each case study demonstrates how to use one or more of the available pre-packaged Spring Boot stream applications, in various scenarios, to build data streaming pipelines.
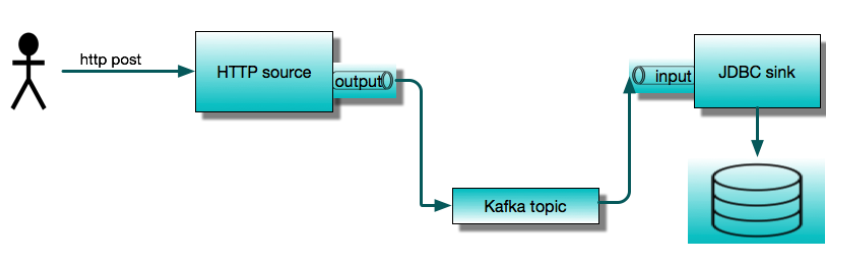
Today we will showcase two of the most commonly used applications, the HTTP source and the JDBC sink. We will use them to build a simple service that accepts HTTP POST requests and saves the contents to a database table. We will first run these as standalone Spring Cloud Stream applications, and then show how to orchestrate the same pipeline with Spring Cloud Data Flow. This is presented as a step-by-step tutorial and we encourage you to follow the steps as you read.
This simple streaming application consists of two remote processes communicating via a message broker. The pre-packaged stream applications work with either Apache Kafka or RabbitMQ out of the box. Here we will use Apache Kafka. The JDBC sink inserts data into a database. We will use MySQL for this example.
Let’s assume that we are starting from scratch and do not have Kafka or MySQL available in our development environment. To run this example, we will have some fun with Docker. So we need Docker running on our local machine. Later we will be using Spring Cloud Data Flow, so we will take advantage of the Data Flow docker-compose installation. This is the easiest way to get started with Data Flow. It starts up several containers, including MySQL and Kafka. In order to make these backend services available to the standalone applications, we need to tweak the standard installation to publish ports, and change Kafka’s advertised host name.
Note
I have run with this setup on Mac OS, and expect that a similar setup will work on Windows. Please leave a note in the comments section if you run into issues or have some helpful tips to share.
First, let’s create a directory called http-jdbc-demo and download docker-compose.yml from github to there:
wget -O docker-compose.yml https://raw.githubusercontent.com/spring-cloud/spring-cloud-dataflow/v2.6.0/spring-cloud-dataflow-server/docker-compose.yml
or
curl https://raw.githubusercontent.com/spring-cloud/spring-cloud-dataflow/v2.6.0/spring-cloud-dataflow-server/docker-compose.yml -o docker-compose.yml
In order to enable connections to Kafka and MySQL from the local host, we will download another bit of YAML to overlay or custom configuration.
wget -O shared-kafka-mysql.yml https://raw.githubusercontent.com/spring-cloud/stream-applications/gh-pages/files/shared-kafka-mysql.yml
Next, we need to obtain the LAN IP address for our local machine. On a Mac, you can do this in one of several ways, for example:
dig +short $(hostname)
or
ping $(hostname)
The LAN IP address is accessible to the docker containers as well, whereas localhost or 127.0.0.1 from inside a container refers to itself. We need to set the environment variable KAFKA_ADVERTISED_HOST_NAME to this value. We also need to set a few other environment variables:
export KAFKA_ADVERTISED_HOST_NAME=$(dig +short $(hostname))
export DATAFLOW_VERSION=2.6.0
export SKIPPER_VERSION=2.5.0
and to register the latest stream applications in Data Flow:
export STREAM_APPS_URI=https://repo.spring.io/libs-snapshot-local/org/springframework/cloud/stream/app/stream-applications-descriptor/2020.0.0-SNAPSHOT/stream-applications-descriptor-2020.0.0-SNAPSHOT.stream-apps-kafka-maven
Now, from our project directory, we can fire up the Data Flow cluster:
docker-compose -f docker-compose.yml -f shared-kafka-mysql.yml up
This will display a lot of log messages and continue running until you terminate it (e.g., Ctrl-C), which will stop all of the containers. Keep this terminal open.
Open a new terminal and type:
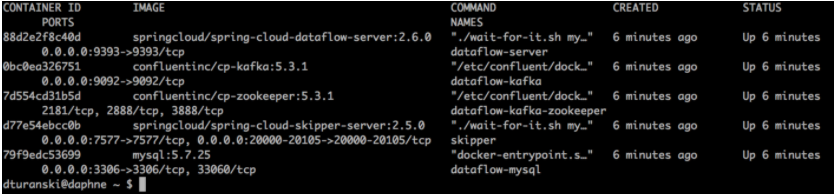
docker ps
This will list the running containers for the Data Flow cluster. We will look at Data Flow later. At this point, make sure that the dataflow-kafka container shows 0.0.0.0:9092→9092/tcp under PORTS, and that dataflow-mysql similarly shows 0.0.0.0:3306→3306/tcp.
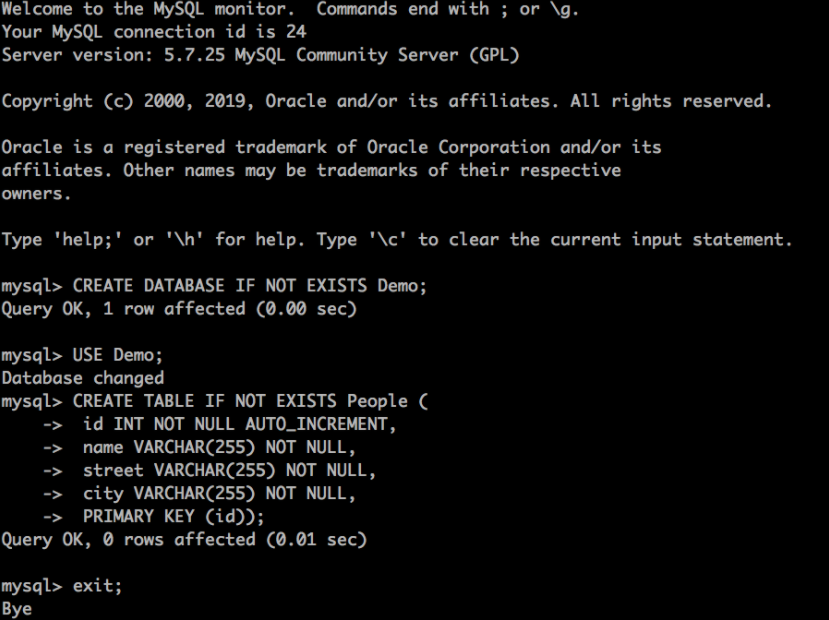
We could configure the JDBC sink application to initialize the database automatically, but for simplicity we will create it manually. We can do this using any JDBC database tool or by running mysql from within the dataflow-mysql container:
docker exec -it dataflow-mysql mysql -uroot -p
You will be prompted for a password. The DB credentials are configured in docker-compose.yml. If you don’t want to look there, the username is root and the password is rootpw.
Enter the following commands - you should be able to copy and paste the whole thing - to create a database and a table.
CREATE DATABASE IF NOT EXISTS Demo;
USE Demo;
CREATE TABLE IF NOT EXISTS People (
	 id INT NOT NULL AUTO_INCREMENT,
	 name VARCHAR(255) NOT NULL,
	 street VARCHAR(255) NOT NULL,
	 city VARCHAR(255) NOT NULL,
	 PRIMARY KEY (id));
Type exit; to exit.
At this point we’re ready to run the HTTP source and JDBC sink. The Spring Boot executable jars are published to the Spring Maven repository. We need ones which are built with the Kafka binder:
wget https://repo.spring.io/snapshot/org/springframework/cloud/stream/app/http-source-kafka/3.0.0-SNAPSHOT/http-source-kafka-3.0.0-SNAPSHOT.jar

wget https://repo.spring.io/snapshot/org/springframework/cloud/stream/app/jdbc-sink-kafka/3.0.0-SNAPSHOT/jdbc-sink-kafka-3.0.0-SNAPSHOT.jar
We will run these in separate terminal sessions. We need to configure these apps to use the same Kafka topic, let’s call it jdbc-demo-topic. The Spring Cloud Stream Kafka binder will create this topic automatically. We also need to configure the JDBC sink to connect to our database and to map the data to the table we created. We will post JSON that looks like this:
{
 “name”:”My Name”,
 “address”: {
      “street”:”My Street”,
       “city”: “My City”
    }
}
We want to insert these values into the People table in the Demo database into the columns name, street, and city.
Open a new terminal session where we downloaded the jars and run:
java -jar jdbc-sink-kafka-3.0.0-SNAPSHOT.jar --spring.datasource.url=jdbc:mariadb://localhost:3306/Demo --spring.datasource.username=root --spring.datasource.password=rootpw --jdbc.consumer.table-name=People --jdbc.consumer.columns=name,city:address.city,street:address.street --spring.cloud.stream.bindings.input.destination=jdbc-demo-topic
Note the jdbc.consumer.columns syntax for mapping the fields to the columns.
Open a new terminal session where we downloaded the jars and run:
java -jar http-source-kafka-3.0.0-SNAPSHOT.jar --server.port=9000 --spring.cloud.stream.bindings.output.destination=jdbc-demo-topic
Here we are setting the HTTP port to 9000 for the source (it’s 8080 by default). Also, it is very important that the output destination of the source matches the input destination of the sink.
Next, we need to post some data to http://localhost:9000.
curl http://localhost:9000 -H'Content-Type:application/json' -d '{"name":"My Name","address":{"street":"My Street","city":"My City"}}}
Once again, find an open terminal session and:
docker exec -it dataflow-mysql mysql -uroot -p
Login with rootpw and query the table:
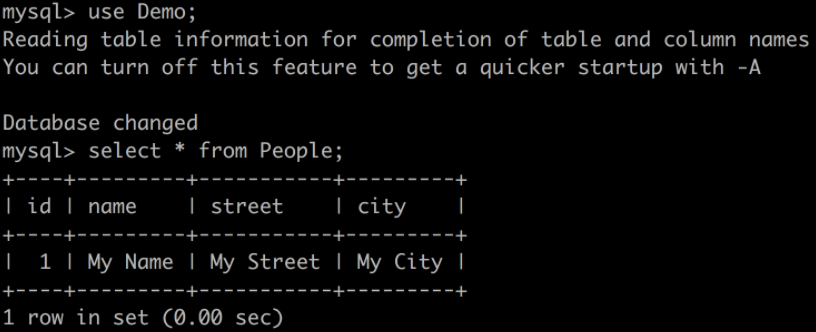
If you see this, congratulations! The standalone Spring Cloud Stream applications are working as expected. We can terminate our standalone applications (Ctrl-C) now. Leave the docker-compose process running so we can take a look at Data Flow.
As we can see, there are a lot of manual steps required to run these applications on “bare metal”, even though we didn’t have to write any code. These include:
customizing the docker-compose configuration, or alternately installing kafka and mysql on the local machine
downloading the desired versions of stream applications using a Maven URL (we just happened to know which ones to use here)
ensuring that the Spring Cloud Stream destination bindings are correctly configured so the applications can communicate
finding and reading the docs to get the configuration properties (we already did that to prepare this example ) and setting them correctly.
managing multiple terminal sessions
In the following sections we will see that doing this with Spring Cloud Data Flow eliminates all of these steps and provides a much richer development experience overall.
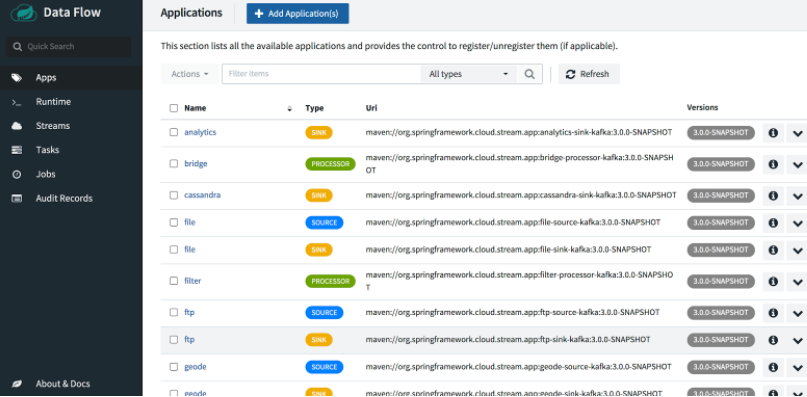
To get started, open the Data Flow Dashboard at http://localhost:9393/dashboard. This will take you to the Applications view where we see the pre-packaged applications registered. The docker-compose command we ran earlier performed this step, using a URL we provided to get the latest snapshot versions of the stream applications, including the same jar files we just ran.
In the dashboard, choose Streams from the left menu and click on Create Streams to open a graphical stream editor.
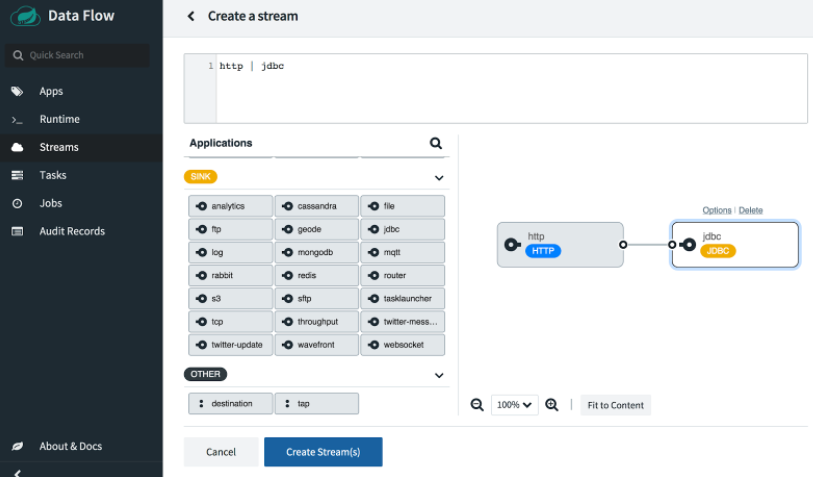
Drag and drop the http source and the jdbc sink into the editor pane and use the mouse to connect the two handles. Alternatively, you can type the Data Flow stream definition DSL directly into the text box at the top: http | jdbc.
Next we need to configure the applications. If you click on either one of the applications, you will see an Options link. Open the options window for the JDBC sink. You will see all the available configuration properties listed with short descriptions. The following screenshot shows a partial view; we need to scroll to see the rest.
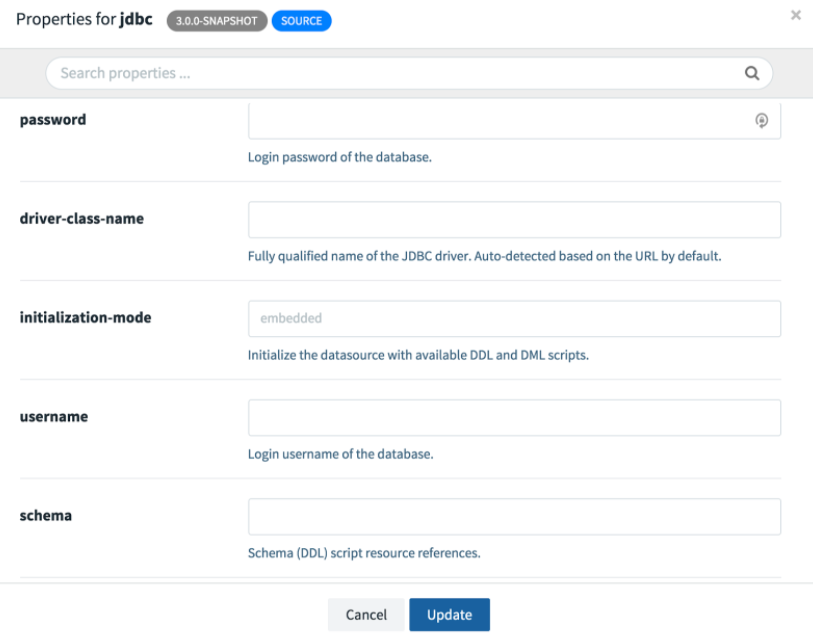
Just as before, we need to provide the url, username, password, table, and columns. Here, we need to change the JDBC URL to jdbc:mariadb://mysql:3306/Demo,since the hostname mysql corresponds to the name of the mysql service defined in docker-compose.yml. Also we set the http port to 20000, since it’s in the configured range of published ports. Refer to the skipper-server configuration for more details.
Let’s take a look at the stream definition DSL that was generated automatically:
http --port=20000 | jdbc --password=rootpw --username=root --url=jdbc:mariadb://mysql:3306/Demo --columns=name,city:address.city,street:address.street --table-name=People
This DSL can be used in a script or a Data Flow client application to automate stream creation. Our configuration is complete, but where are the Spring Cloud Stream destination bindings? We don’t need them because Data Flow takes care of the wiring for us.
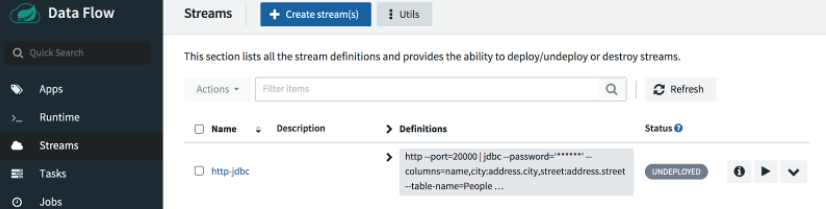
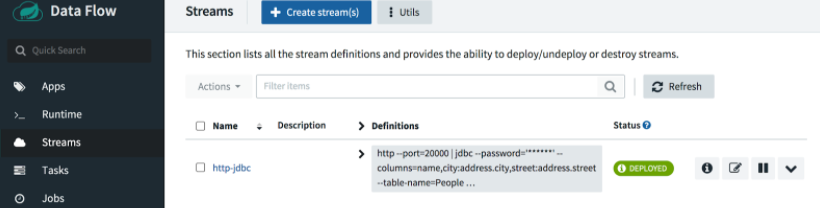
Select the Create Stream button and name the stream http-jdbc.
To deploy the stream, click on the play button:

Accept the default deployment properties and click Deploy stream at the bottom of the page.
Click on the Refresh button as necessary. After a minute or so, you should see our stream is deployed.
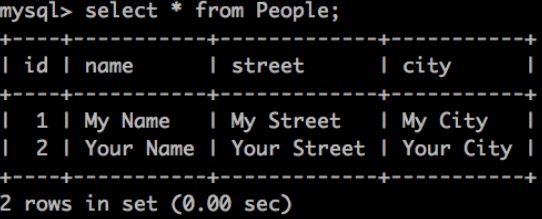
Here we will post some different values to port 20000:
curl http://localhost:20000 -H'Content-Type:application/json' -d '{"name":"Your Name","address":{"street":"Your Street","city":"Your City"}}}'
When we run the query again, we should see a new row added to the table.
Nice work!
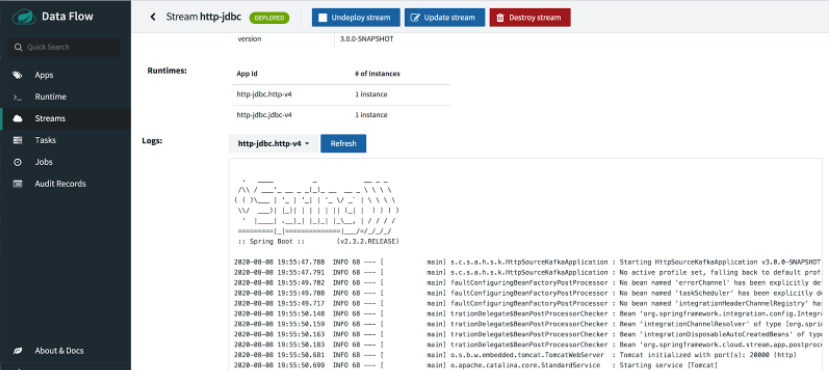
The astute reader will notice that no Docker containers were created for the deployed applications, even though the platform itself is running in containers. In the Data Flow architecture, the Skipper server is responsible for deploying stream applications. In the local configuration, Skipper uses the Local Deployer to run jar files on its localhost, just like we did when we ran the applications standalone. To see that this is the case, we can run ps in the skipper container:
docker exec -it skipper ps -ef

To look at the console log use the stdout path:
docker exec -it skipper more /tmp/1596916545104/http-jdbc.jdbc-v4/stdout_0.log
The tail -f command also works.
The application logs are also viewable from the UI if the deployment is successful.
But if the deployment fails, we may need to look under the hood to troubleshoot it.
Note
The local Data Flow installation is fine for local development and exploration, but we do not recommend it for production. Production grade Spring Cloud Data Flow OSS , as well as commercially licensed products, are available for Kubernetes and Cloud Foundry.
We just took a close look at how to build a simple data streaming pipeline from pre-packaged Spring Cloud Stream applications to save JSON content posted via HTTP to a relational database. We used Docker and docker-compose to install a local environment and then we deployed the source and sink applications, first on “bare metal”, and then using Spring Cloud Data Flow. Hopefully, we learned something interesting about working with Spring Cloud Stream, Data Flow, Docker containers, the HTTP source, and JDBC sink.
In the coming weeks we will present many more case studies for Spring Cloud Stream and Spring Cloud Data Flow, each will explore different stream applications and capabilities.

VMware offers training and certification to turbo-charge your progress.
Learn moreTanzu Spring offers support and binaries for OpenJDK™, Spring, and Apache Tomcat® in one simple subscription.
Learn moreCheck out all the upcoming events in the Spring community.
View all